
Altegio connects to your own applications, integrations and AI assistants. Developers get an access key (also called an API key, partner token or Bearer token) in the Altegio Developer Hub. AI assistants, such as Claude or ChatGPT, connect through ready-made Marketplace apps or Altegio MCP servers, without any keys.
When to use
- You are developing your own application or integration with the Altegio API and need an access key.
- Your server needs to receive notifications about changes in the location, for example new appointments or changes in client data.
- You want to work with Altegio data from an AI assistant, for example ask Claude how revenue changed last month.
Where to find Integrations and access
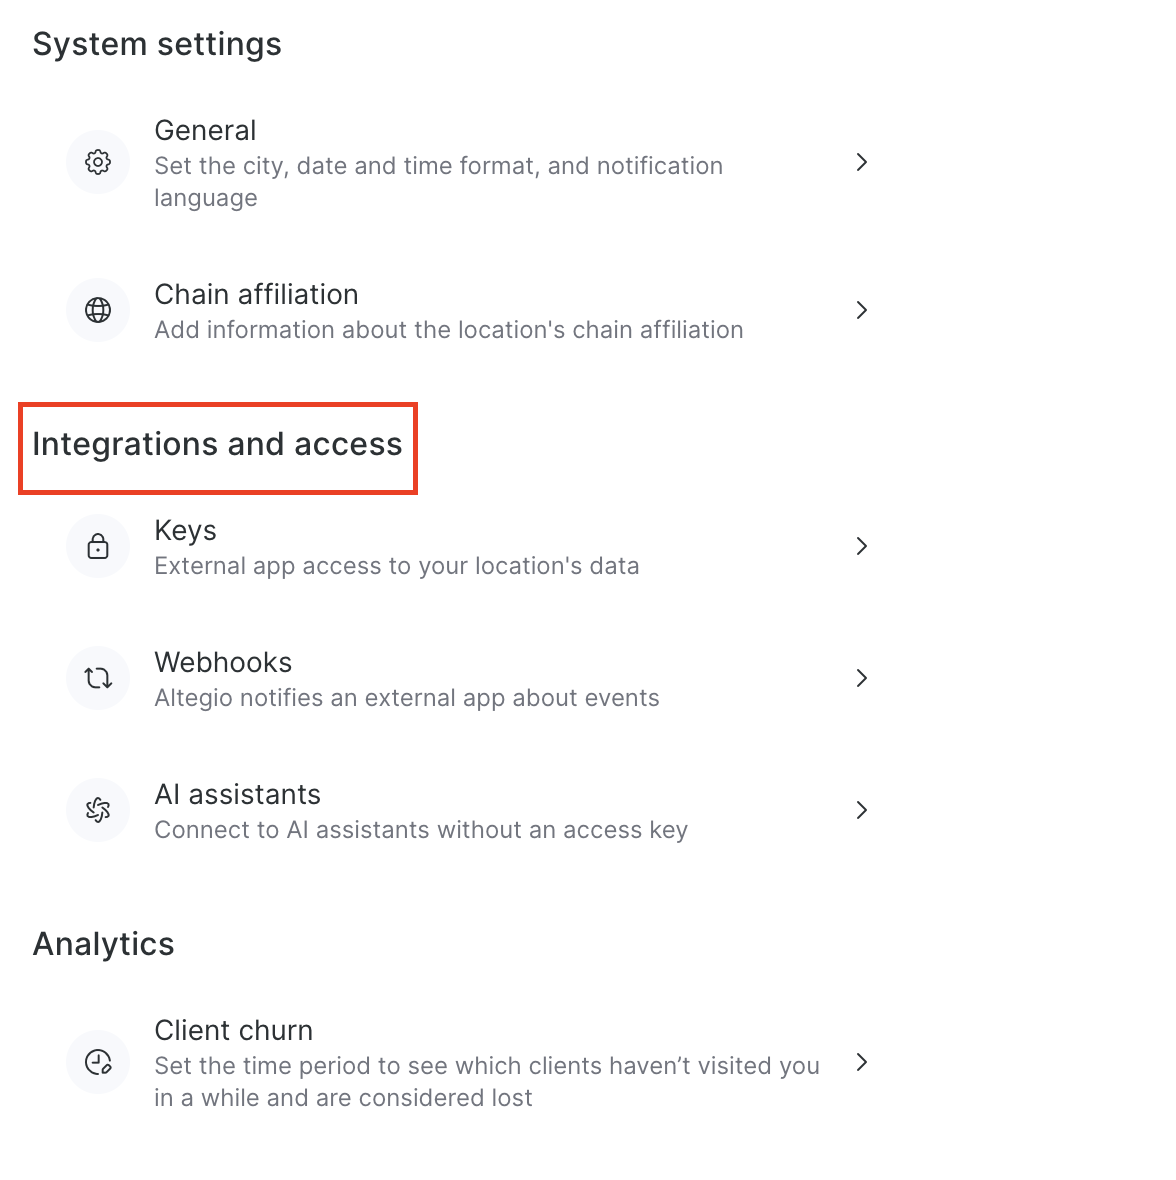
The Integrations and access block in the location settings has 3 items:
- Keys: for developers of their own applications and integrations. Opens the Access keys page, which leads to the Altegio Developer Hub, where access keys are issued.
- Webhooks: opens the Webhook settings page. The page itself hasn’t changed.
- AI assistants: for connecting an AI assistant. No access key is needed.
To open the Integrations and access block:
- In Administration mode, click Settings in the left menu.
- Find the Integrations and access block and click the item you need.
Getting an access key for your integration
An access key is needed for a program that accesses location data without logging in as a team member, for example a bot or a script. Access keys are issued in the Altegio Developer Hub, where you register a developer account. Registration is free. You don’t need to contact support or fill in the partner form to get an access key.
Access key and user key
Requests to location data in the Altegio API are signed with 2 keys:
- Access key: belongs to your developer account and is shown in the Developer Hub. In the Altegio API documentation, the access key is called the partner token and is passed as a Bearer token.
- User key: returned by the API authorization method in response to the login and password of an Altegio user. The user key determines on whose behalf the application works with the data. In the Altegio API documentation, the user key is called the user token.
Step 1. Open the Developer Hub
- Open Settings > Integrations and access > Keys.
- On the Access keys page, click Register in Developer Hub.
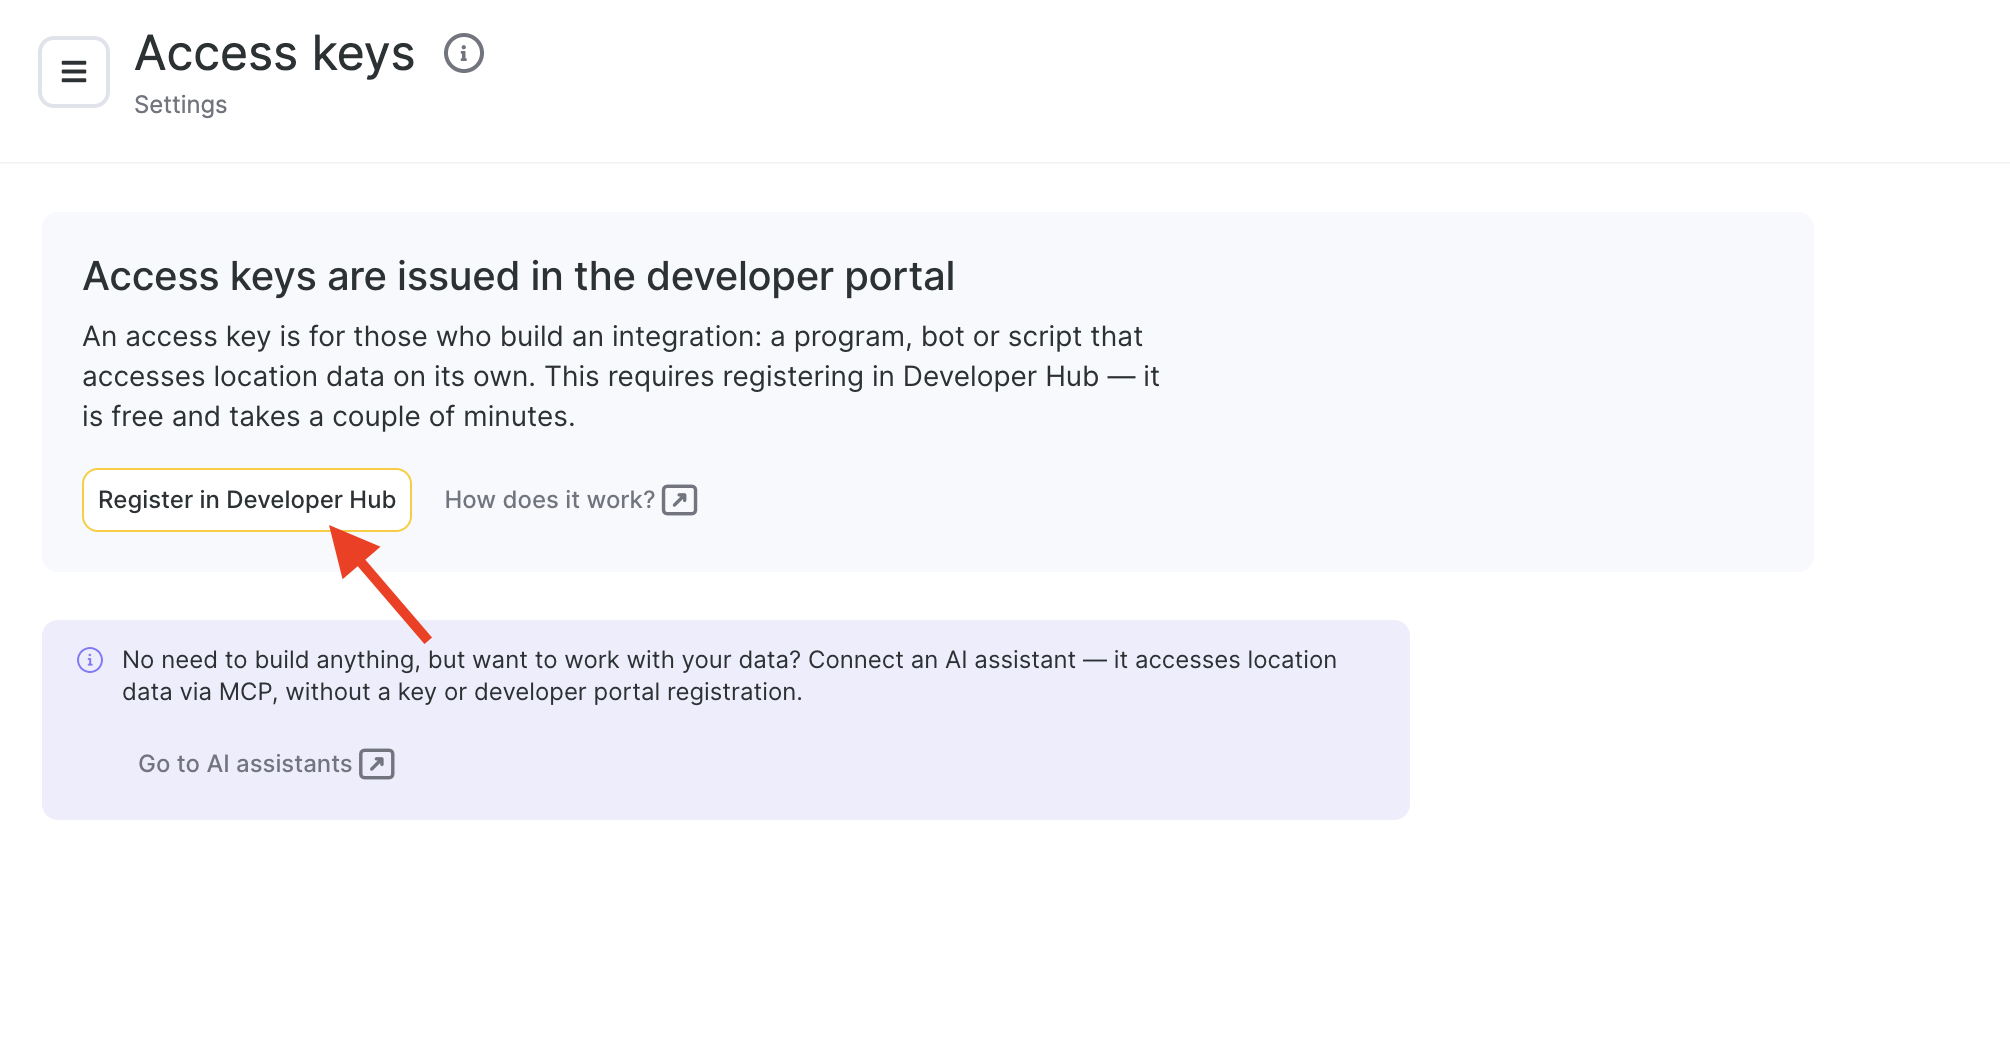
What opens after you click Register in Developer Hub depends on whether you already have a developer account. If you don’t have a developer account yet, the Developer Hub Registration page opens: go to Step 2. If you already have a developer account, your Developer Hub account opens right away: go to Step 3.
If you don’t need to build anything and only want to work with your data from an AI assistant, click Go to AI assistants on the same page: an AI assistant connects without an access key or Developer Hub registration.
Step 2. Register in the Developer Hub
- In Developer account name, enter the name of your company or your own name. Users will see this name when your app is published in Integrations Hub.
- In Who do you plan to build the integration for, select For my own or a client’s locations or For other companies via Integrations Hub. Integrations for other companies are reviewed before they are published in Integrations Hub.
- In What will the developer account be used for?, describe your integration, for example a chatbot that sends notifications.
- Check the Contact details block. Name, Phone number and Email address are filled in from your Altegio profile. An Altegio manager may contact you using these details, so make sure they are up to date.
- In Website, enter the website of your company.
- Click Register.
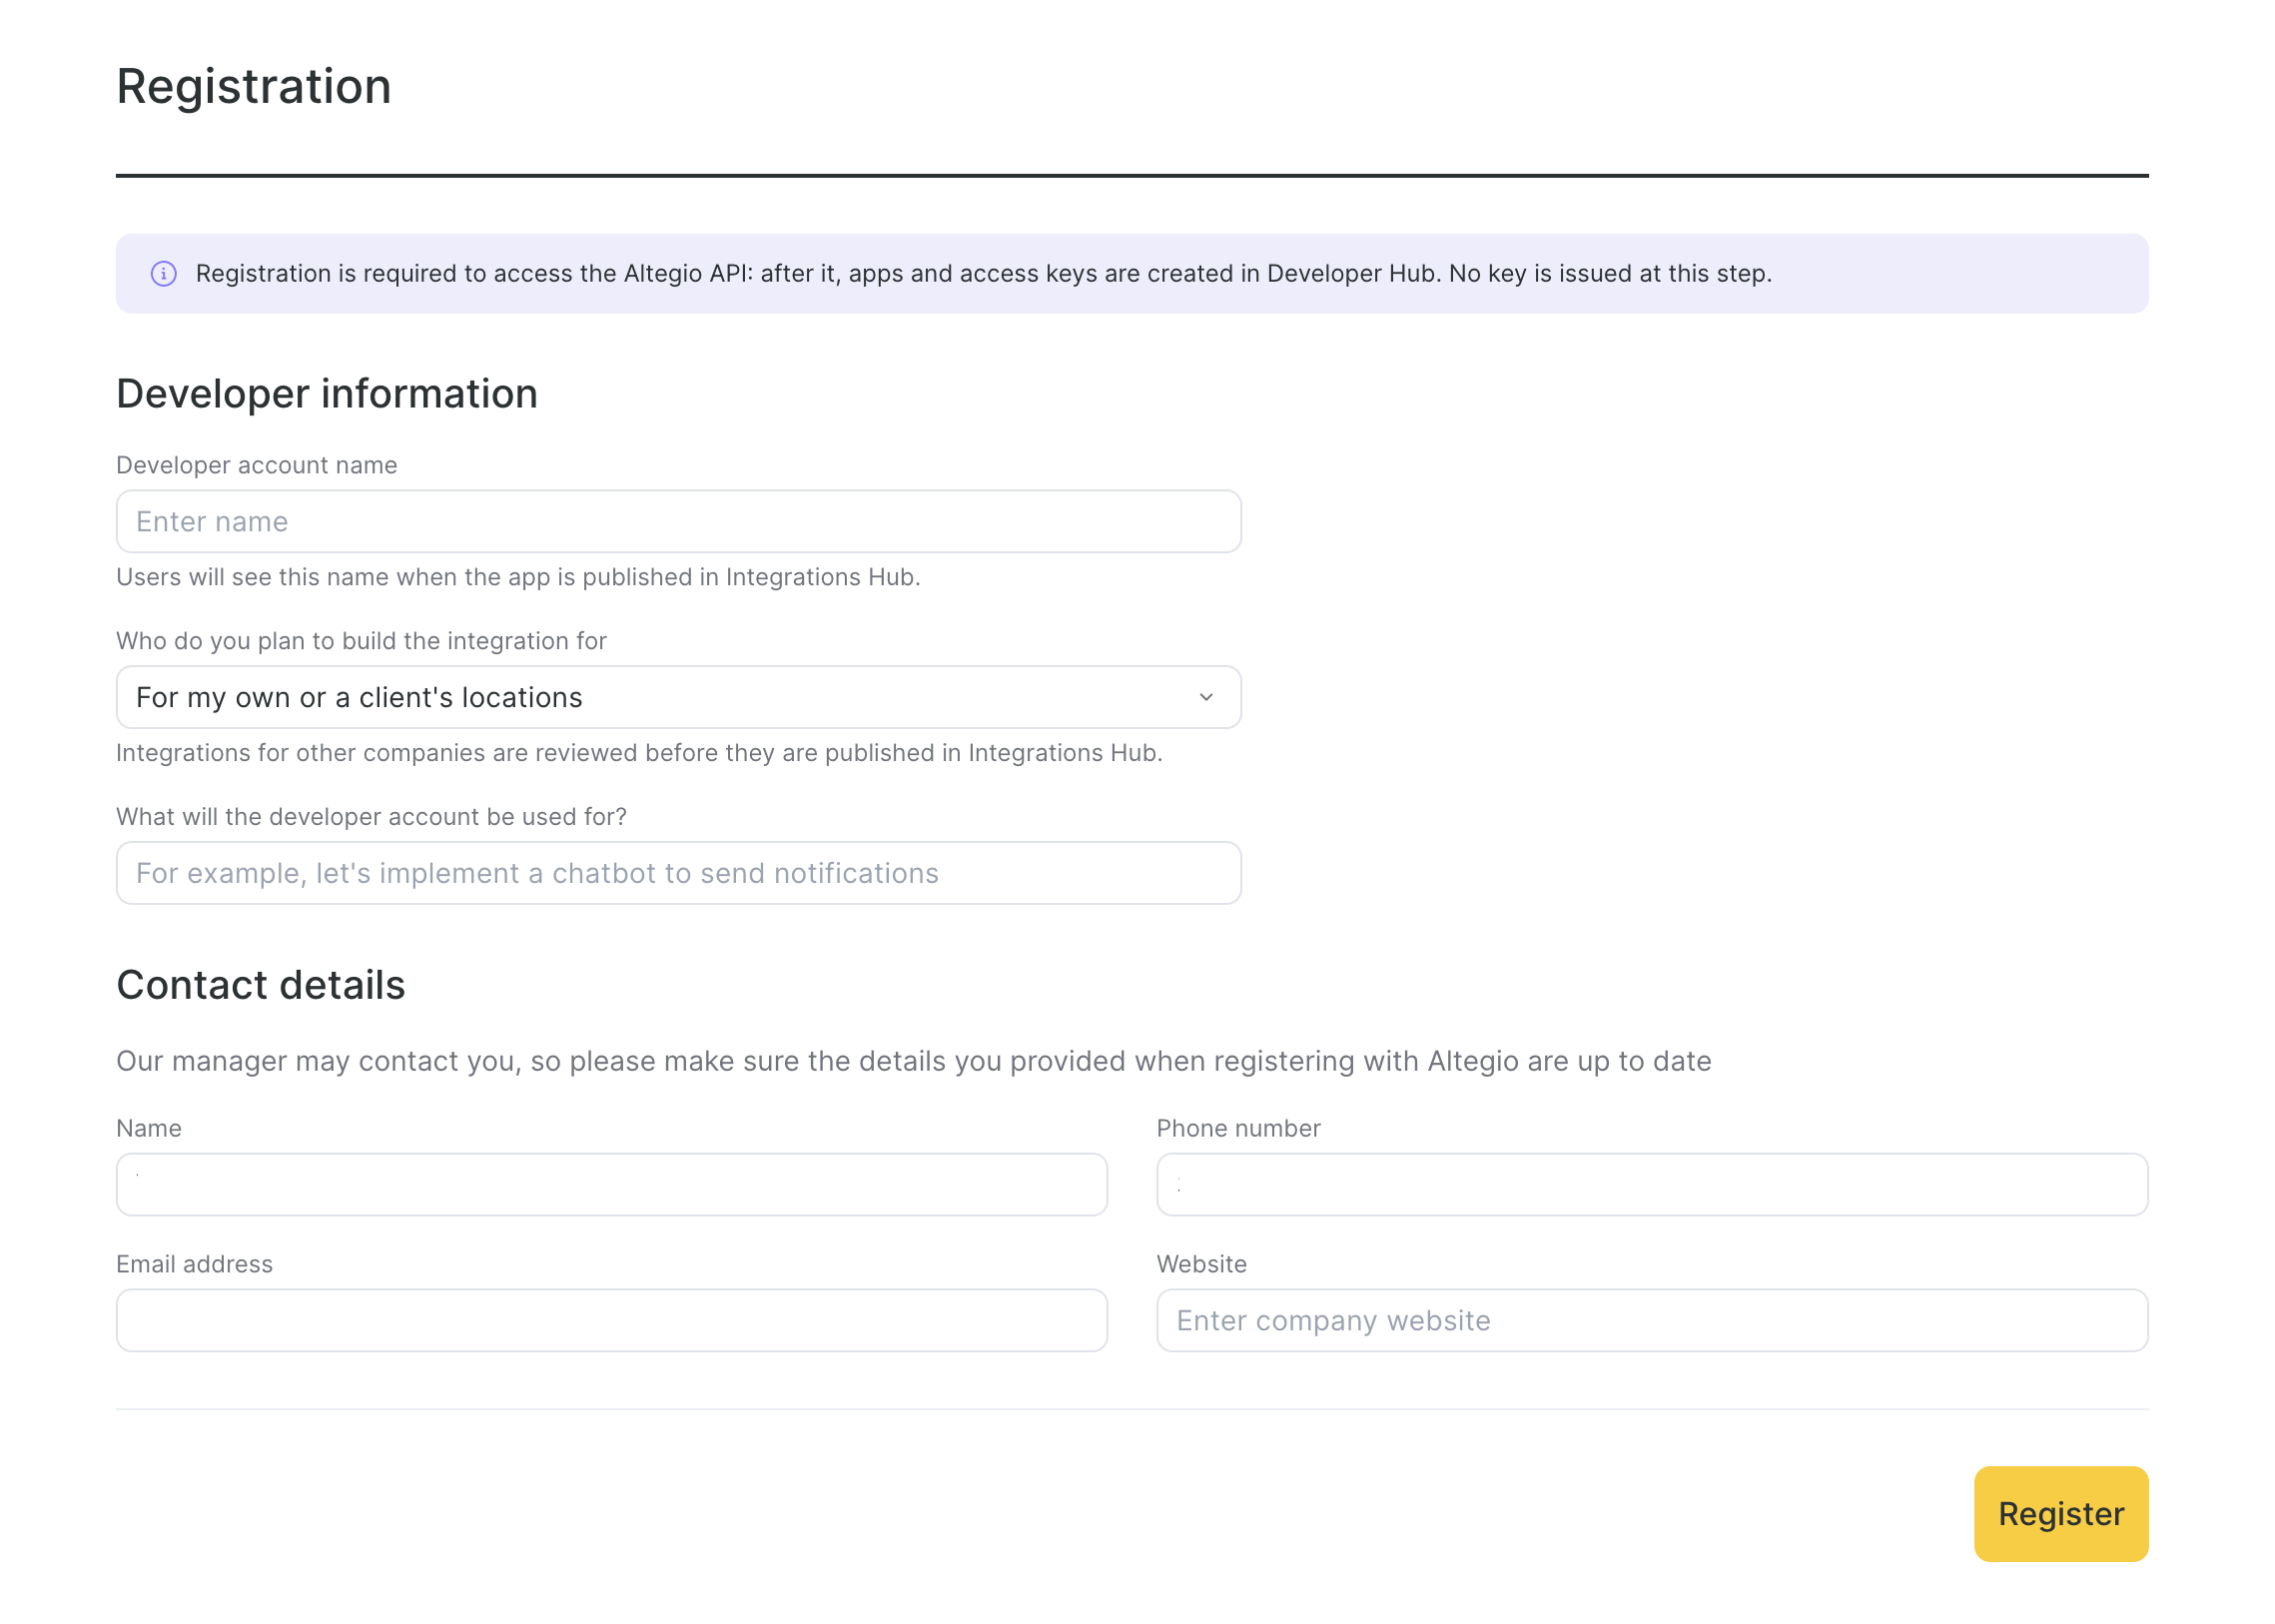
The Developer Hub registration form has no token field, and no access key is issued at this step: after registration, apps and access keys are created in the Developer Hub.
Step 3. Copy the access key
Access keys are in the My API keys block of your Developer Hub account.
- Find the Access key field. If there are no keys yet, click Create API key.
- Copy the access key and save it in a secure place.
Important. The access key is a private key. Don’t show it to anyone and don’t publish it in open code, for example in a public repository.
The user key is returned by the API authorization method in response to the login and password of an Altegio user. The ways to get a user key and the list of API methods are described in the Altegio API documentation.
Webhook settings
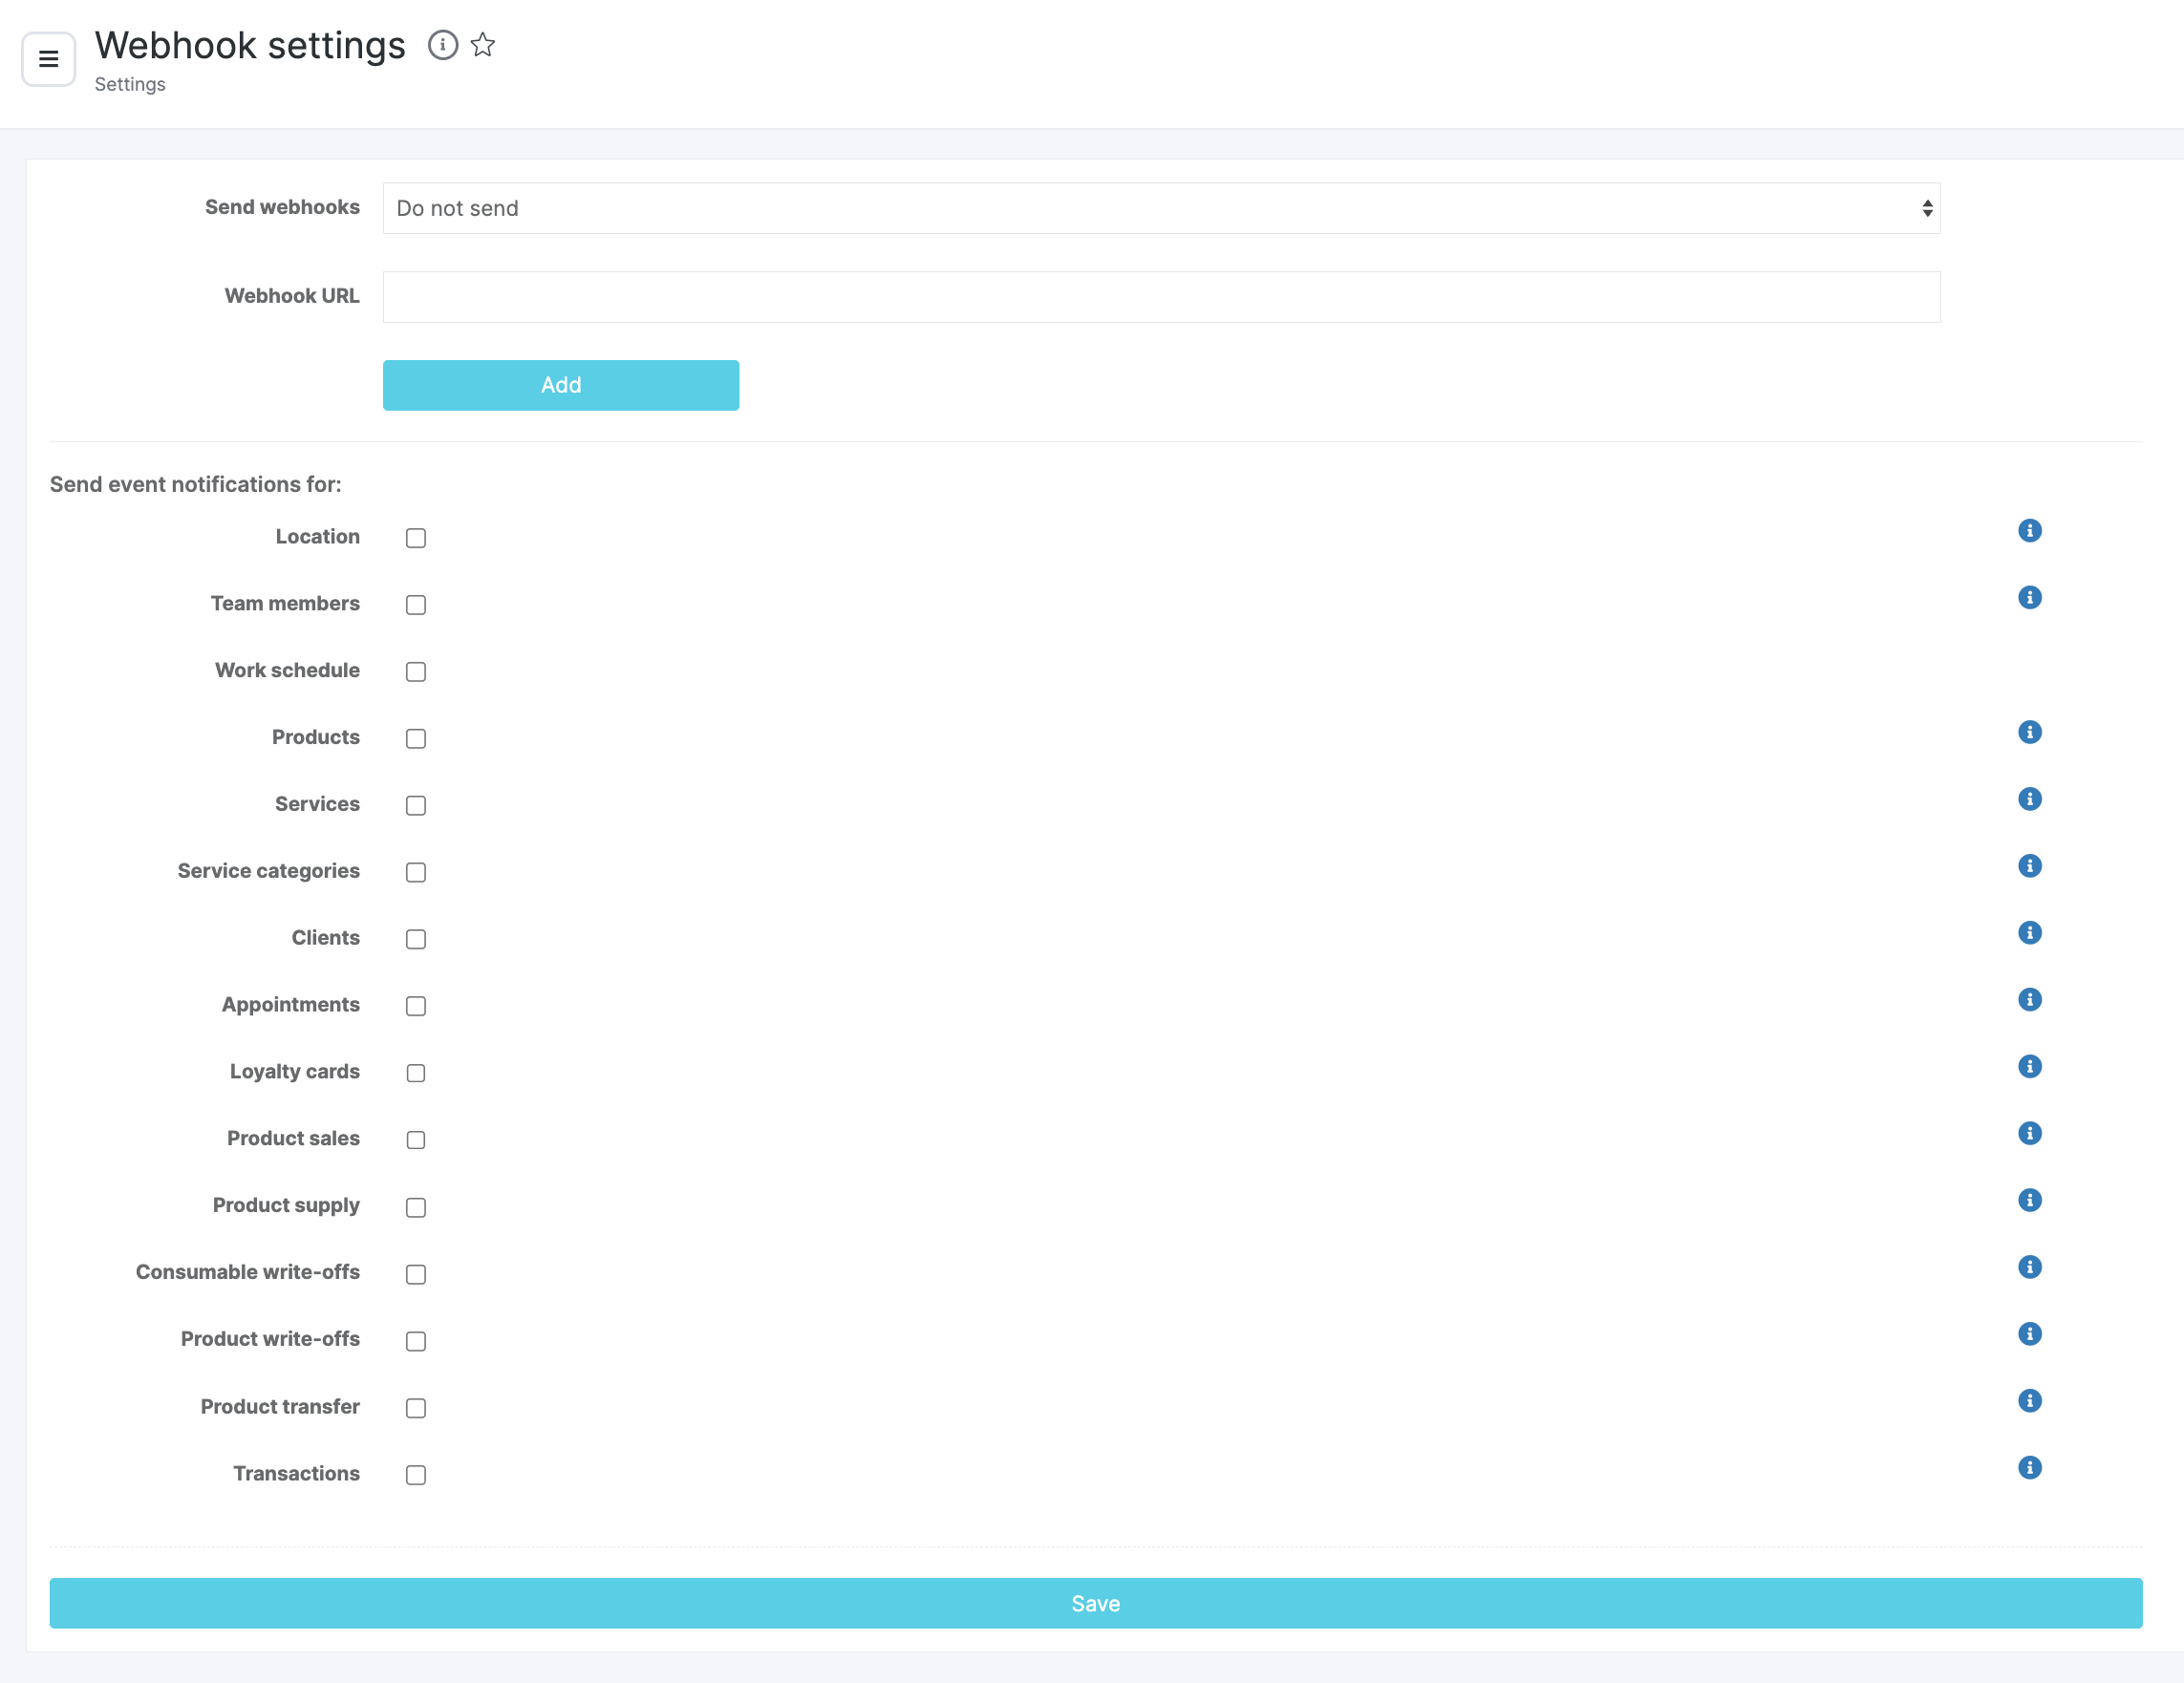
The Webhook settings page opens from Settings > Integrations and access > Webhooks. The page itself hasn’t changed.
Connecting an AI assistant to Altegio
An AI assistant doesn’t need an access key to work with Altegio. To choose how to connect an AI assistant, open Settings > Integrations and access > AI assistants. The AI assistants page has 2 cards.
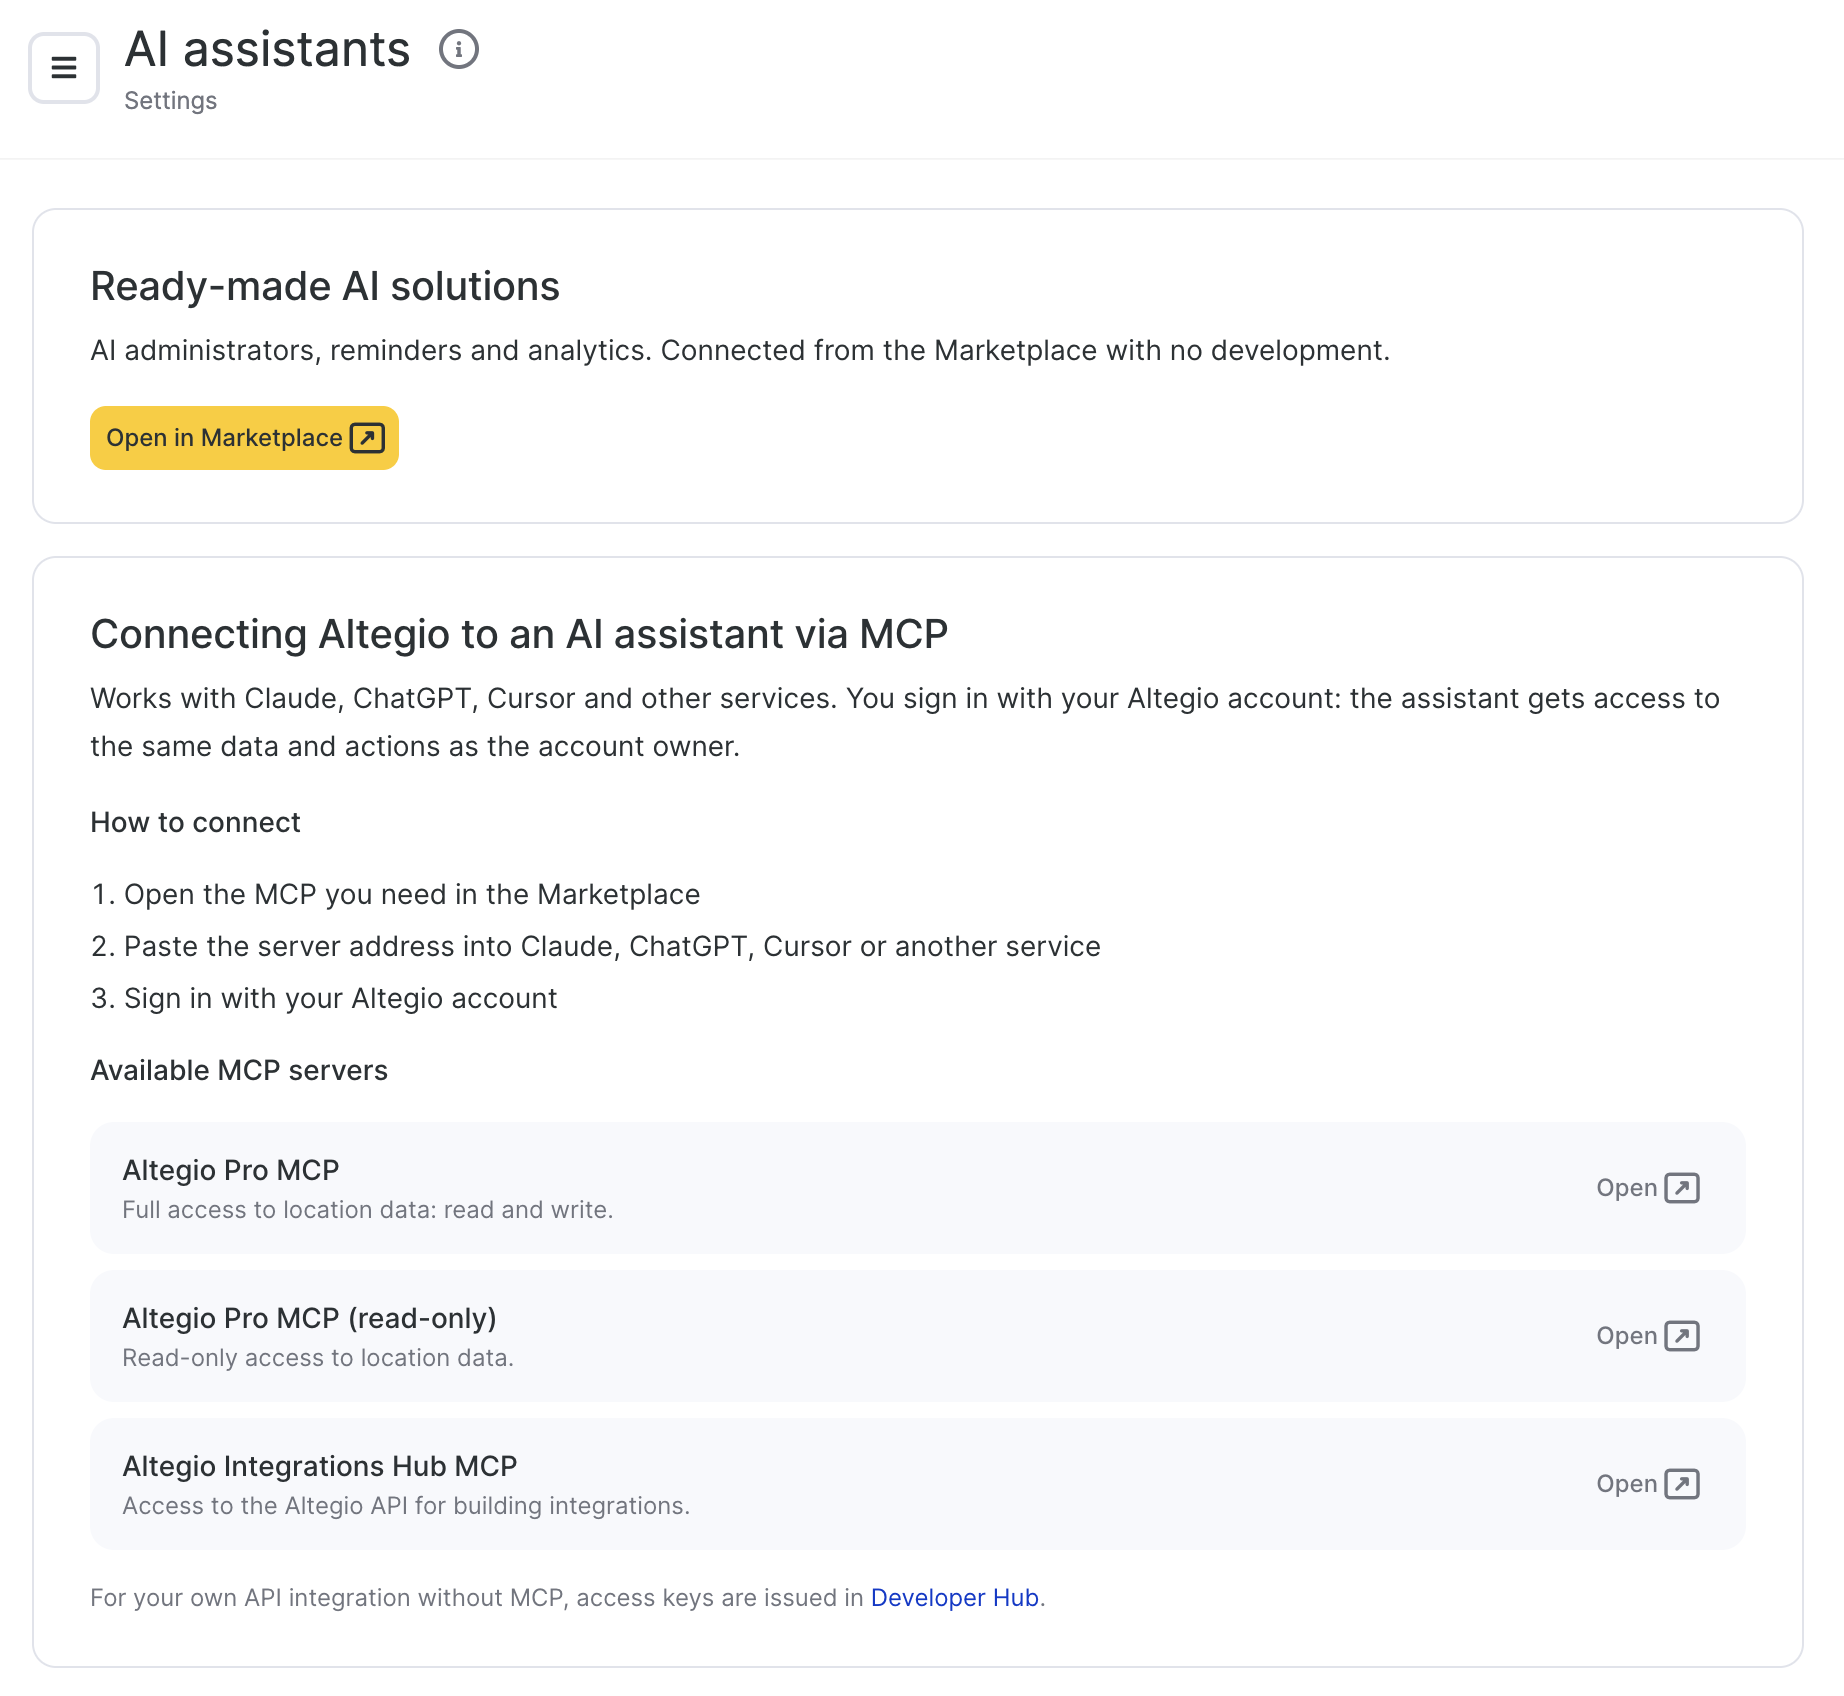
Ready-made AI solutions. AI apps from the Altegio Marketplace, such as AI administrators, reminders and analytics, that connect without development. Click Open in Marketplace to see them in the Marketplace. Each app has its own price, shown on the app card.
Connecting Altegio to an AI assistant via MCP. For AI apps that support MCP servers, such as Claude, ChatGPT or Cursor. You sign in with your Altegio account, and the assistant gets access to the same data and actions as the account owner. The card lists 3 Altegio MCP servers:
- Altegio Pro MCP: full access to location data, read and write.
- Altegio Pro MCP (read-only): read-only access to location data.
- Altegio Integrations Hub MCP: access to the Altegio API for building integrations.
To connect an Altegio MCP server:
- Next to the server you need, click Open. The server page opens in the Marketplace.
- Paste the server address into Claude, ChatGPT, Cursor or another AI app.
- Sign in with your Altegio account.
No access key or token is needed. To find out what each server can do and which address to paste, see Altegio MCP servers for AI assistants.
FAQ
Open Settings > Integrations and access > Keys and click Register in Developer Hub. If you don’t have a developer account, register in the Developer Hub. Then copy the key from the Access key field in the My API keys block of your Developer Hub account.
No. The access key is issued in the Altegio Developer Hub: open Settings > Integrations and access > Keys and click Register in Developer Hub. The Developer Hub registration form doesn’t ask for a token.
Yes. The Integrations and access block doesn’t affect access keys and tokens issued earlier. Integrations that use them keep working, and you don’t need to issue new keys.
The Developer tools item is no longer in Settings > System settings. The webhook settings are in Settings > Integrations and access > Webhooks. The Webhook settings page hasn’t changed.
No. When you click Register in Developer Hub in Settings > Integrations and access > Keys, your Developer Hub account opens right away, without registration.
No. Open Settings > Integrations and access > AI assistants and choose a ready-made AI app from the Marketplace or one of the Altegio MCP servers. To connect an Altegio MCP server, you sign in with your Altegio email and password.
The access key belongs to your developer account and is shown in the Developer Hub. The user key is returned by the API authorization method in response to the login and password of an Altegio user, and it determines on whose behalf the application works with the data. Requests to location data in the Altegio API are signed with both keys.