The waiting list lets you keep a client’s request when there’s no suitable slot to book them into right now — instead of losing the lead or writing it on a sticky note. You save the client, the service, and the times they’d accept; later, when a slot frees up, you turn that request into a real appointment in one move.
This article covers the receptionist side: turning the waiting list on, creating and managing requests, and booking an appointment from a request.
When to use
- A client calls, the day they want is full, and you want to record their request so you can fit them in if someone cancels.
- You want to gauge demand for a service or a specific professional — a long waiting list is a hiring signal.
- Reception needs one shared place for “call-back when free” requests instead of paper notes or a spreadsheet.
Before you start
- The waiting list is part of the Appointment Calendar (Digital Schedule). For the basics of the calendar, see Working with the Appointment Calendar.
- To use it, your role needs the Show waiting list permission, in the Appointment Calendar block of access rights. Owners and Managers grant it in Team > Team members list > Access. See Appointment Calendar access rights.
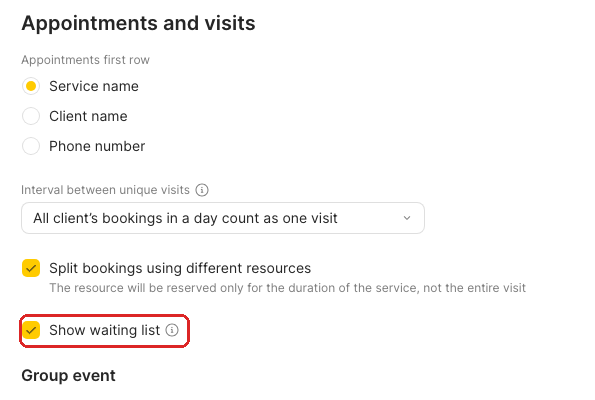
Step 1. Turn the waiting list on
Go to Settings > Digital schedule > Digital schedule settings> Appointments and visits and tick Show waiting list.
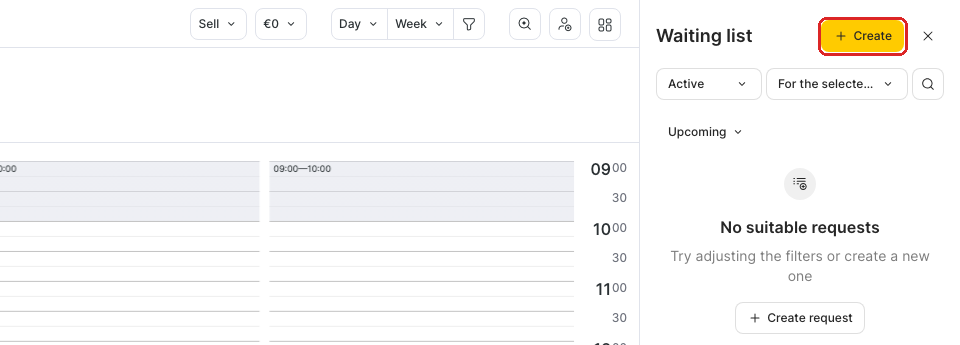
Step 2. Open the waiting list
Open the Appointment Calendar (Digital Schedule). In the left panel under the calendar, click the Waiting list tile. The waiting list opens as a panel on the right; it stays open as you work and remembers its open/closed state after a page reload.

Step 3. Create a request
In the Waiting list panel, click Create.
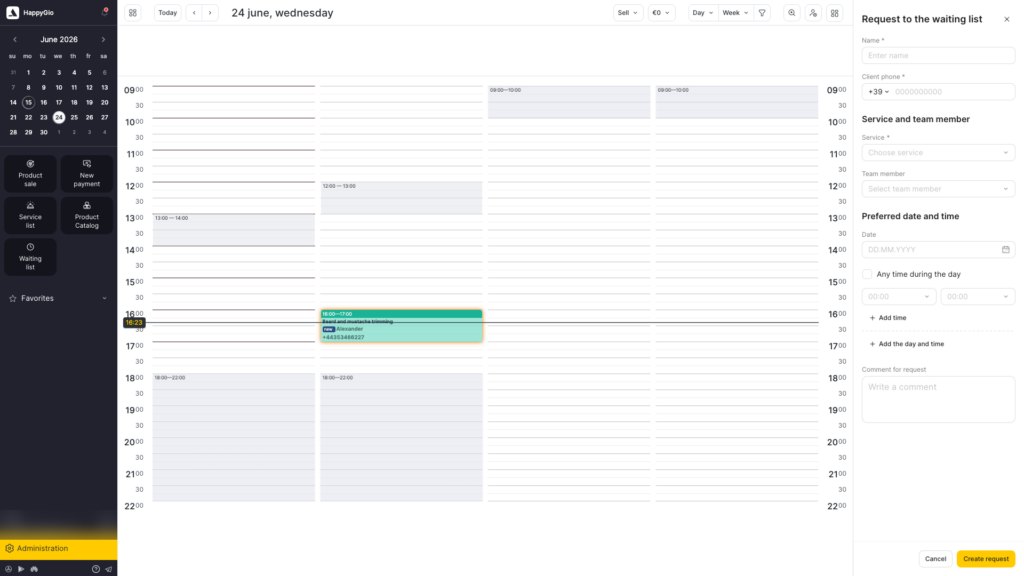
Fill in the form:
- Enter the client’s name and phone (both required; the same suggestions/validation as the appointment window).
- Choose at least one service — type to search. Group and package (combo) services aren’t supported here.
- Optionally pick one or more team members (the list is grouped by position; team availability isn’t checked at this stage).
- Set the preferred date and time — past dates are blocked. Use Add time / Add the day and time for several options, or tick Any time during the day.
- Add a comment if needed (it carries over to the appointment when you book).
- Click Create request.
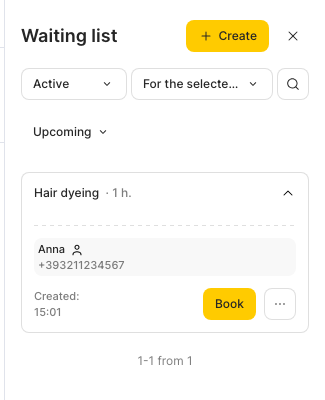
What’s in the waiting list panel
Once you have requests, the panel lists them and gives you tools to find the right one:
- Search — by client name or phone number.
- Sort — Upcoming (soonest-ending first; requests with no date go to the end), Newest to oldest, or Oldest to newest.
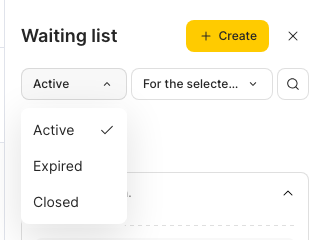
- Filter by status — Active (default; at least one requested date/time is still in the future), Expired (all requested dates/times are in the past), Closed (an appointment was booked from the request — it can then only be deleted).
- Filter by date — For the selected date (the day open in the calendar), Today, or All. Search, sort, and filters combine.
Read a request card
Cards are collapsed by default and show the essentials — the service(s) and duration, the preferred date(s) and time slots, and the preferred professional with their specialization. Click a card to expand it: the expanded card adds the client’s full name and phone, any tags, the comment, the Created date, the Book button, and a ⋮ menu.
Note
If your role doesn’t have access to phone numbers, the phone is masked in the list (for example
36 999 xxx xx 16).
Book an appointment from a request
This is the point of the waiting list — turning a saved request into a real booking when a slot opens.
- Expand the request and click Book.
- The calendar switches to slot-picking mode. Click the slot you want — the professional and time come from where you click.
- The appointment window opens, prefilled from the request: client name and phone, the selected service(s), and the comment.
- Adjust anything you need, then click Save to create the appointment.
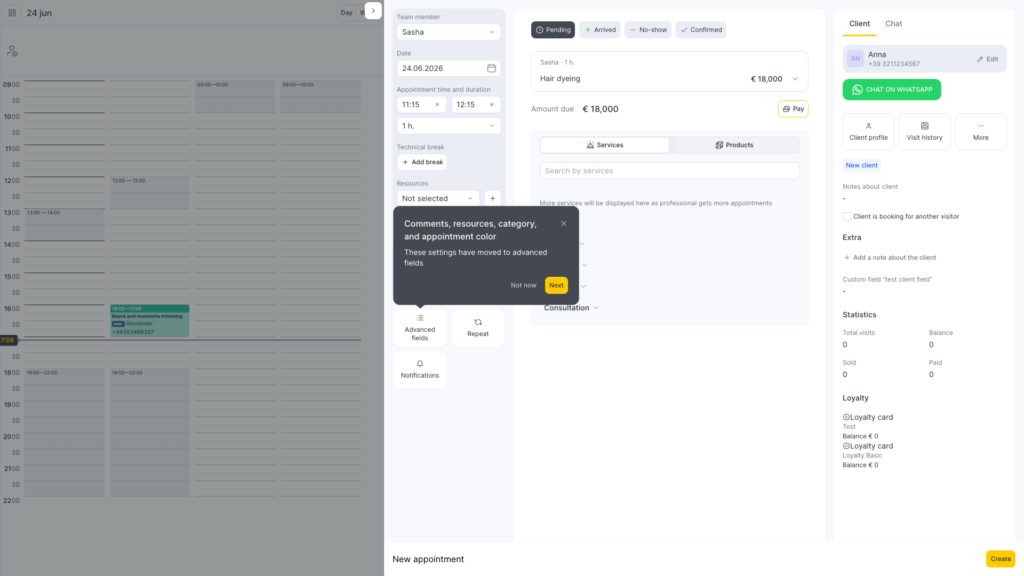
The appointment is created only after you click Save. If you close the window or click away without saving, the request stays exactly as it was. After a successful save, the request moves to Closed.
Edit or delete a request
Open the ⋮ menu on an expanded card:
- Edit — change any detail (client, service, team, dates/times, comment).
- Delete — remove the request. This is the only action available on a Closed request.

What’s not included
The first version of the waiting list focuses on the reception workflow above. These are not part of it yet:
- Clients can’t add themselves to the waiting list through online booking.
- There’s no separate waiting-list report.
- There are no automations or triggers (for example, auto-notifying a client when a slot opens).
- Waiting-list requests aren’t stored in the client’s appointment history.
Will the client be notified?
Adding a client to the waiting list does not send any notification — it’s an internal record for your team. When you later book the client from the waiting list, the appointment is created through the normal booking flow, so the client receives the usual booking notifications.A request disappeared from the list — where did it go?
Check the status and date filters. The default view is Active for the selected date; switch the status filter to Expired or Closed, and the date filter to All, to see everything.Can I add a request without a specific date?
Yes — tick Any time during the day, or leave the time open. Requests without a fixed date are sorted to the end of the Upcoming list.I don’t see the Waiting list tile.
Your role is missing the Show Waiting List permission. Ask an Owner or Manager to enable it in Team > Team members list > Access, in the Appointment Calendar access block. Also check that Show waiting list is on in Settings > Digital schedule > Appointments and visits.Does booking from a request check the professional’s schedule?
You choose the slot yourself in the calendar when you click Book, so you place the appointment on a real free slot. The request form itself doesn’t check availability — it only records what the client wants.