
Before you start using Online booking, configure the key settings in the Online booking section.
In the updated interface, settings are grouped by purpose. Open Online booking and select the relevant item:
- Customize client data fields
- Automate notifications
- Enable online payments
- Set your available hours
- Define cancellation and rescheduling rules
- Enable “Any professional” mode
You can also complete your public-facing page setup in:
- Brand, Contacts, Gallery, and Use a promo block.
Where to find these settings #
- To access the Online booking settings, from the menu panel on the left click Online Booking> Settings. This will open a page with various settings available.
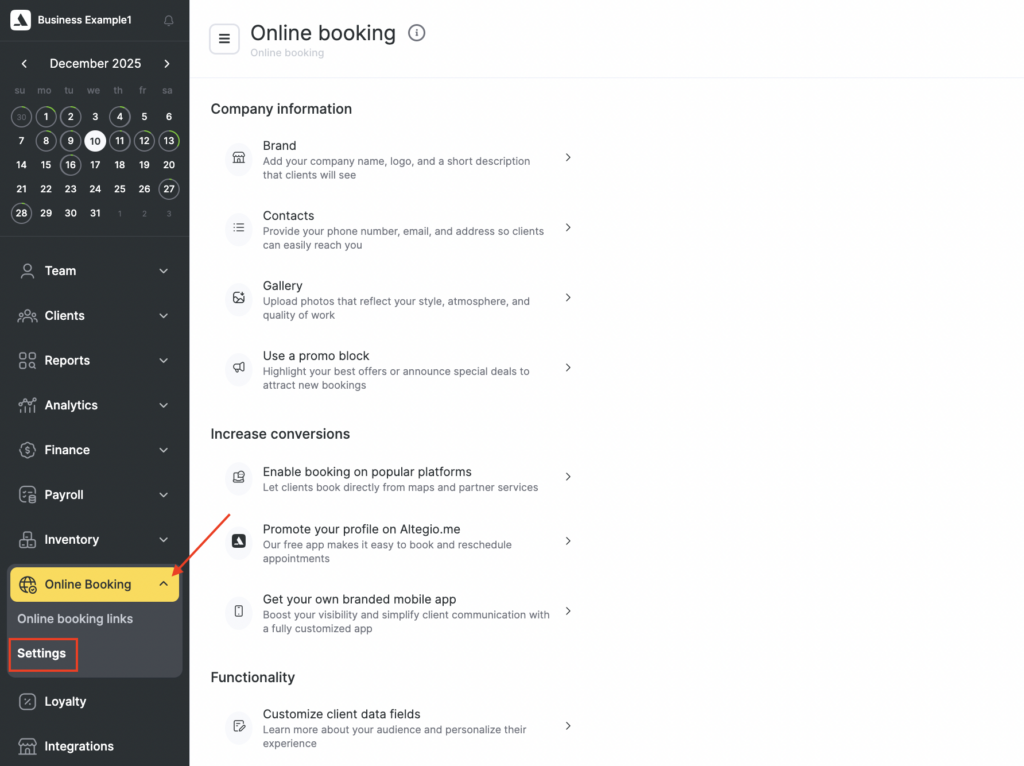
From here, start customizing each section that matches your brand identity. Below, we will go over each section in detail.
Company information #
The Company information section helps you set up the public identity of your business in Online booking. This is the first layer of trust and clarity your clients see when they open your booking page or widget.
By completing this section, you make your brand recognizable, your contact details easy to find, and your booking page more attractive — which can improve conversion and bring more new appointments.
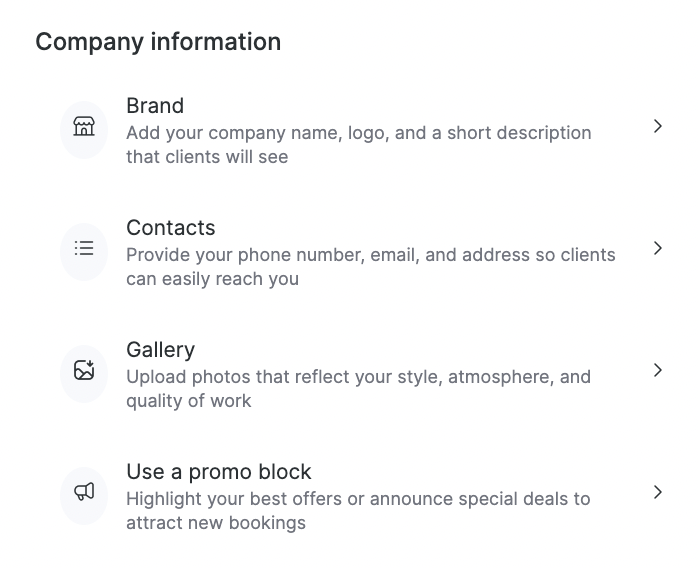
This section includes:
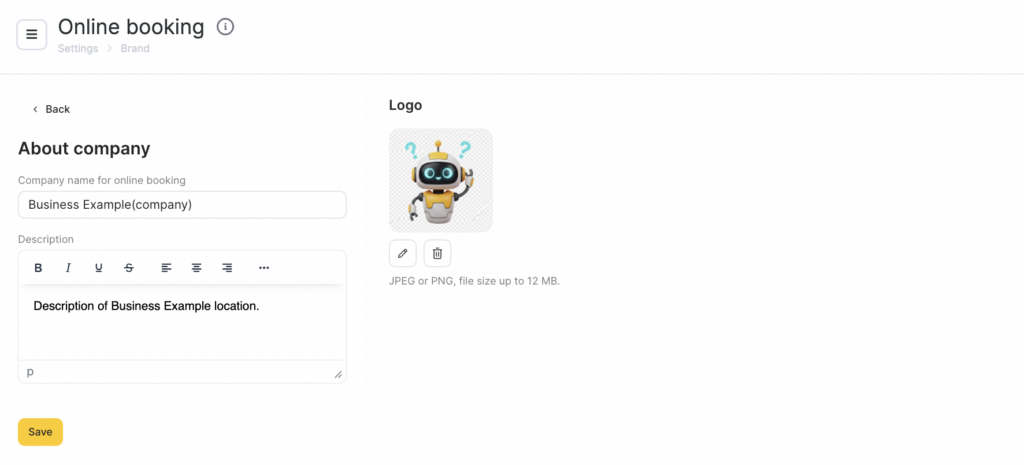
Brand #
Add your company name, logo, and short description.
This information is shown to clients on your online booking page and helps them immediately understand who you are and what you offer.
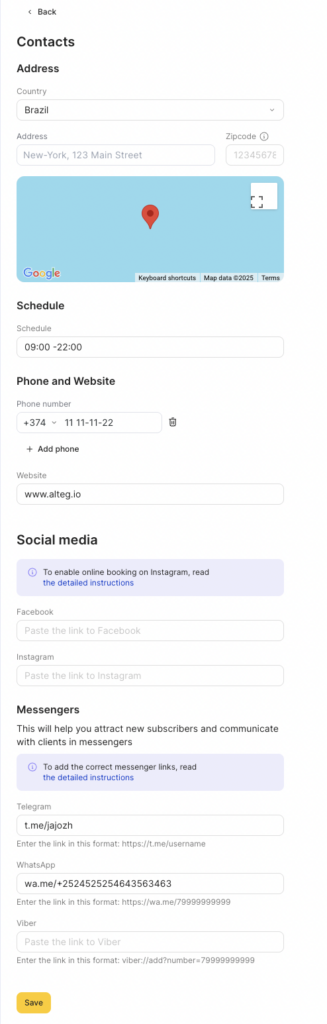
Contacts #
Provide your phone number, email, and address so clients can easily reach you and feel confident about visiting your location. You can add your social media links, specify working hours and other contact information here too.
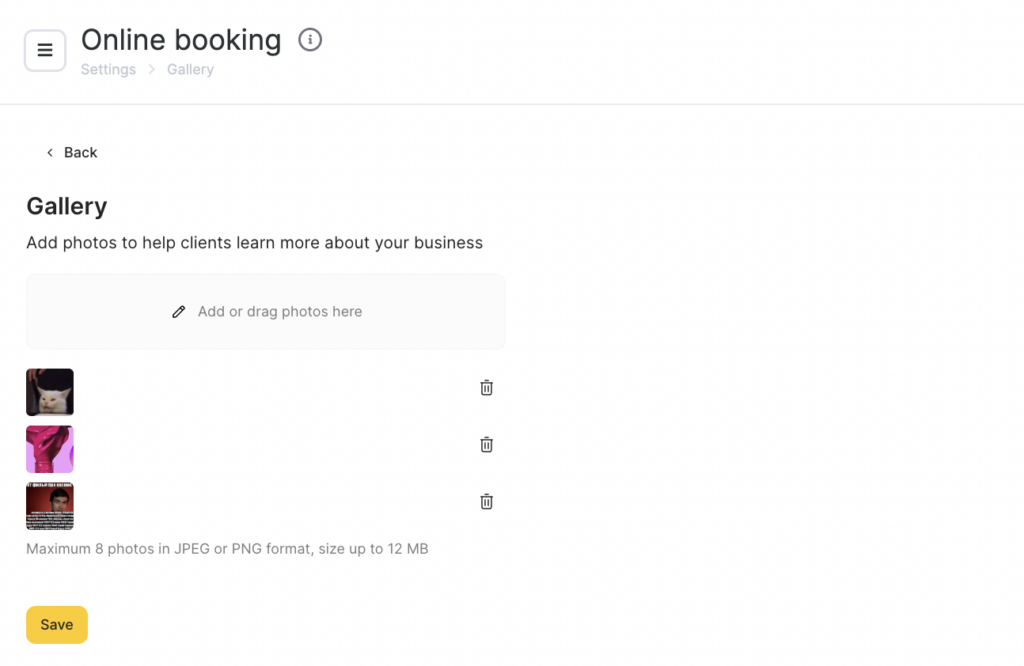
Gallery #
Upload photos that reflect your style, atmosphere, and quality of work. This is especially useful for beauty, wellness, and service-based businesses where visual proof builds confidence.
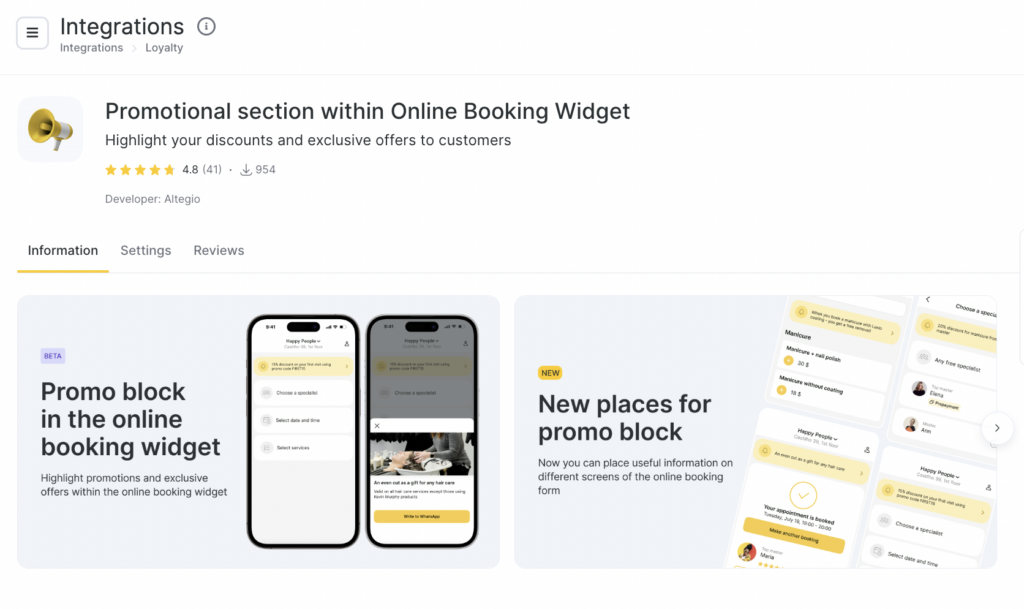
Use a promo block #
Highlight your best offers or announce special deals to attract new bookings. This can be a limited-time discount, seasonal offer, or a simple first-visit benefit. To use this feature you will be prompted to connect a free integration.
Increase conversions #
The Increase conversions section includes tools that help you attract more clients and turn more views into actual bookings.
Instead of relying only on your main booking page, these options expand your presence across additional channels and make it easier for clients to find you and book you in fewer steps.
This section is especially useful if you want to grow new-client bookings and improve your visibility outside your existing customer base.
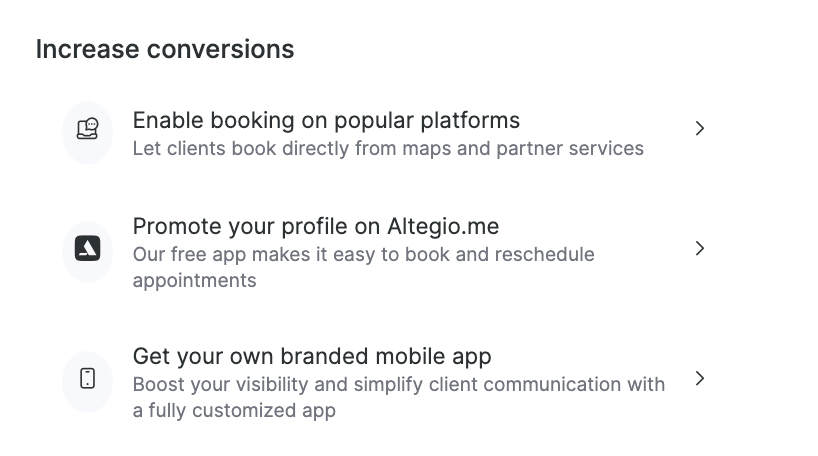
It includes:
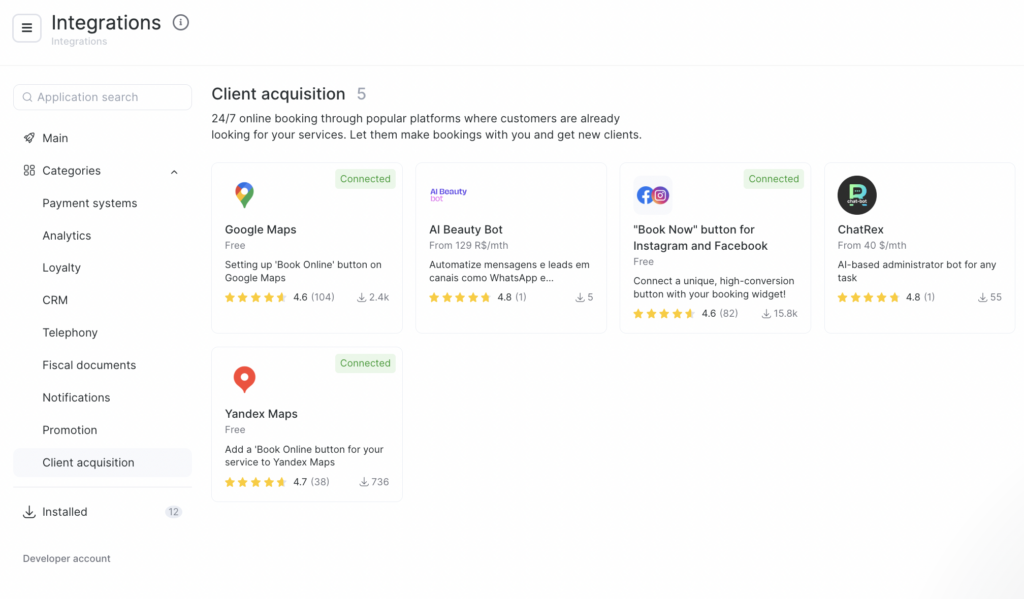
Enable booking on popular platforms #
Let clients book your services directly from maps and partner services. By opening this setting you will be offered a list of available integrations.
Promote your profile on Altegio.me #
Showcase your business through Altegio’s free booking app, making it easier for clients to book and reschedule appointments.
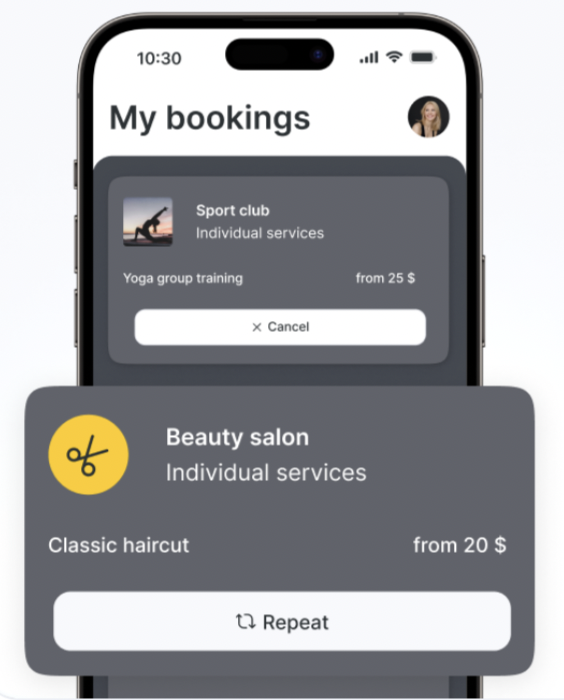
Get your own branded mobile app #
Launch a fully customized app for your business to boost visibility and simplify client communication. By clicking this section you will be redirected to a page where you can instantly request a consultation with Altegio manager for your branded mobile app.
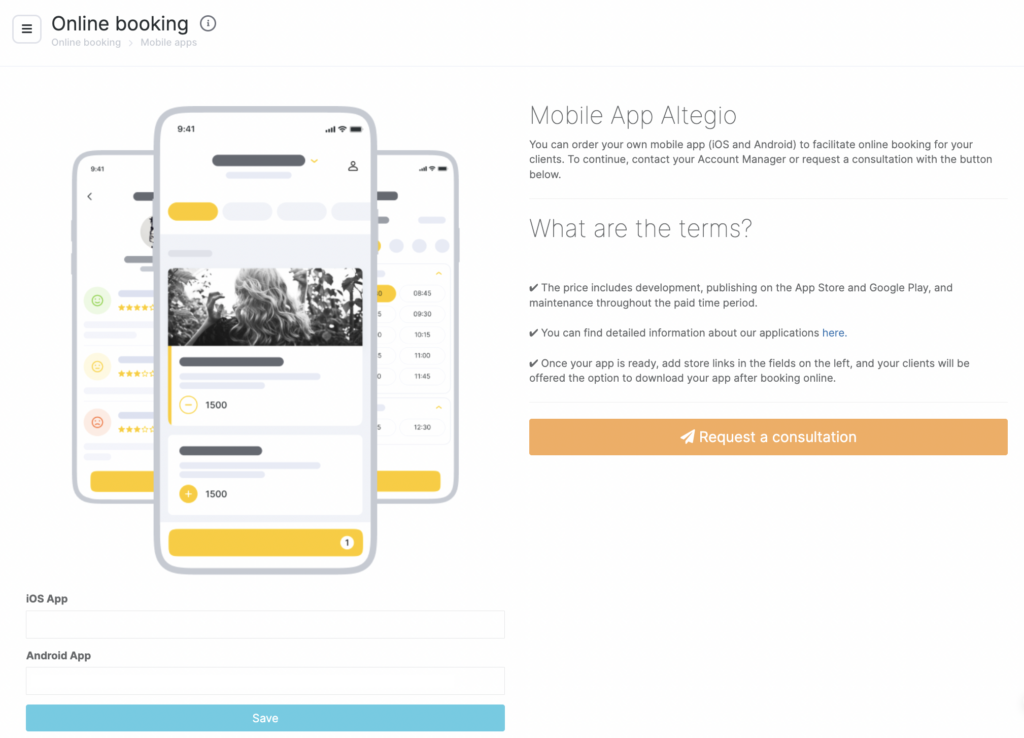
With a branded mobile app your clients get a familiar, branded space to book, track visits, and stay connected with your brand.
Functionality #
The Functionality section includes core tools that help you fine-tune how Online booking works for your business.
These settings are designed to improve the client experience, reduce missed appointments, and help you build stronger long-term relationships with your audience.
In short: this is where Online booking becomes smarter, more personalized, and more reliable.
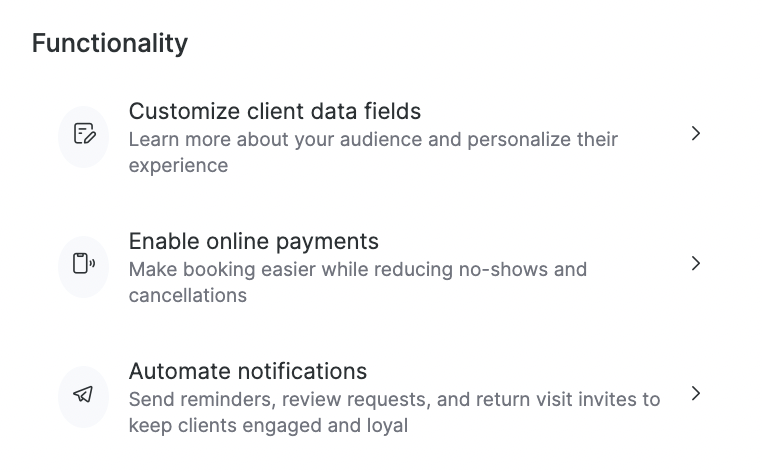
This section includes:
Customize client data fields #
Collect the information you actually need from clients during booking and tailor the signup experience to your workflows.
If you need to receive additional information from clients, indicate the required entry field: comment and/or email. If the setting is enabled, the client will not be able to sign up until they fill out the field.
Client’s full name – if necessary, make the client’s last name and/or middle name a required field at the step of entering contact information.
For the setting to become available, you must allow the display of the “Last name” and “Middle name” fields in the Settings > Appointment Calendar section. Read more about the “Last name” and “Middle name” fields here.
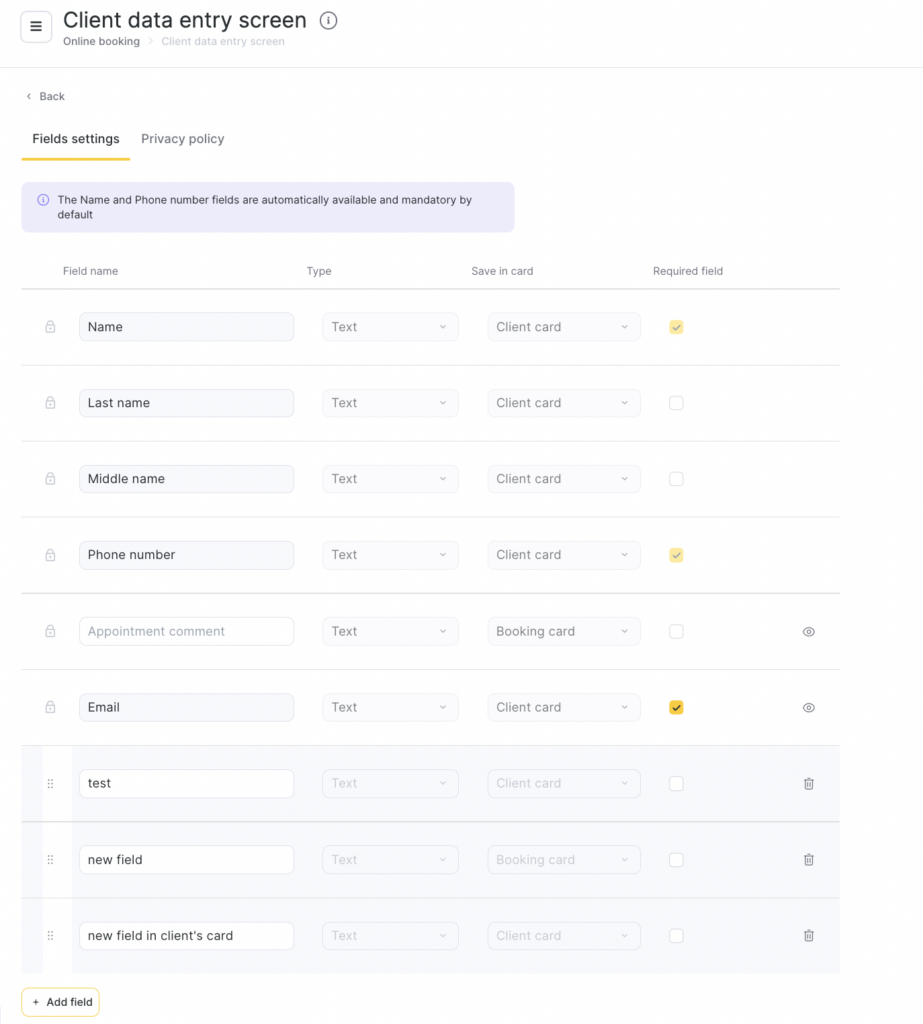
You can customize which fields appear, which are required, and how they are labeled. You can change the name of the comment field (up to 60 characters) or leave the default text (“Appointment comment”). The comment field can be used, for example, to clarify the car number, the contact name of the client’s social network account, age, etc.
You can also hide comment and/or email fields from online booking.
Enable online payments #
Allow clients to pay online when booking.
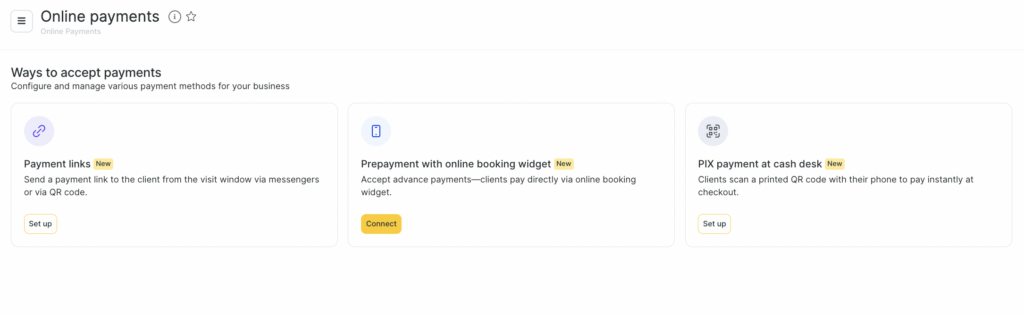
This makes booking more convenient and helps reduce last-minute cancellations and no-shows.
This way clients get a faster, more seamless booking process and a clear payment expectations before the visit.
For you this setting allows for more reliable appointments, better cash-flow predictability and less schedule disruption from no-shows.
Automate notifications #
Set up automated messages to support the full client journey.
This can include reminders, review requests, and return-visit invitations.
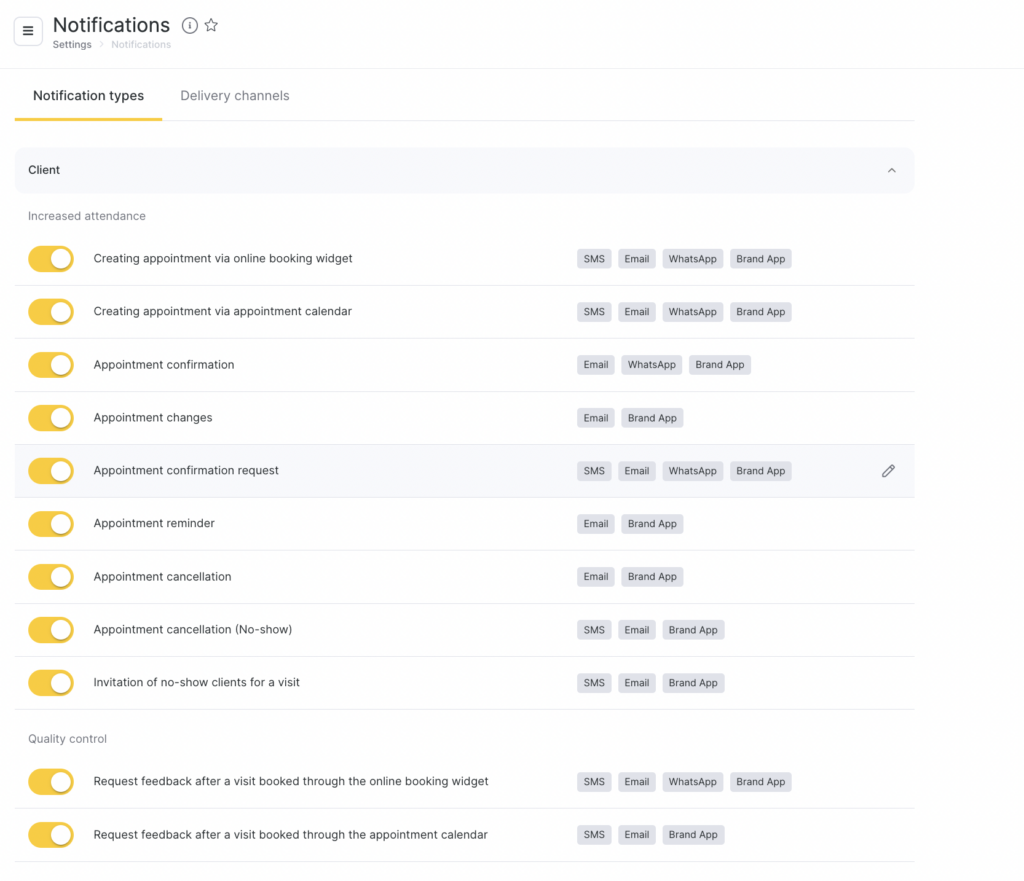
Set up notification types to send helpful reminders to your clients so they don’t forget appointments and maintain an easier rebooking and follow-up.
Automated notifications gives you higher attendance rates, stronger client loyalty and more repeat visits without manual effort.
More features #
This section brings together advanced options that help you fine-tune scheduling, improve booking speed, and strengthen client trust.
These tools are not always required for a basic setup, but they’re especially valuable if you want tighter control over your schedule, smoother client self-service, and a more polished brand presence.
This section includes:
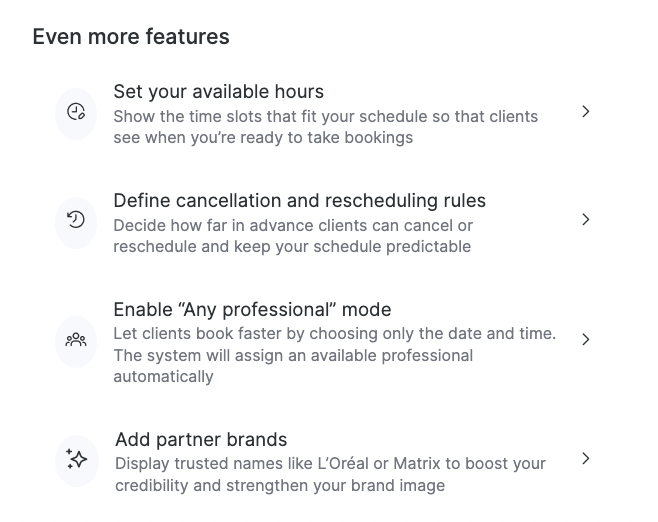
Set your available hours #
Define when you are ready to accept bookings so clients only see time slots that match your working schedule.
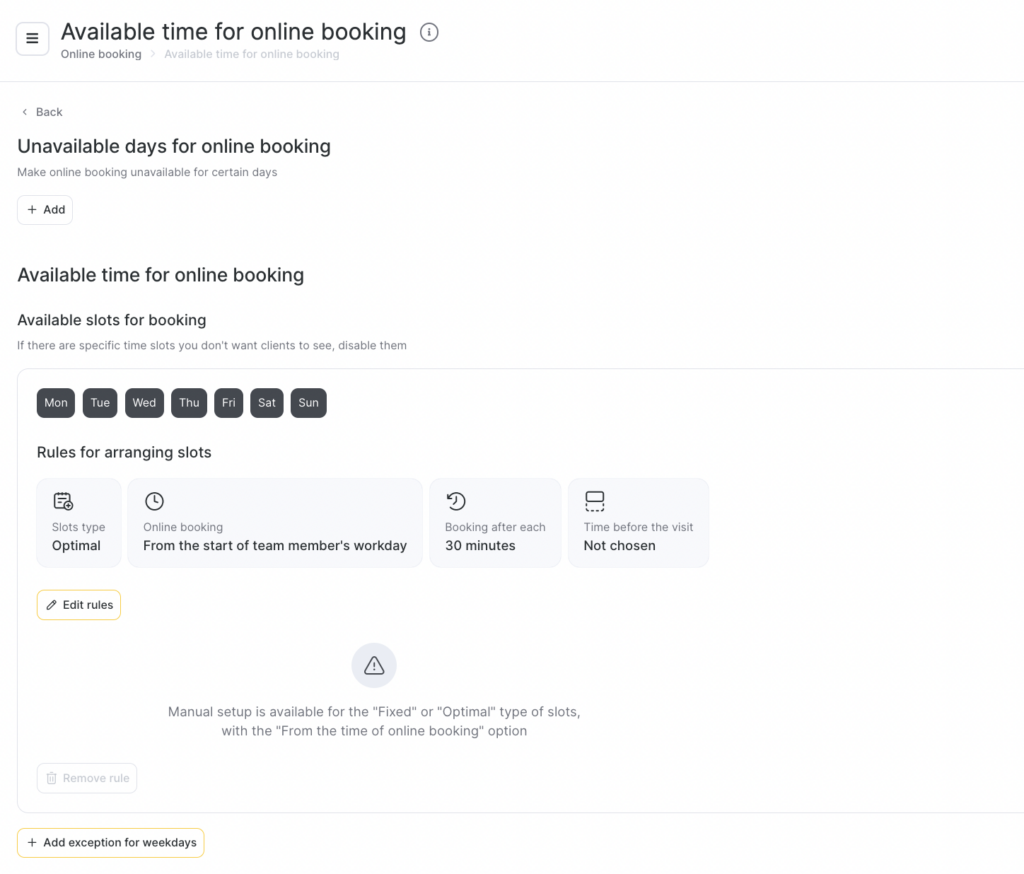
Unavailable days: Mark days when the professional is not available for online bookings.
Available slots for booking: Select and customize which time slots clients can see and book for each day of the week.
Slot rules:
- Set the type of slots (Optimal, Flexible, etc.).
- Choose the online booking window (for example, 09:00–18:00).
- Define booking intervals (e.g., every 30 minutes).
- Set time before visit (how far in advance clients can book).
Day-part sections: Divide the schedule into Morning, Day, and Evening blocks and enable/disable time slots individually.
Exceptions: Add exceptions for specific weekdays or periods to temporarily change availability.
Read detailed article here.
Define cancellation and rescheduling rules #
Set how far in advance clients can cancel or reschedule online. Enable clients to reschedule or cancel their appointments online by setting a cutoff time in the widget. This limit determines how far in advance of the appointment start time a client can no longer modify their booking. Implementing this feature prevents last-minute changes, ensuring smoother operations. You can adjust this interval in 15-minute increments, with a maximum limit of 48 hours.
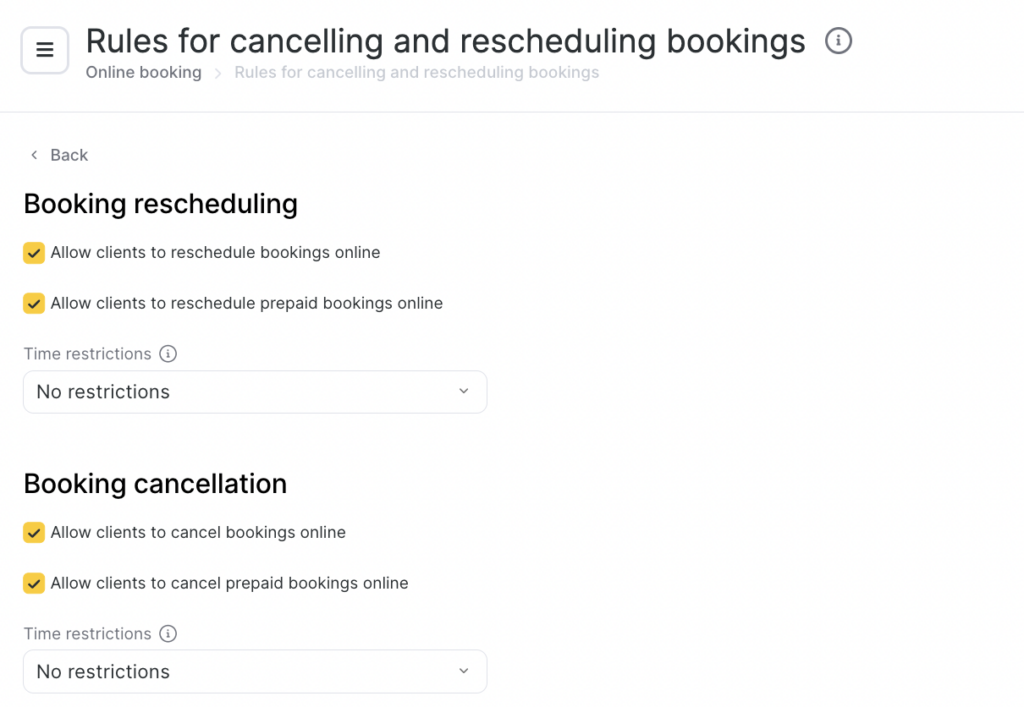
This helps protect your calendar from last-minute changes and improves overall schedule stability.
Important
If a client cancels a prepaid appointment, the refund process is manual and must be initiated by a receptionist. This means the client’s money will not be automatically returned upon the appointment’s cancellation.
Enable “Any professional” mode #
Let clients book faster by choosing only the date and time. The system will automatically assign an available professional. This allows clients to bypass choosing a specific professional by clicking the “Any available professional” option during signup.
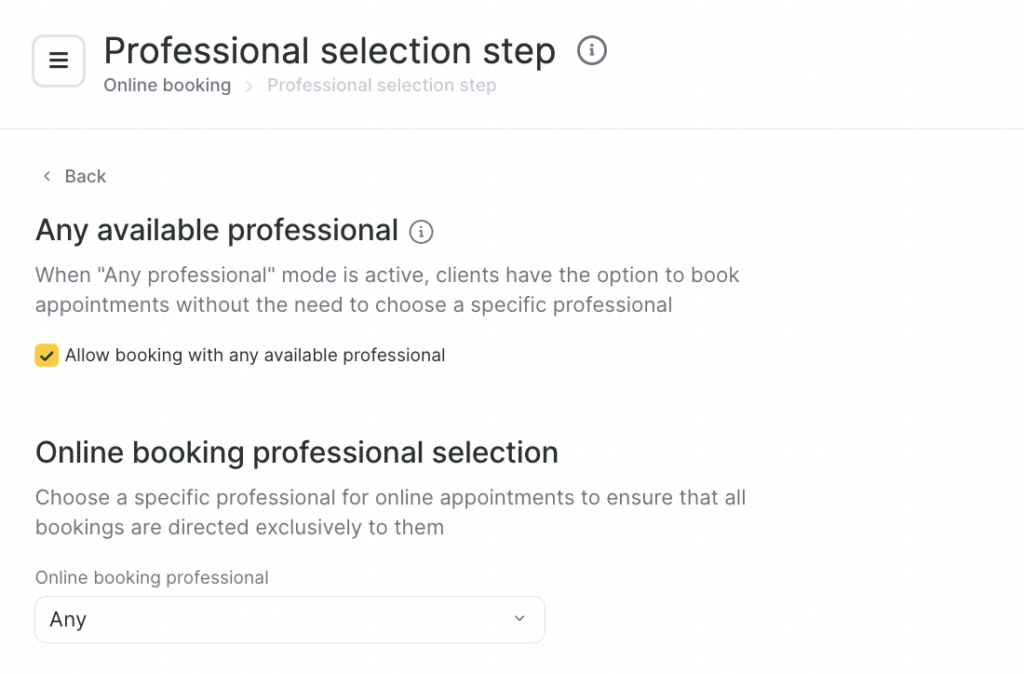
This mode can also be activated during the configuration of booking steps in the widget, by setting the default choice to any professional. For more details on these settings, refer to this article.
Additionally, team members must hav an activate “Skip choosing professional” option on their profile for them to be considered in the selection pool.
Note
When the online payment feature is activated, the “Any professional” mode bypasses the individual prepayment requirements of a chosen team member. In this scenario, only the service’s mandatory prepayment criteria are considered.
Add partner brands #
Display trusted brand names you work with (for example, well-known product or service brands) on your booking page.
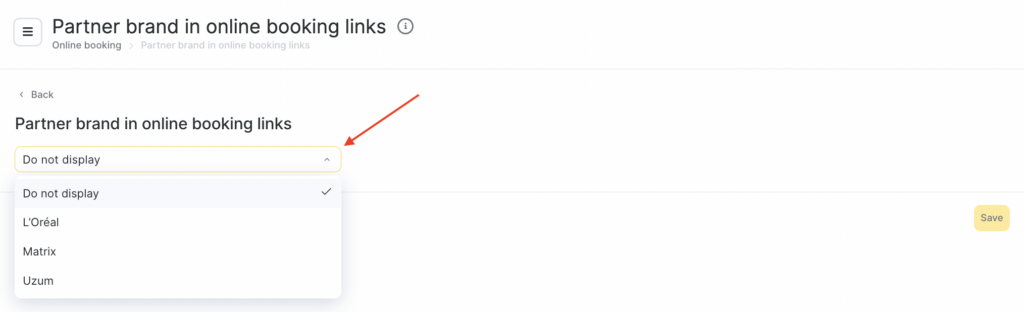
This strengthens credibility and helps new clients feel more confident about choosing you.
What clients get:
- Extra trust signals
- A clearer understanding of your quality standards or affiliations
What this gives you:
Better conversion for new-client bookings

