
In the Altegio mobile app, you can set up an online booking widget. Users can quickly create a new widget or edit an existing one directly from the app.
With online booking, your clients can choose an professional and a convenient time, and book a service on their own — on your website, via social media, Google Maps, 2GIS, and other platforms.
You can create as many forms as you want: one for the whole company, for a specific service direction, or for a specific professional.
How it works #
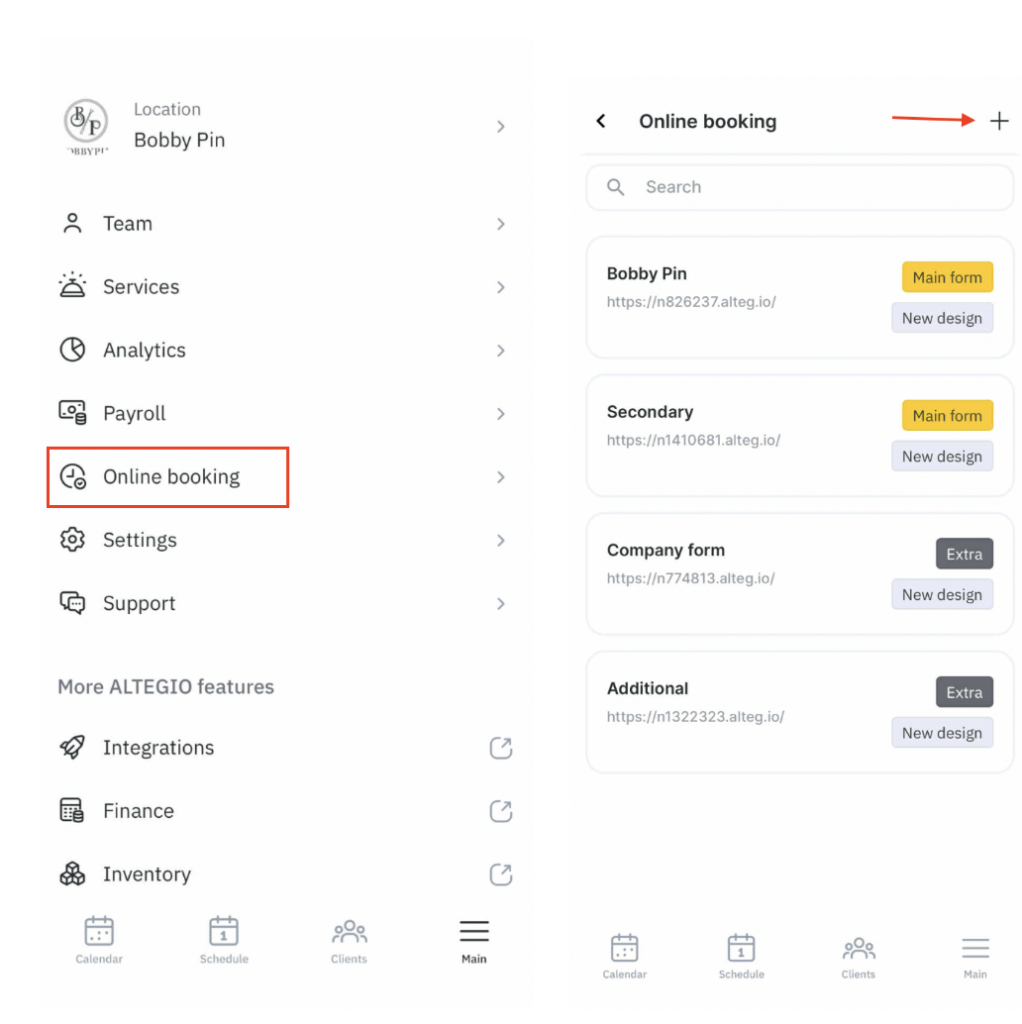
To set up online booking, go to the main menu, open Online booking, and tap Go to setup. If you have already set up online booking in the app, you will immediately see the available settings options.
In the Online booking section you can:
- Create and set up a new online booking form.
- Edit or delete an existing form.
- Configure additional online booking parameters.
- Edit company information.
- Configure booking steps.
- Set up the online booking button on your website.
Setting up an online booking form #
To create a new online booking form, go to Online booking and tap Go to setup. If you already have widgets created earlier, tap the plus button.
In the window that opens:
- Enter the Online booking form name. Only Altegio internal users will see this name.
- Enable Make primary if you want to use this form on online platforms and in the network online booking form.
- Below, you can configure the parameters (Main settings) that apply to all forms created in the branch:
- Time before the nearest session. Specify how much time before the visit start a client will no longer be able to book.
- Extra spots in an event. This option is relevant for group events. It allows a client to reserve multiple spots when booking a group event. This lets clients book for themselves and friends/family without creating separate bookings for each person.
- Verify the client’s number by SMS. Enable this option if you want the client to complete the booking only after confirming their phone number. This helps prevent invalid and test bookings.
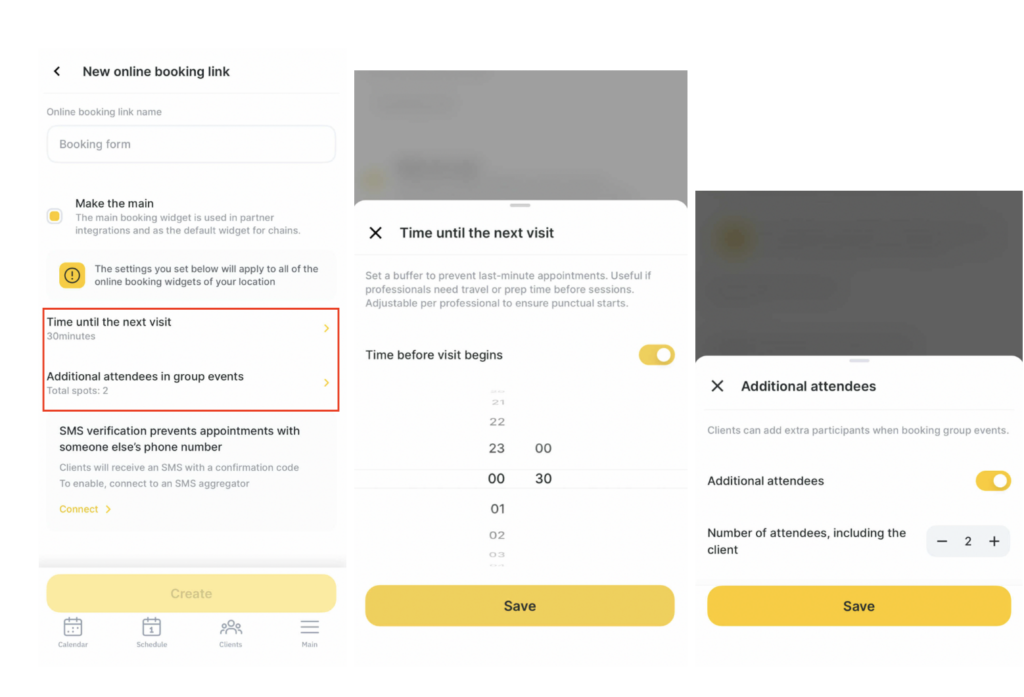
To send SMS messages, you need to connect an SMS aggregator.
After you fill in the settings, tap Create online booking.
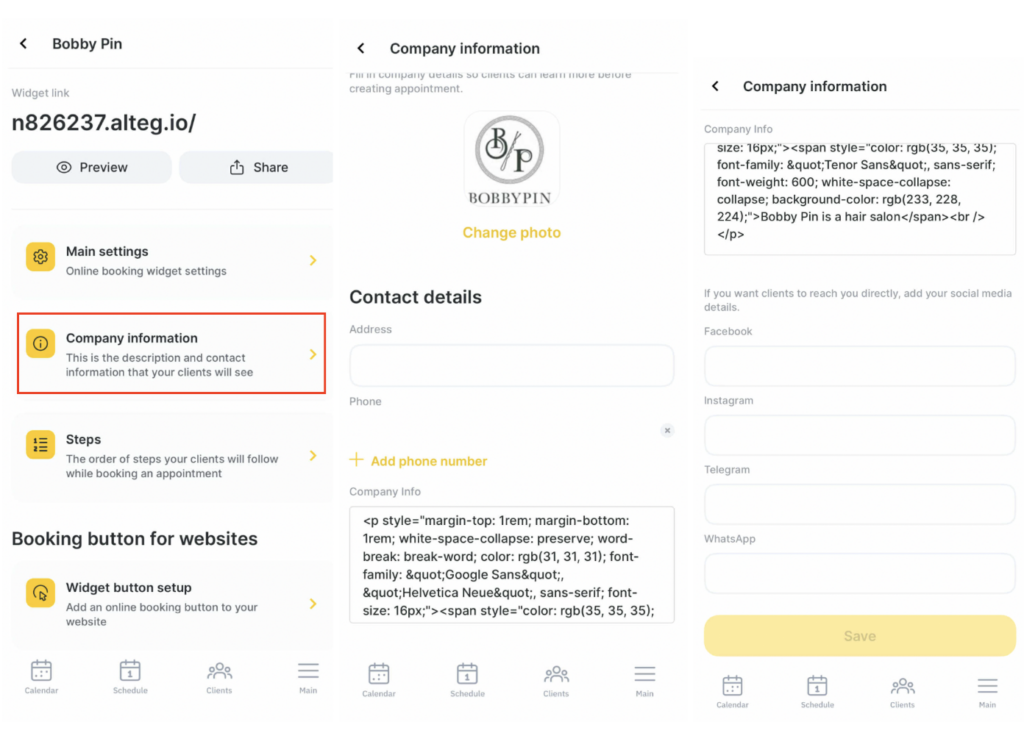
After the form is created, you can copy its link, delete the created form (only additional forms can be deleted), edit Main settings (see step 4 above), Company information, configure Booking steps, and the Website booking button.
To do this, tap the form name and select the required section.
Company information #
Upload a logo (recommended resolution 500 × 500 px, file size up to 12 MB), add contact details (address, phone number), a description, and links to social media and messengers.
Booking steps #
Set up the sequence of actions a client will follow when booking online. For example, first they choose a date and time, and then choose a service and a professional.
Booking step settings are the same as in the web version — you can read more in the article.
- When you create a new online booking form in the mobile app, the default booking format is Menu.
- When changing the booking format, the following scenarios are available: Menu, Step-by-step, and Short step-by-step.
- For an existing booking form, the step sequence set by the user will be displayed. If there is no form yet, by default the sequence will be Choose professional > Choose service > Choose date and time. You can change the step sequence in the settings. If needed, you can also hide steps.
- If Any professional selection is enabled, the client doesn’t have to choose a professional — the system will randomly select any available professional.
- If Default professional is enabled, a professional will be pre-selected. When you tick this checkbox, select the professional from the list — all online bookings will be assigned to this professional.
- If Default service is enabled, a service will be pre-selected. When you tick this checkbox, select the service from the list — it will be automatically chosen in the online booking widget.
Setting up the button on your website #
In this section, you can:
- Enable/disable the button on your website pages.
- Configure the button position.
- Configure the widget panel position.
- Change the button color.
- Enable/disable button animation.
After changing the settings, tap Get code.
Copy the code using Copy or send it to your developers using Share.
Setting up the button in the mobile app is the same as in the web version. Detailed instructions can be found here.

