
In the Altegio system you can manage all your team members’ settings in one place. Go to Team > Team members list (Administration mode) to view and configure your team profiles.
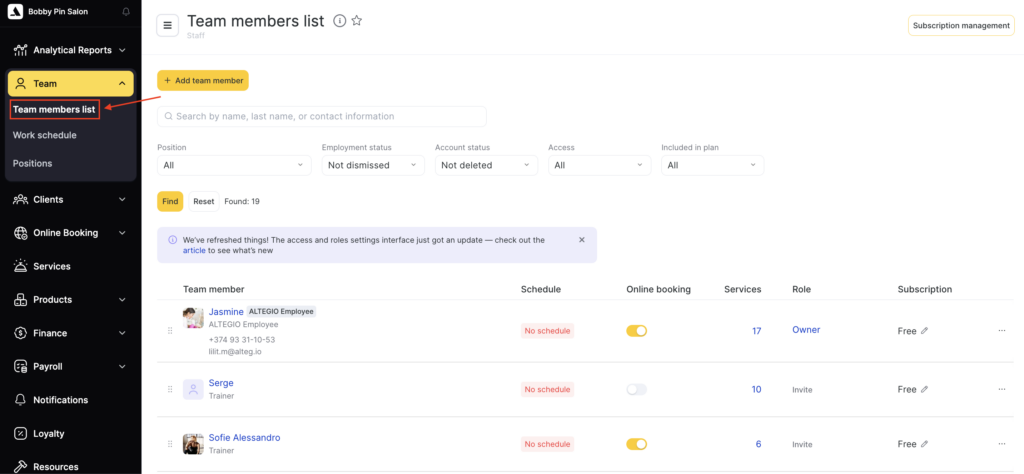
In this section click on specific team member’s name to open their profile.

The Team section is your central hub for:
- Adding and editing team members
- Assigning services and working hours
- Managing payroll and compensation settings
- Configuring online booking visibility
- Controlling access permissions and notifications
Tabs #
Each team member profile contains several tabs at the top. These tabs help you organize and manage all aspects of the team member’s work in your company:
- Information – Basic details such as name, position, specialization, contact information, and profile photo.
- Services – Services assigned to the team member including pricing, durations, and specialization.
- Online Booking – Settings related to the team member’s visibility and booking rules in the online booking widget.
- Payroll – Commissions, bonuses, and pay rules assigned to the team member.
- Work Schedule – Working hours, breaks, and recurring schedules.
- Access – Permissions and roles controlling what the team member can see and do.
- Notifications – Settings for which notifications the team member will receive.
- Settings – Advanced or additional settings for the team member.

Information tab #
The Information tab in the Team section is where you store and manage all the essential details about each team member. This tab acts as the team member’s profile card — it’s the first place to visit when you want to view or update their personal and professional information.
Basic profile data: Add or update the display name (this name will be visible to clients), position, specialization (this title is also visible to your clients), and contact details of your team member.
Profile photo: Upload or edit the team member’s photo to appear in the booking system and internal lists.

Additional information: Enter the first name, last name, patronymic (middle name), citizenship, gender, passport details, tax ID, and insurance number.
Specify the date of hire and the registration/patent expiry date, as well as an additional phone number. Here you can also Delete or Dismiss a team member if they no longer work at your company.

Important
The data in the Additional information section is visible only to you and to integrated systems that have access to team member data. Clients will not see this information.
Services tab #
The Services tab lets you manage which services a team member can provide and how those services appear to clients. Here you can configure service visibility in online booking and in the Appointment Calendar, set the service duration and price for the team member, and also link a bills of materials.

Changes made here directly affect what clients see in your online booking widget and what your team sees in the Appointment Calendar.
Read in detail about this section settings in this article.
Online Booking tab #
The Online Booking tab controls how clients can book appointments with a specific team member. This is where you decide if and how the professional appears in your online booking widget and what conditions apply to their online appointments.
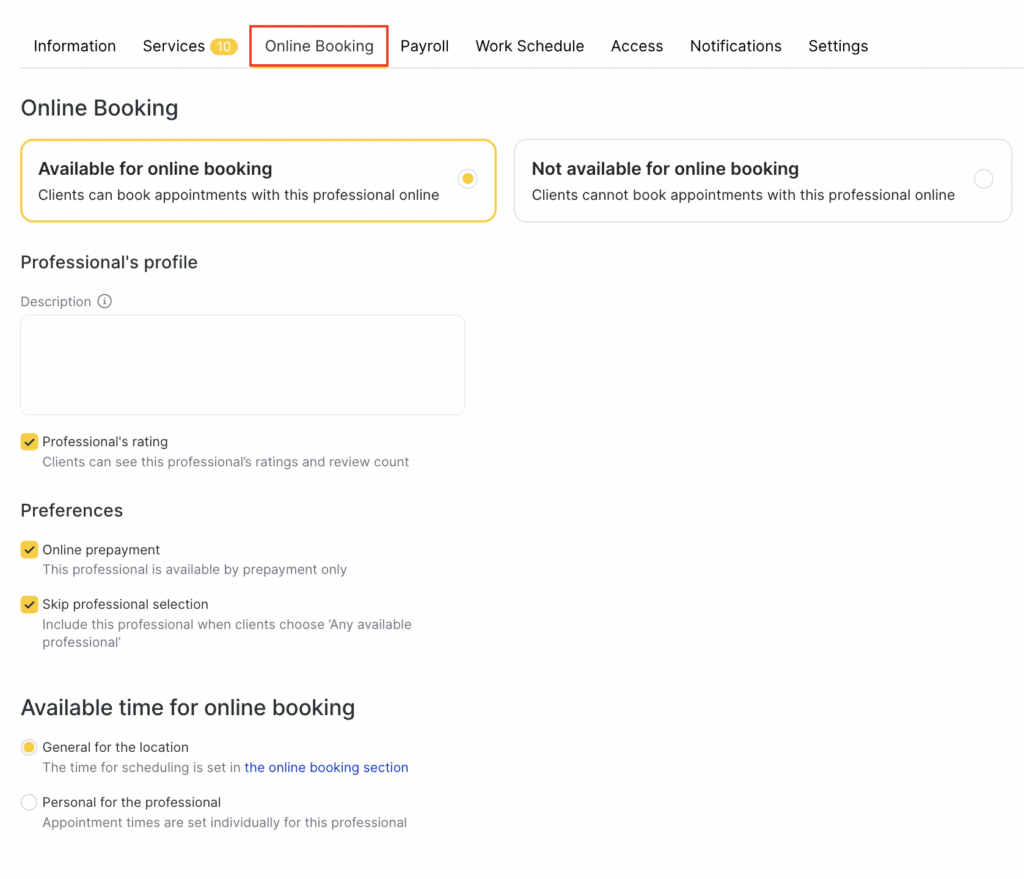
Enable or disable online booking: Choose whether clients can book this professional online or not.
Professional’s profile: Add a description that clients will see when booking online and optionally display ratings and reviews.
Payment and selection preferences:
- Online prepayment: Require prepayment for this professional’s services.
- Skip professional selection: Include or exclude the team member when clients select “Any available professional.”
Available time for online booking:
- General for the location: Use the location’s default online booking hours.
Personal for the professional: Set unique booking times for this team member. This gives you full control over their online booking availability, slot rules, and exceptions.

Unavailable days: Mark days when the professional is not available for online bookings.
Available slots for booking: Select and customize which time slots clients can see and book for each day of the week.
Slot rules:
- Set the type of slots (Optimal, Flexible, etc.).
- Choose the online booking window (for example, 09:00–18:00).
- Define booking intervals (e.g., every 30 minutes).
- Set time before visit (how far in advance clients can book).
Day-part sections: Divide the schedule into Morning, Day, and Evening blocks and enable/disable time slots individually.
Exceptions: Add exceptions for specific weekdays or periods to temporarily change availability.
Read detailed article here.
Payroll tab #
The Payroll tab allows you to set up how each team member is compensated for their work. This is where you define which types of payments or commissions apply to a specific team member, from service-based earnings to product sales and shift-based pay.

Read the full guide on how to set up compensation rules here.
Work Schedule tab #
The Work Schedule tab in the Team section provides quick access to manage team member’s working hours. In the latest version of Altegio, the full schedule settings have been moved to Team > Work schedule for better centralization.

Click Remove from schedule to detach the professional from their assigned work schedule (a confirmation message will appear).
Click Configure to go directly to Team > Work schedule where you can edit detailed working hours, breaks, and shifts for the professional.
Read the full guide on configuring team work schedule here.
Access tab #
The Access tab allows you to define what each team member can do inside Altegio. This is where you assign roles and permissions to team members. The access level you choose also affects whether the team member counts toward your Altegio subscription billing.
Choose the appropriate role from the dropdown menu — e.g., Team Member, Receptionist, Call Center, Accountant, Manager, or Owner.
Decide whether a team member can log into their personal account, receive notifications, and use Altegio according to the assigned rights.
Each role comes with a predefined set of permissions for scheduling, managing clients, handling payments, or accessing reports.
Subscription/Billing impact:
The assigned access rights determine whether a team member is non-billable or billable:
Team member – non-billable access rights (unless team member has an active schedule).
Manager – non-billable access rights.
Accountant – non-billable access rights.
Call Center – non-billable access rights.
Technical users (SMS aggregators, chatbots) – non-billable if the connection was made via the Altegio Integrations.
Receptionist – billable access rights.
Owner – the first owner in a location is non-billable, the second and subsequent owners will be billable.
Important
When billable access rights are added to any role, the team member automatically becomes billable.
A team member who provides services but does not have access rights to the system is billable and occupies one seat in the plan. A team member with a role will also occupy only one seat in the plan.

Here’s a tab display of a member who is included in the subscription and has specific access level:

To disable access to the system click the Grant system access toggle.

If you disable Grant system access, a confirmation window will appear.

In this window you will be notified that:
- The team member will lose access to the system.
- They will no longer be able to log in or perform any actions in Altegio.
- You can re-invite them at any time later by enabling access again.
To confirm the action, click Revoke access.
Notifications tab #
The Notifications tab in this section allows you to control how each team member receives alerts and updates about appointments, client actions, and other important events. This ensures your team stays informed and responsive at all times.
Notification types:
Choose which events trigger notifications for the team member (e.g., appointment creation, cancellation, rescheduling, subscription expiration, booking cancellation by receptionist).
Delivery channels:
Select how notifications are sent — via SMS, Email, and/or Push notifications.
Client data:
Enable or disable sending the client’s name and phone number in notifications for privacy control.
Web version notifications:
- Appointment actions: Show notifications for creation, rescheduling, deletion, or QR-code payments.
- Incoming calls: Show notifications for incoming calls directly inside the web version.

In the Notification types dropdown menu you can choose notification access based on several settings.
Settings tab #
The Settings tab in the Team section provides advanced options for each team member. Here you can manage how the team member appears in the Appointment Calendar, track statistics, and connect their profile with external tools such as Google Calendar.

Read about setting in this tab in detail in this article.

