
The Client ID parameter helps to identify unique devices of visitors. With its help you can combine data from GA and CRM systems and set up end-to-end analytics.
Settings in Google Analytics #
You need to have administrator rights in Google Analytics (Universal Analytics version) at the Property or Account levels.
- Sign in to Google Analytics, go to the Admin section.
- In the Property column, click Custom Dimensions > Custom Dimensions.
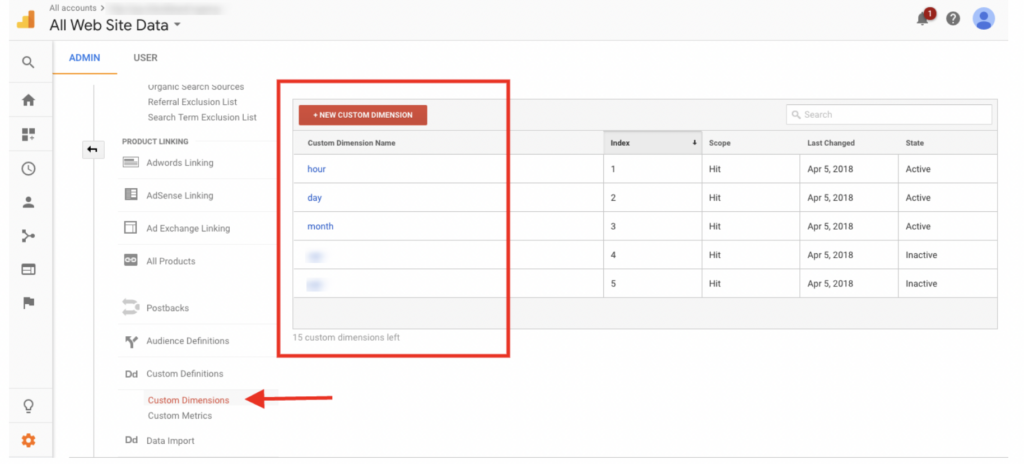
- Click New Custom Dimension.
- Add a Dimension name, for example, Custom Client ID.
- Select the Scope – User
- Check the Active box
- Click Create
- Then a page with code fragments will be opened, there is no need for settings, click Done.
- You have created a special dimension, it has an Index (ID). You will need it for the next settings.
Settings in Altegio account #
For the required online booking form the Google Analytics counter must have been already installed. See more information about setting up integration in the article.
- To set up the transfer of Client ID in the Altegio personal account, go to Online booking > Online booking widget, select the required online booking form and go to the Analytics tab.
- In the Google Analytics section check the Pass the custom Client ID parameter box.
- In the field for the special Client ID parameter, enter the Index (ID) that was assigned to the created dimension (parameter) in Google Analytics.
- Save the changes.
Settings accuracy #
The data is sent to the analytics service after a time delay. Therefore, the data in the reports will be generated some time after saving all the settings.
- In Google Analytics, go to Reports -> Acquisitions -> All Traffic -> Source/Medium. This report shows the Source/Medium and Sessions data.
- Add the previously created Custom Client ID dimension as an additional report dimension.
- If the settings are completed properly, the Custom Client ID dimension appears in the report table.

