
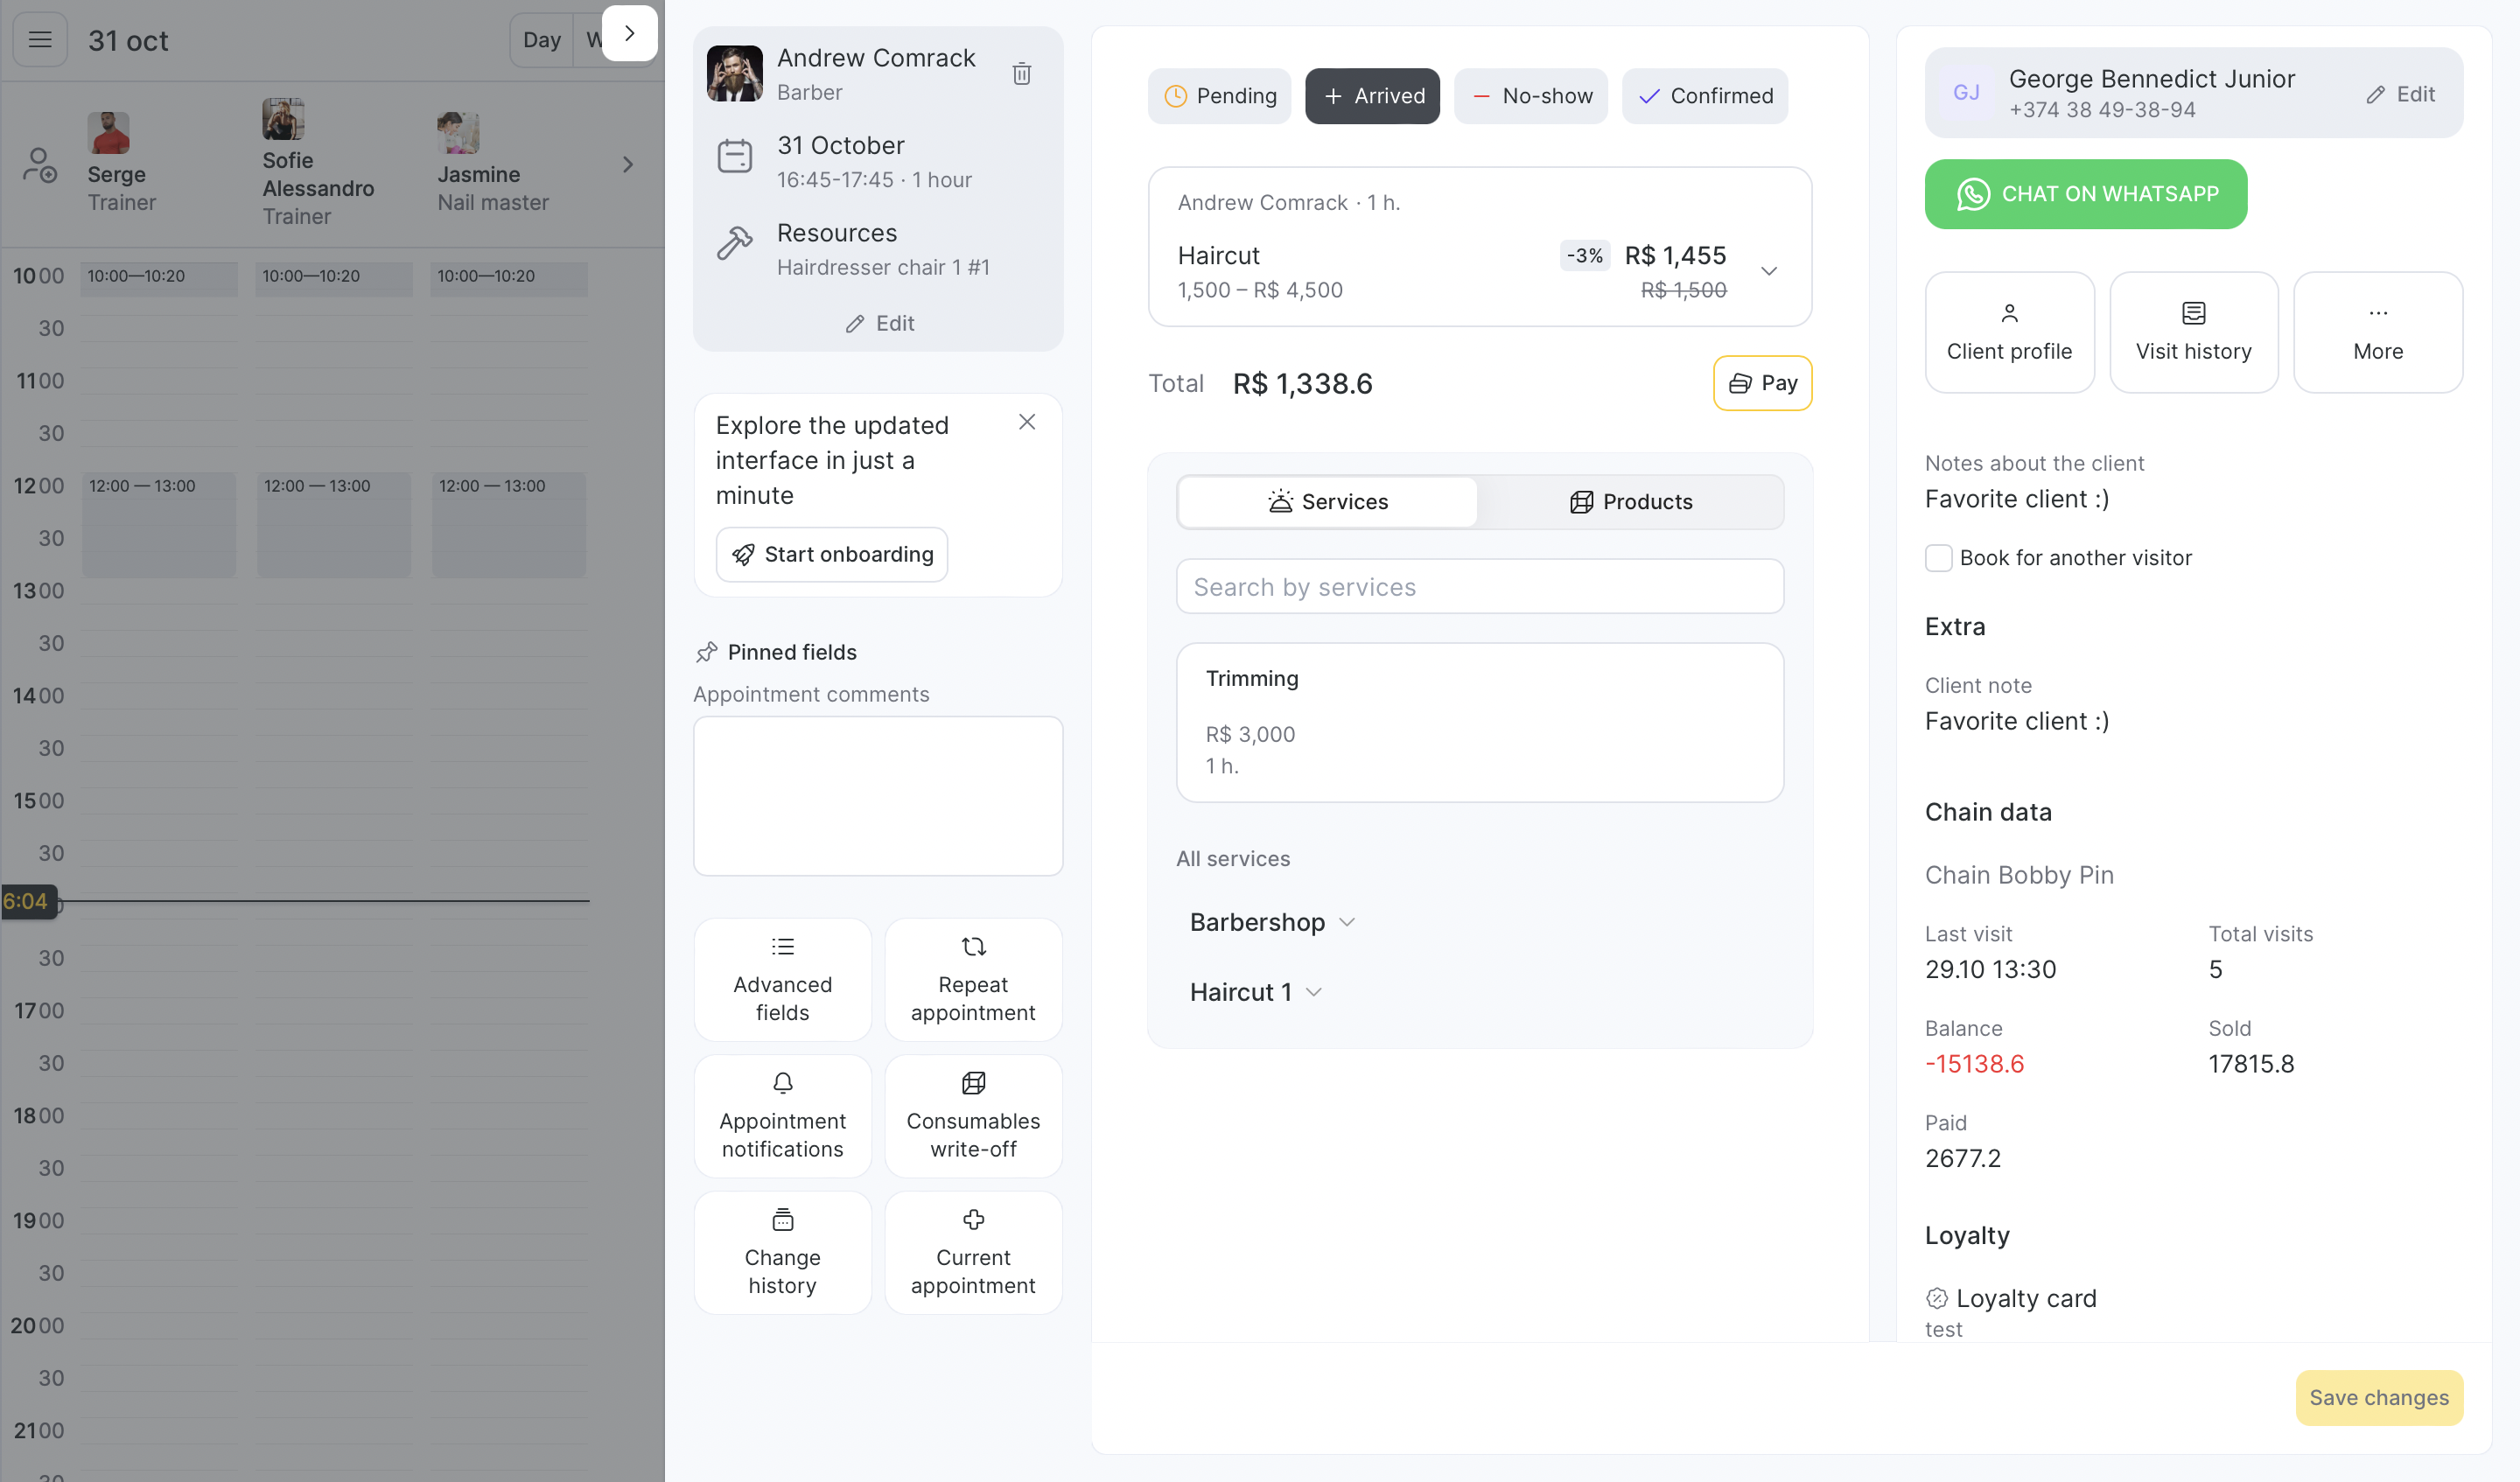
Altegio has introduced a new version of the visit window. Now, most of the appointment management can be done directly in the central part of the window—adding services and products for sale, as well as editing all relevant information without navigating through multiple tabs. The new version no longer includes the “Visit Status” and “Visit Payment” sections.
Additional appointment tasks have been moved to the left side of the window, while client-related actions are now on the right. Customization options have also been added, allowing users to pin essential fields for booking on the left or client-related sections on the right. Read on for more details about the updates in this new version.
Besides, previously displayed as a modal in the center of the screen, it will now open on the right side as a sidebar. This visual change makes it easier to navigate the workspace and view visit details without interrupting your main workflow.
Working with the Visit Window #
The new visit window retains all the essential features of the previous versions but has undergone significant usability improvements. The window is now divided into three main sections:
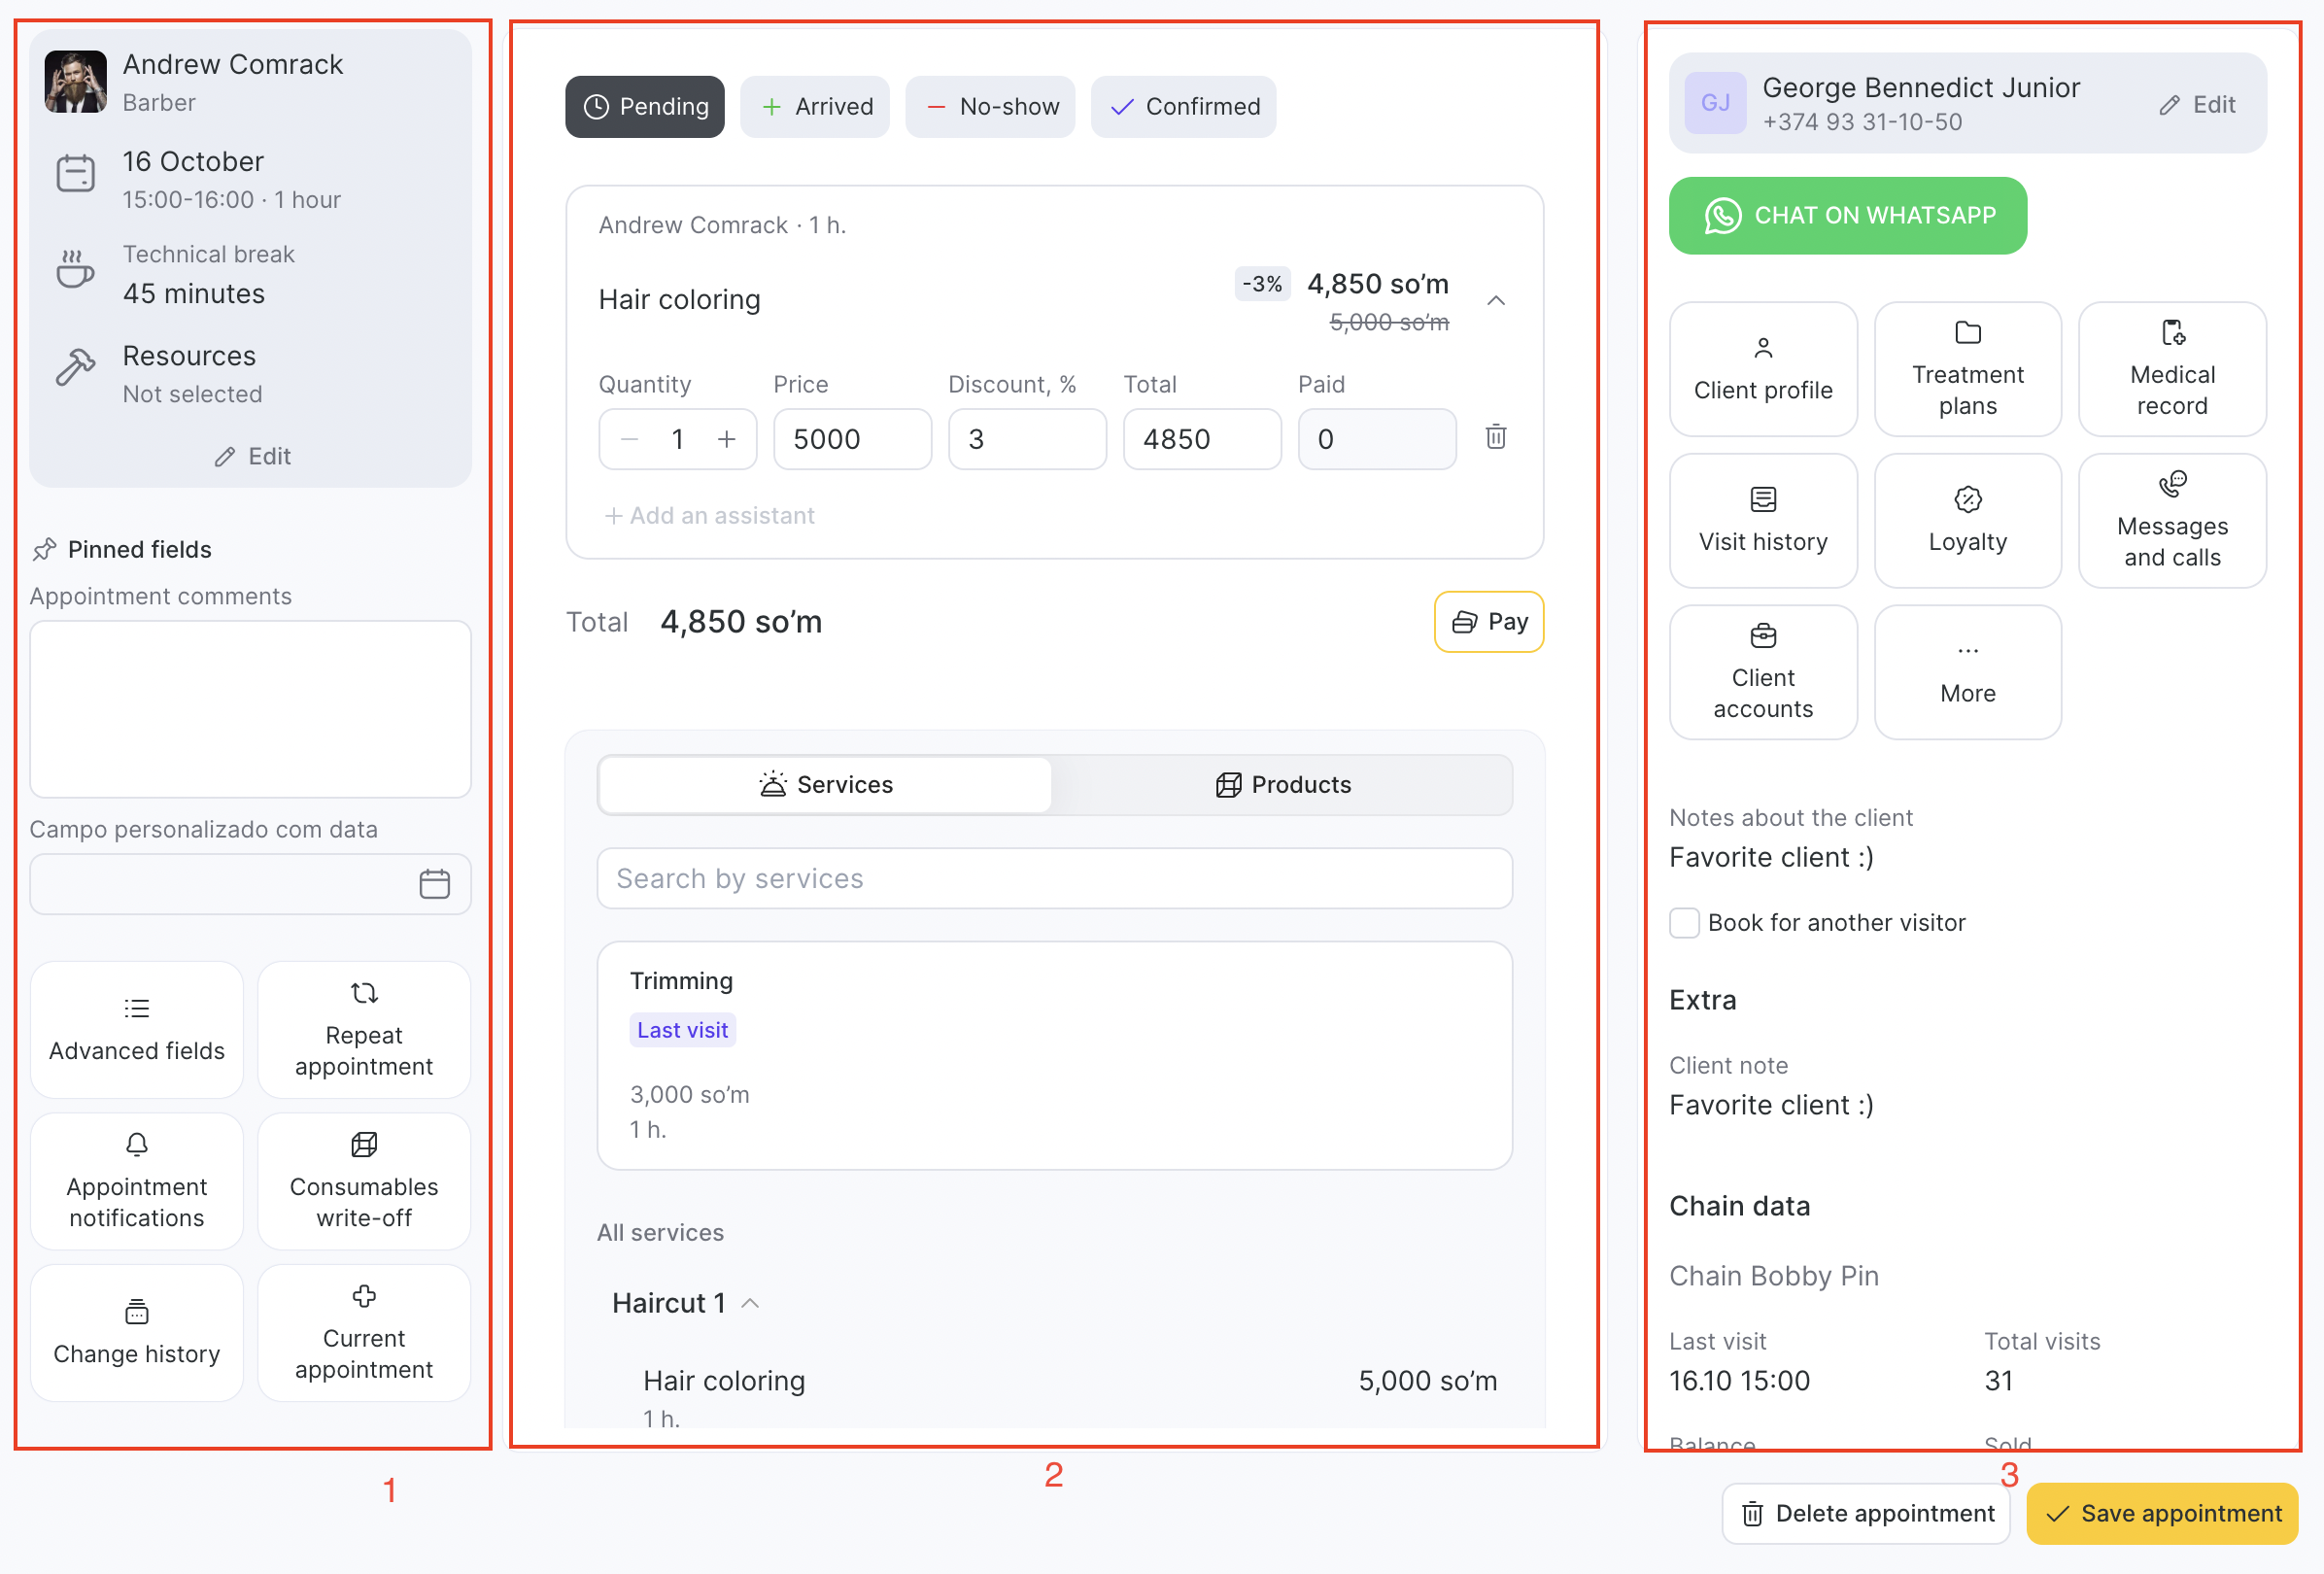
Left section: Focused on additional appointment tasks. Here, you can change the team member, date, time, and duration of the appointment. You can also pin essential fields, such as comments or resources. Sections like “Repeat appointment,” “Appointment notifications,” “Consumables write-off,” and “Change history” remain in this section.
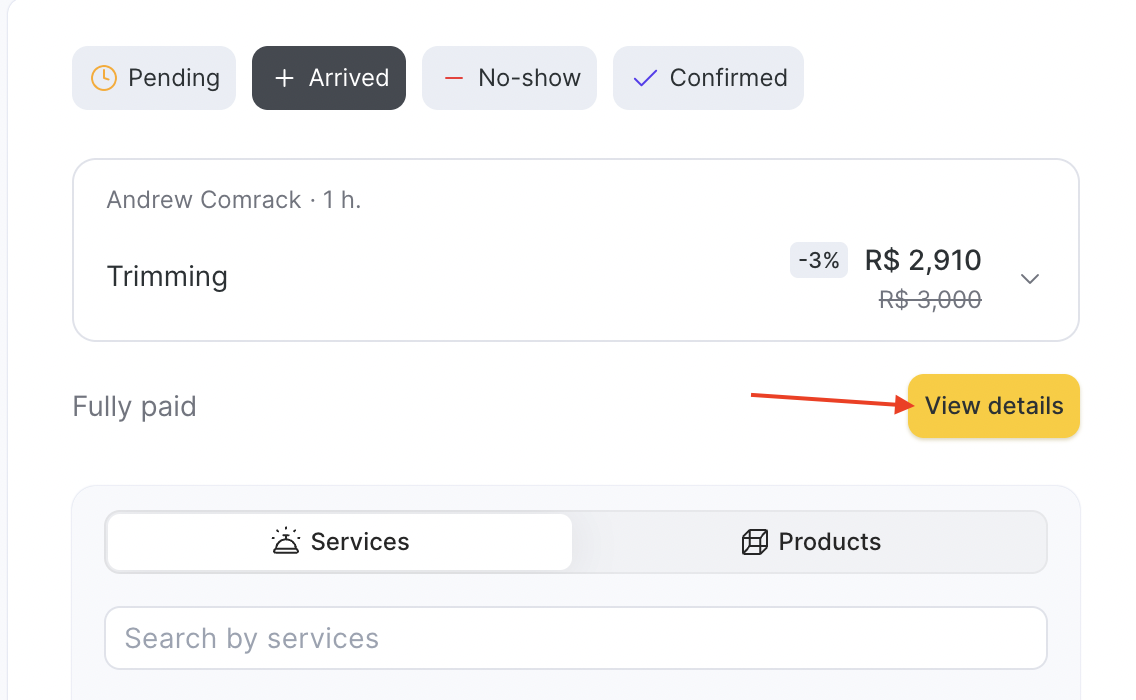
Central Section: Designed for core booking tasks, including managing visit statuses, services, products, and payments.
Right Section: Dedicated entirely to client management. This includes adding a client to an appointment, viewing client information, and accessing sections like “Visit history,” “Loyalty,” “Statistics,” “Messages and Calls,” “Client accounts,” and “Files.”
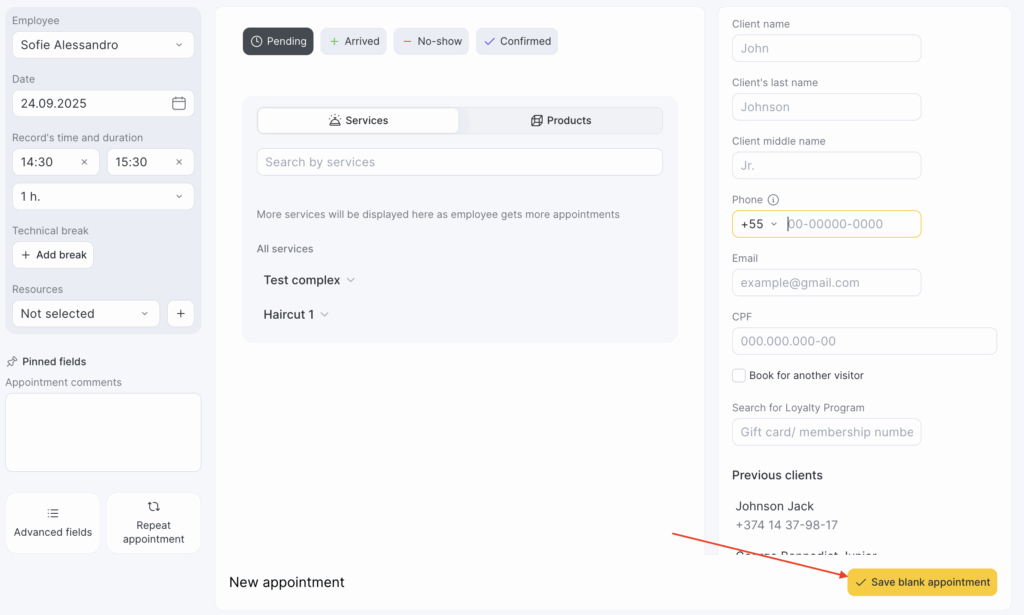
Above all you can create an empty/blank appointment and add client details later. To create a blank appointment, simply click on the desired space in the Appointment Calendar, choose between booking or group event. The visit window will open where you can simply click the button “Save blank appointment”.
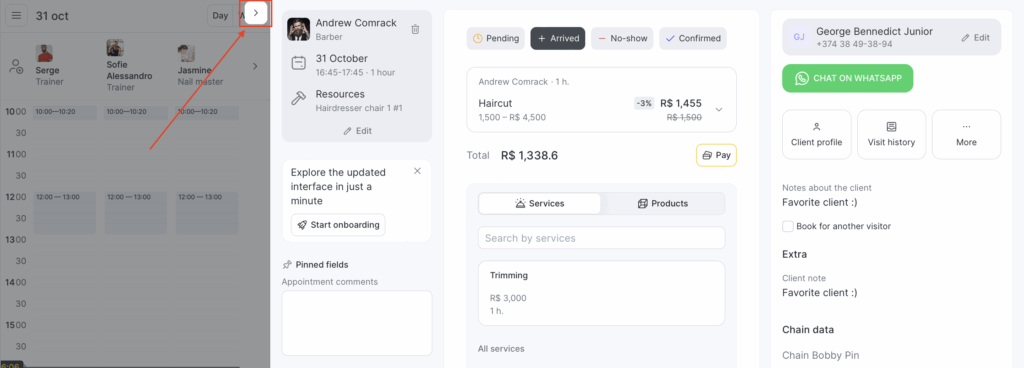
To hide the visit window, simply click on the floating arrow next to the window:
Team member, Date, Time, and Duration #
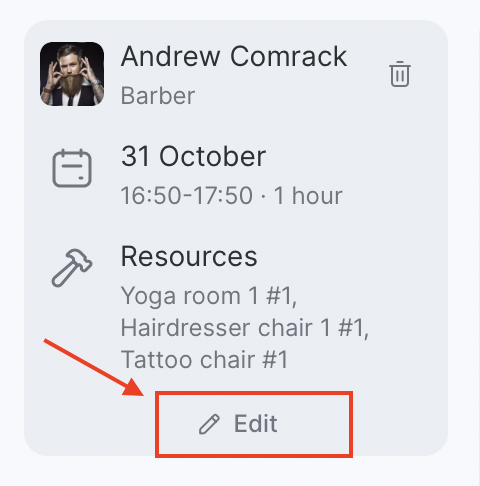
In the top-left corner of the window, there is a section showing the assigned team member and the appointment’s date, time, resources, technical breaks and duration. You no longer need to scroll down to find these fields. This block is collapsible and can be edited via the Edit button.
At the top, you’ll find a gray block that includes:
- Team member — who provides the service
- Date and time — when the visit is scheduled
- Duration — how long the appointment lasts
- Resources — rooms, equipment, or workstations used for the service
If your location uses resources (for example, a treatment room, yoga hall, or tattoo chair), the Resources field is always visible here.
If no resource is selected yet, the field shows “Not selected.”
When you add a service that automatically assigns a resource, its name will appear here.
If multiple resources are linked to the visit, they’ll be listed separated by commas.
If your location doesn’t use resources at all, this block won’t appear.
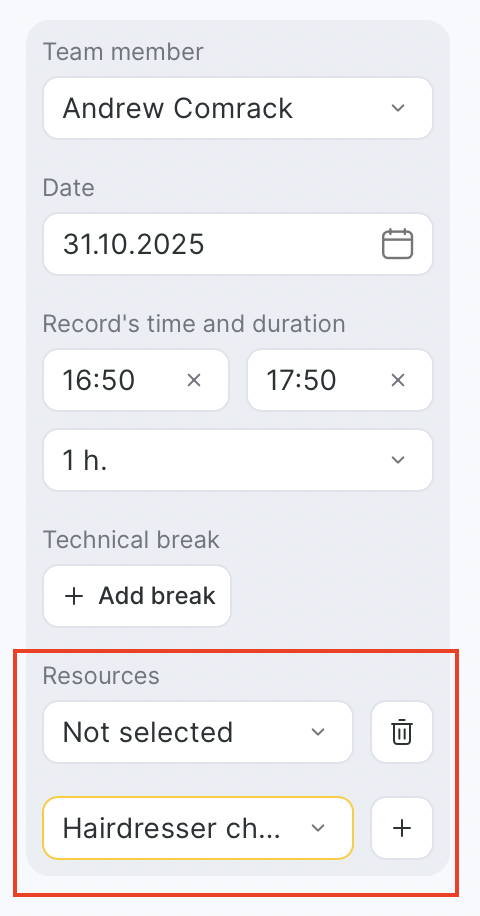
To add another resource, click the “+” button — a new line will appear for selection.
To remove a resource, click the 🗑️ bin icon next to it.
To edit a resource, simply open the dropdown and select a different one.
In addition to the main booking details, the sidebar can also display custom fields from the Advanced Fields section.
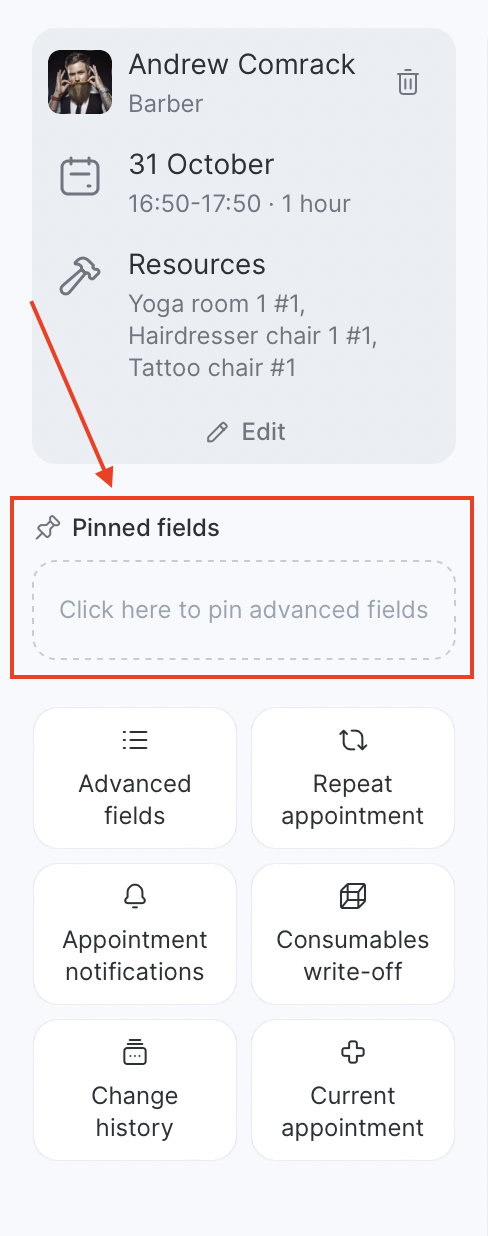
Once added to favorites, the selected field will appear directly in the sidebar, allowing you to view or edit it along with other booking details — without switching tabs.
Pinned Fields and “Advanced Fields” #
The window allows users to pin specific fields in the left section.
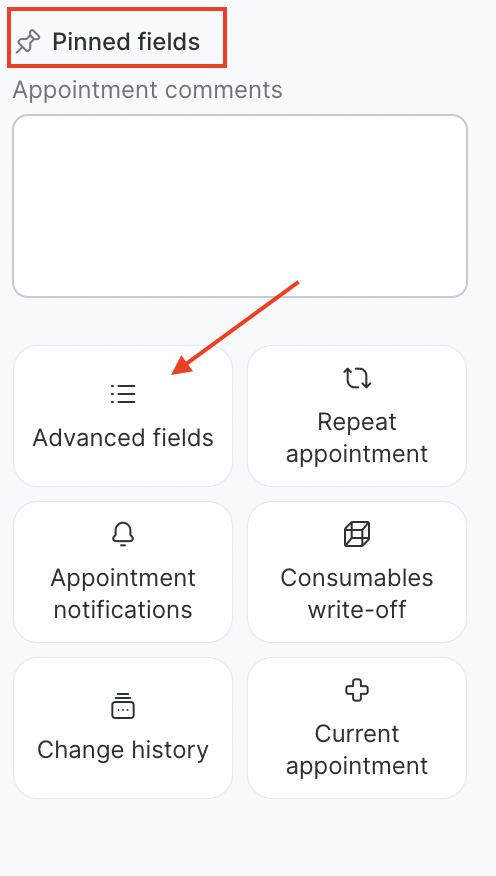
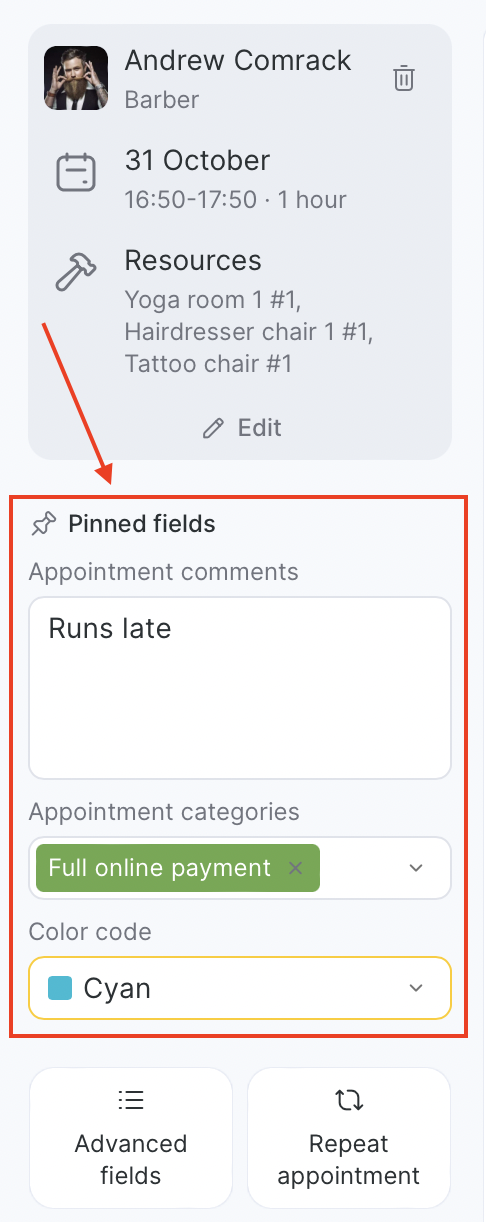
Receptionists and team can customize the window to display only the most relevant fields. You can pin fields such as:
Additional comments
Appointment categories
Appointment color
Custom fields
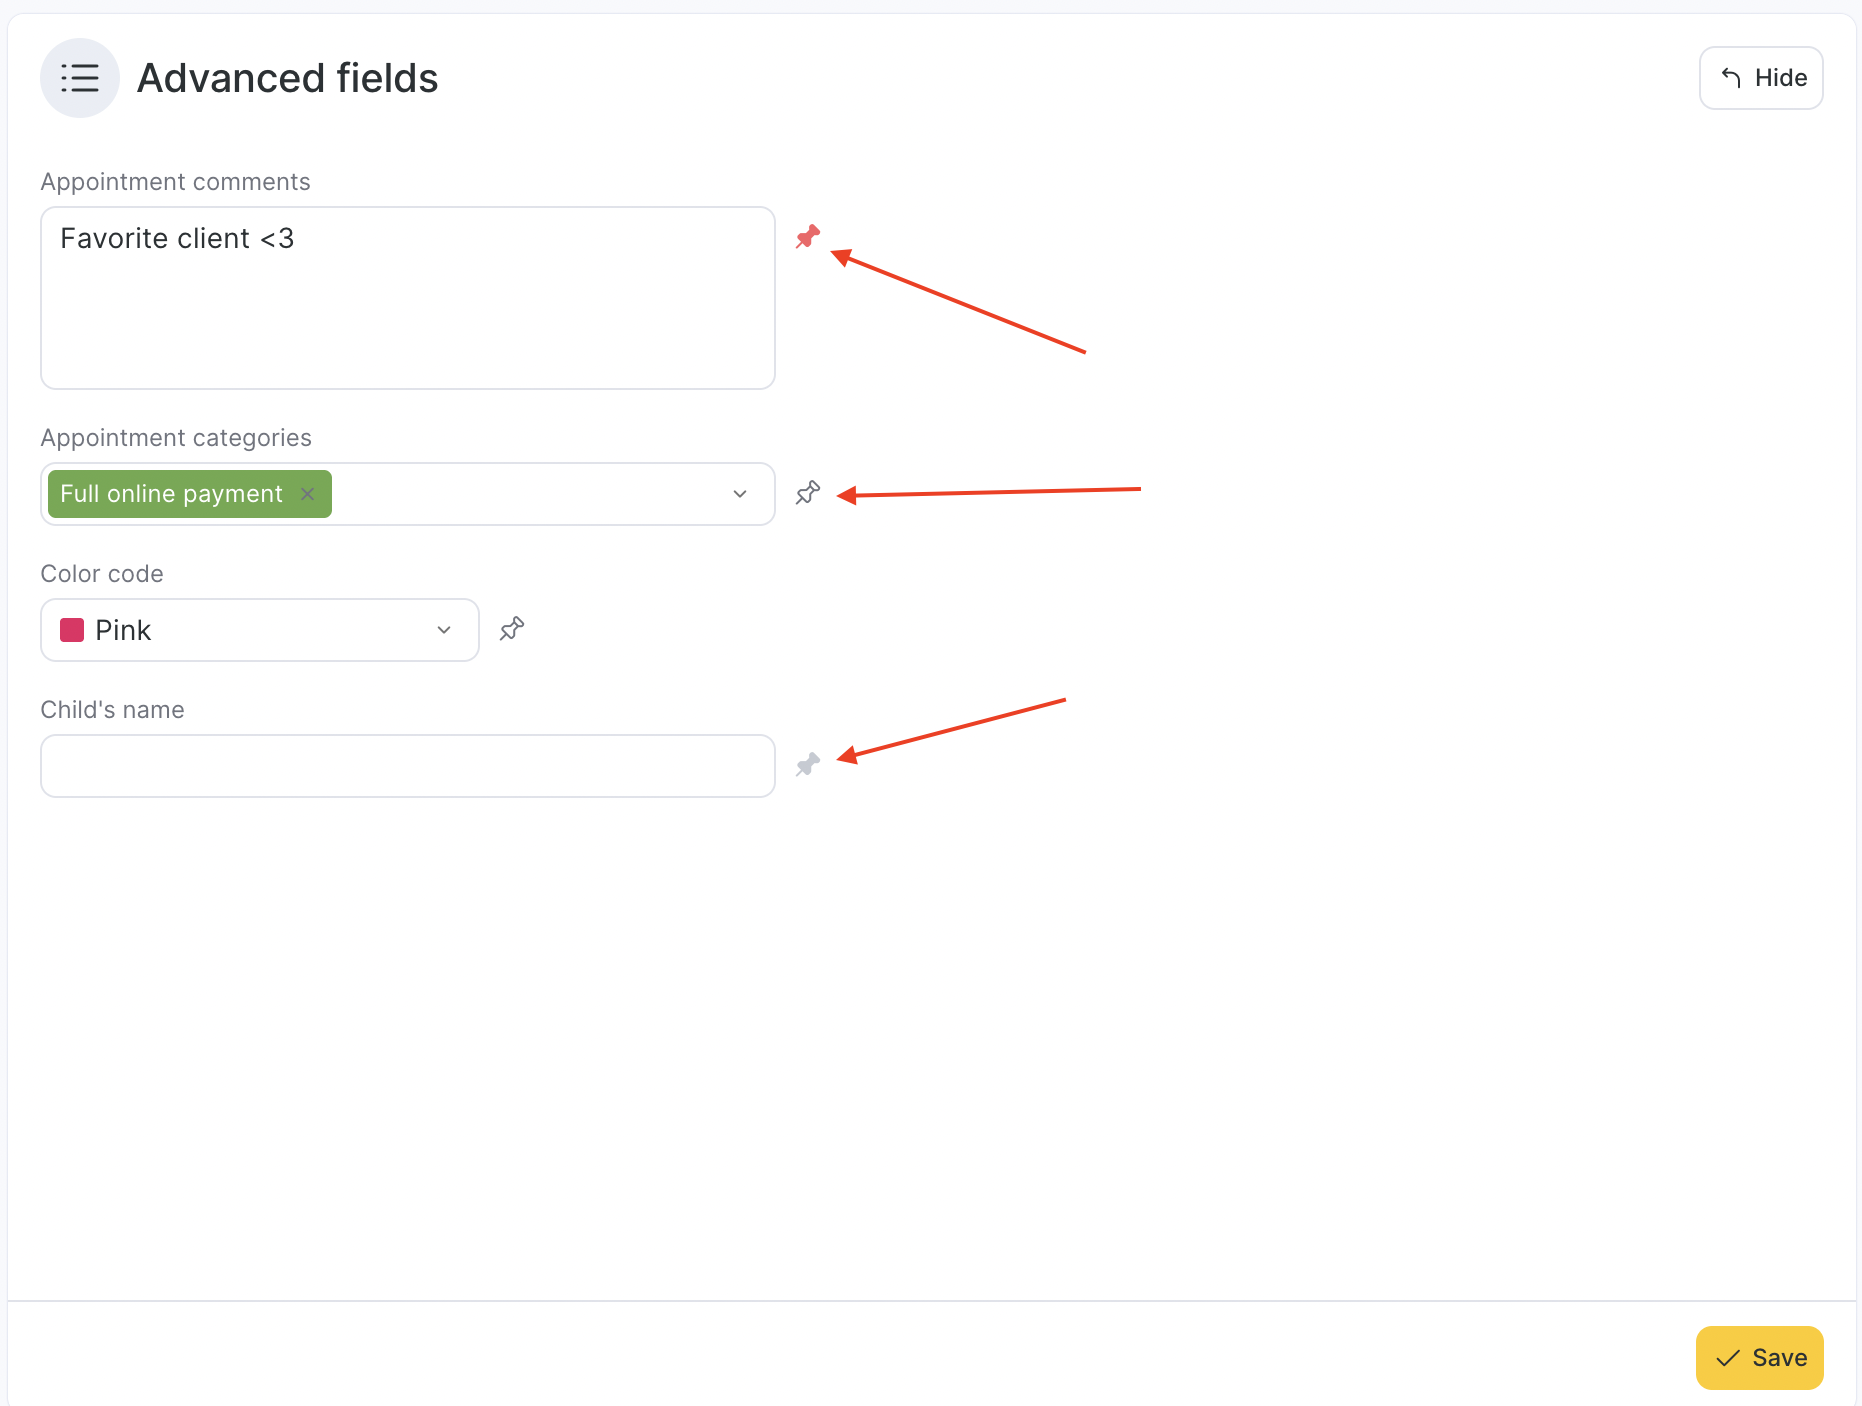
Pinned fields are color-coded:
Red: The field is pinned.
White: The field is not pinned.
Gray: The field can only be pinned via the chain interface under Settings > Custom fields. Read about setting custom fields in detail here.
Repeat appointment, Appointment notifications, Consumable write-offs, and Change history #
These sections remain largely unchanged, apart from design updates.
Core Appointment Tasks #
Services and Products
Services: Popular services for the assigned team member are displayed by default. Less common services can be added using the search function or the service list at the bottom of the window.
Products: Products can be added via the search bar by switching from “Services” to “Products.” Products added to the booking can be edited for quantity, price, discounts, and payment details.
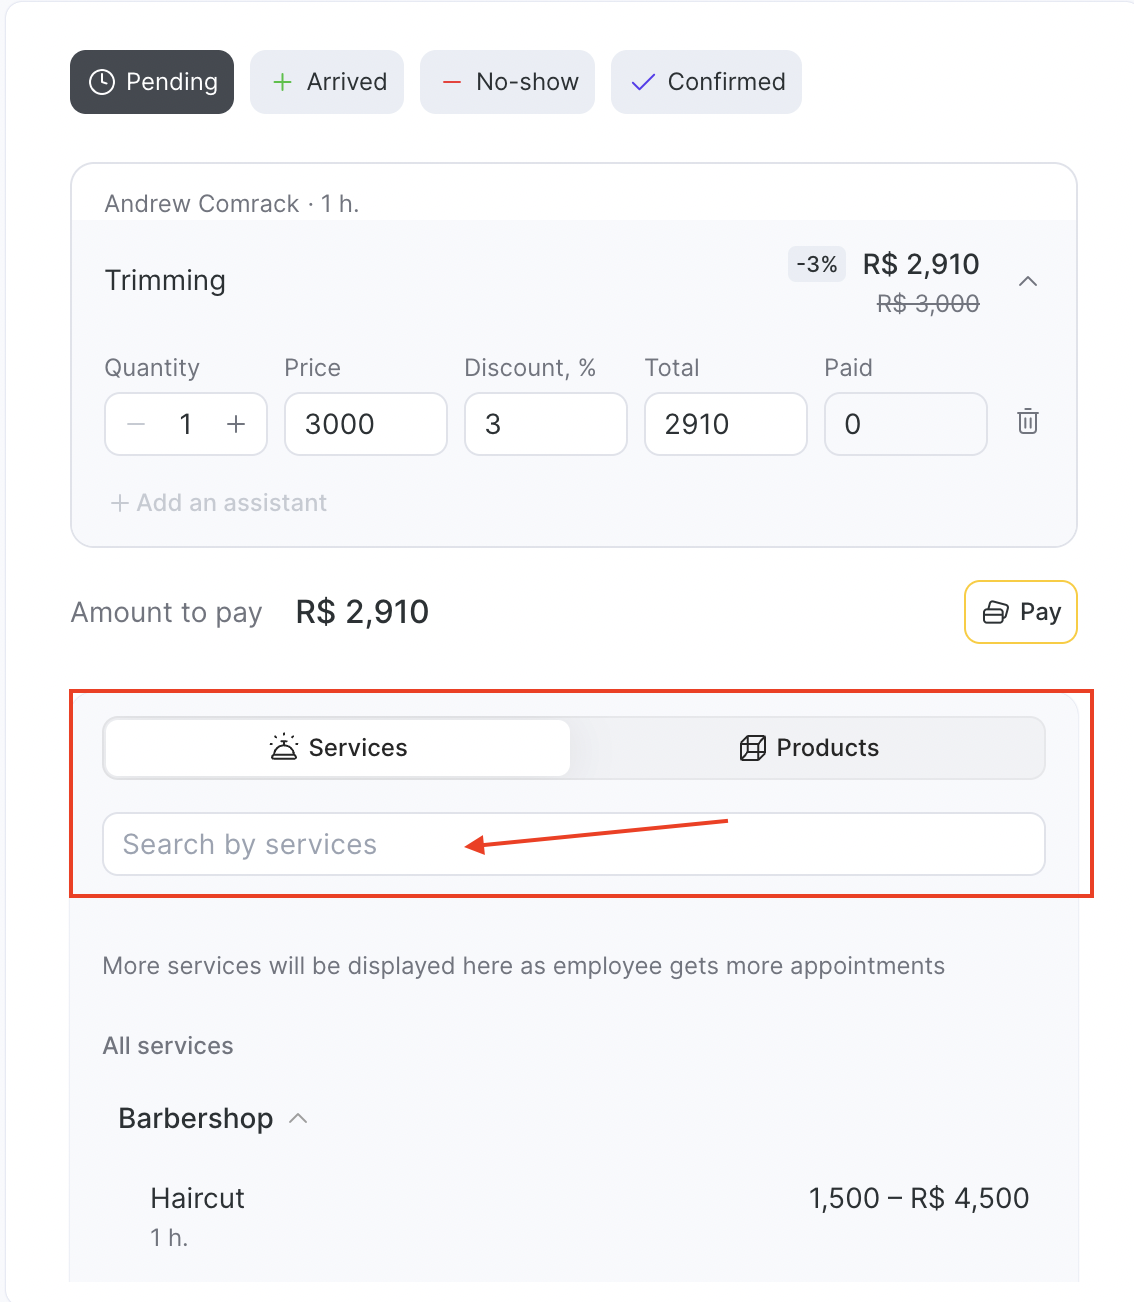
Payments #
The “Visit Status” and “Visit Payment” tabs have been replaced by a single payment section in the central area.
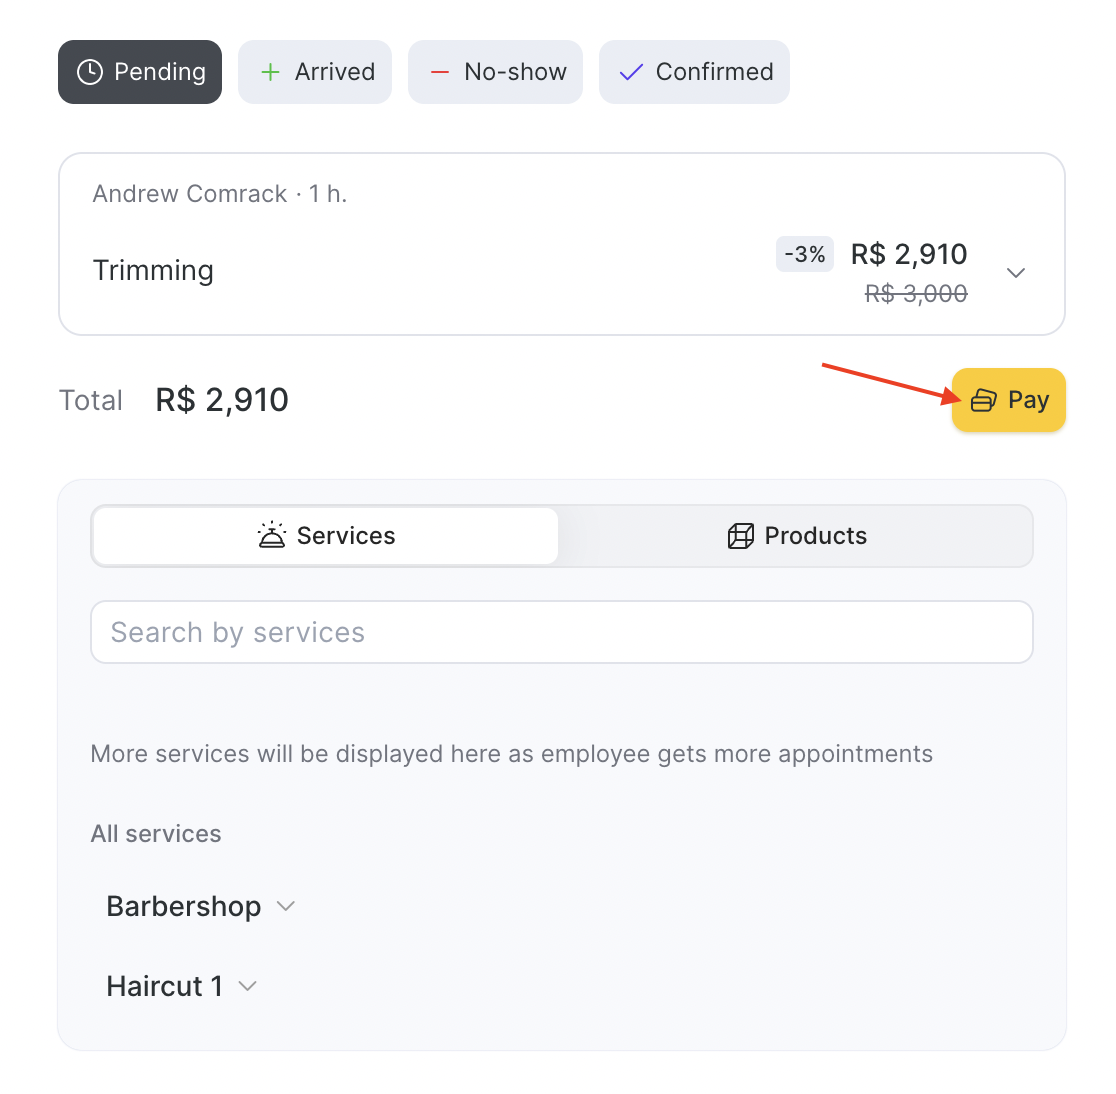
Payments can be processed in two ways.
Fast payment: For standard methods like bank cards and cash or via payment link.

Split payment: Allows splitting payments across multiple methods (e.g., part cash, part card, or loyalty points).
You can view the total amount, print receipts, and manage payment cancellations directly in the left section.
Besides, you can check the payment details by clicking the View details button.
After the payment is processed, the left side of the screen will display the amount due and the details of payments made using all methods. To delete a payment, click on the trash bin icon. You can return to the appointment by clicking the “Close” button located in the upper-right corner of the window.
IMPORTANT
When you process a payment that includes services covered by a membership, gift card, or loyalty balance, the system will automatically prioritize those payment options.
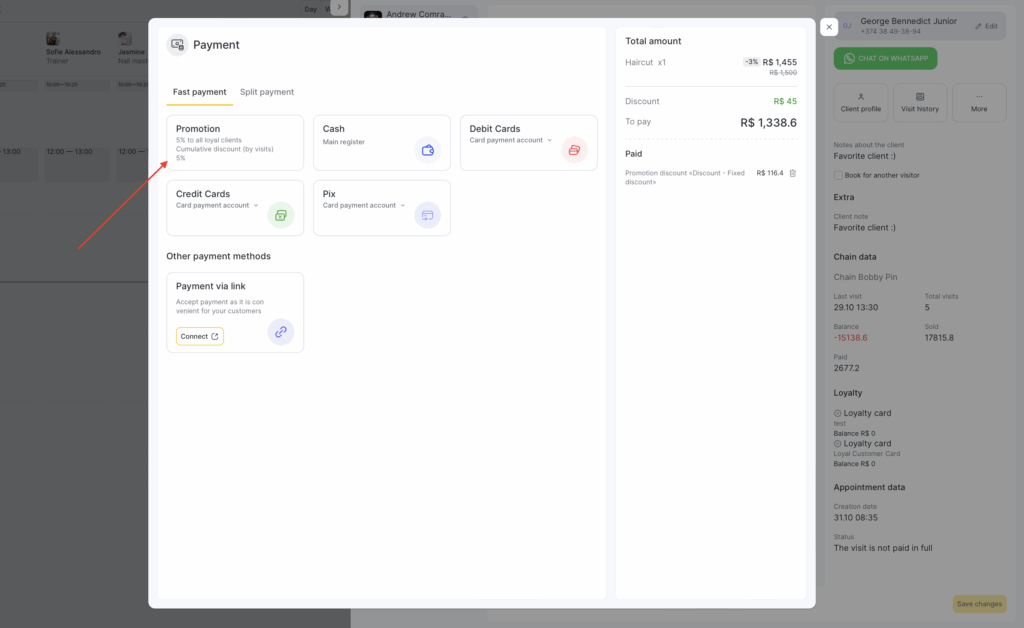
If at least one of the services in the visit can be paid through loyalty, the “Loyalty Payment” method will appear at the top of the list of available payment methods.
This helps ensure the payment is processed correctly and that the client’s membership or balance is used first.
For the most accurate payment processing:
- Start with loyalty payments (memberships, gift cards, or client accounts).
- After that, cover the remaining amount using other payment methods like cash or card.
This way, the membership benefits are applied correctly and the total payment is reflected without errors.
Client Management #
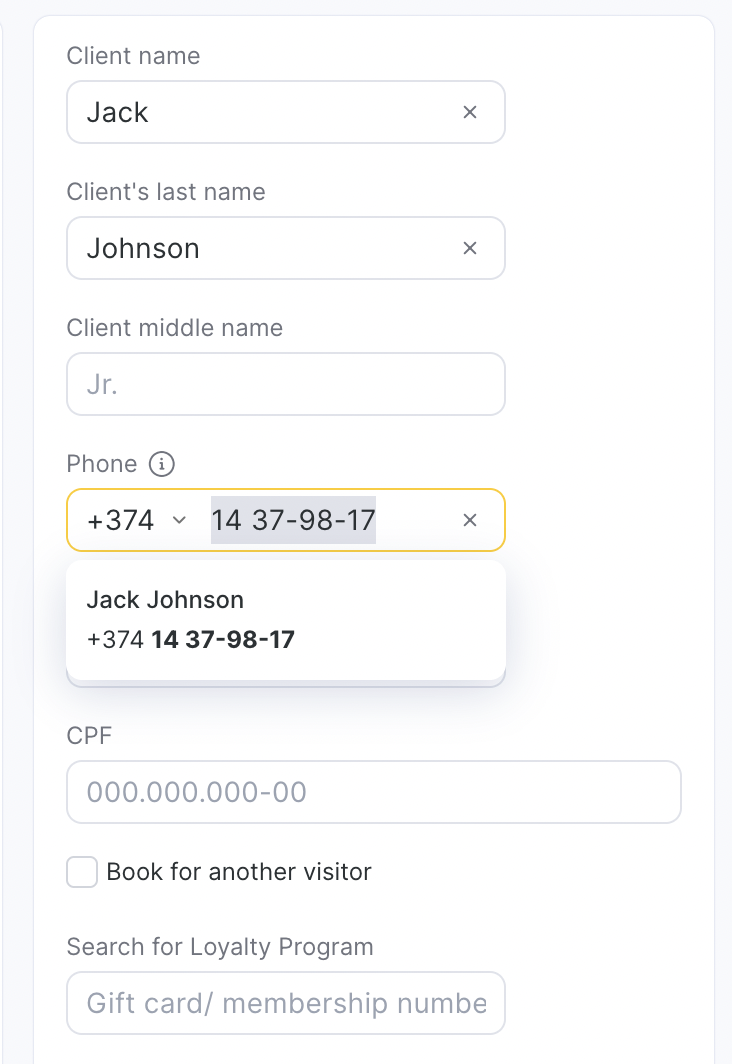
Adding a Client to the Booking #
Client data fields are immediately available for editing when creating an appointment:
Name
Last name (if enabled in settings)
Phone
Email
Loyalty information
Client Information #
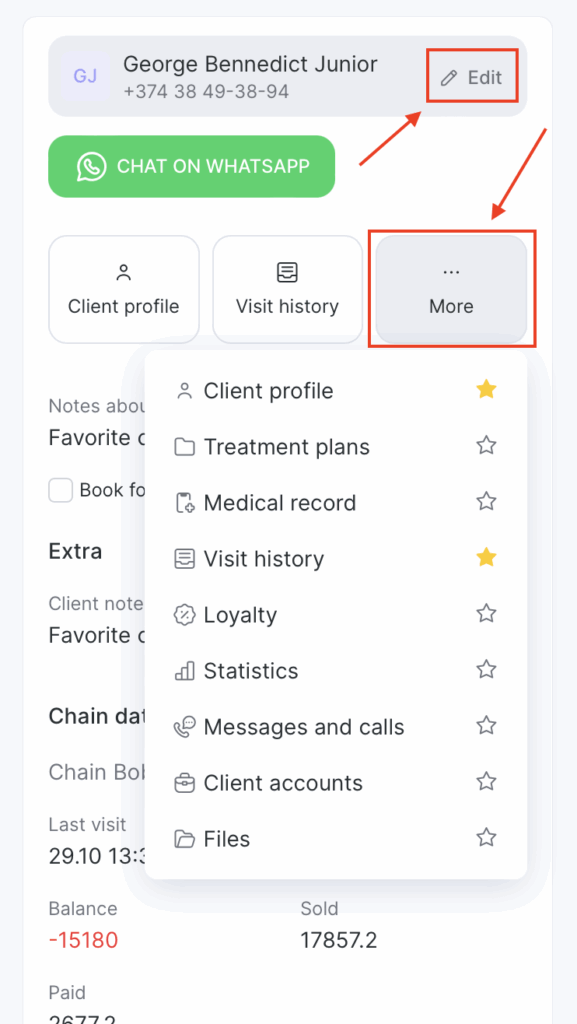
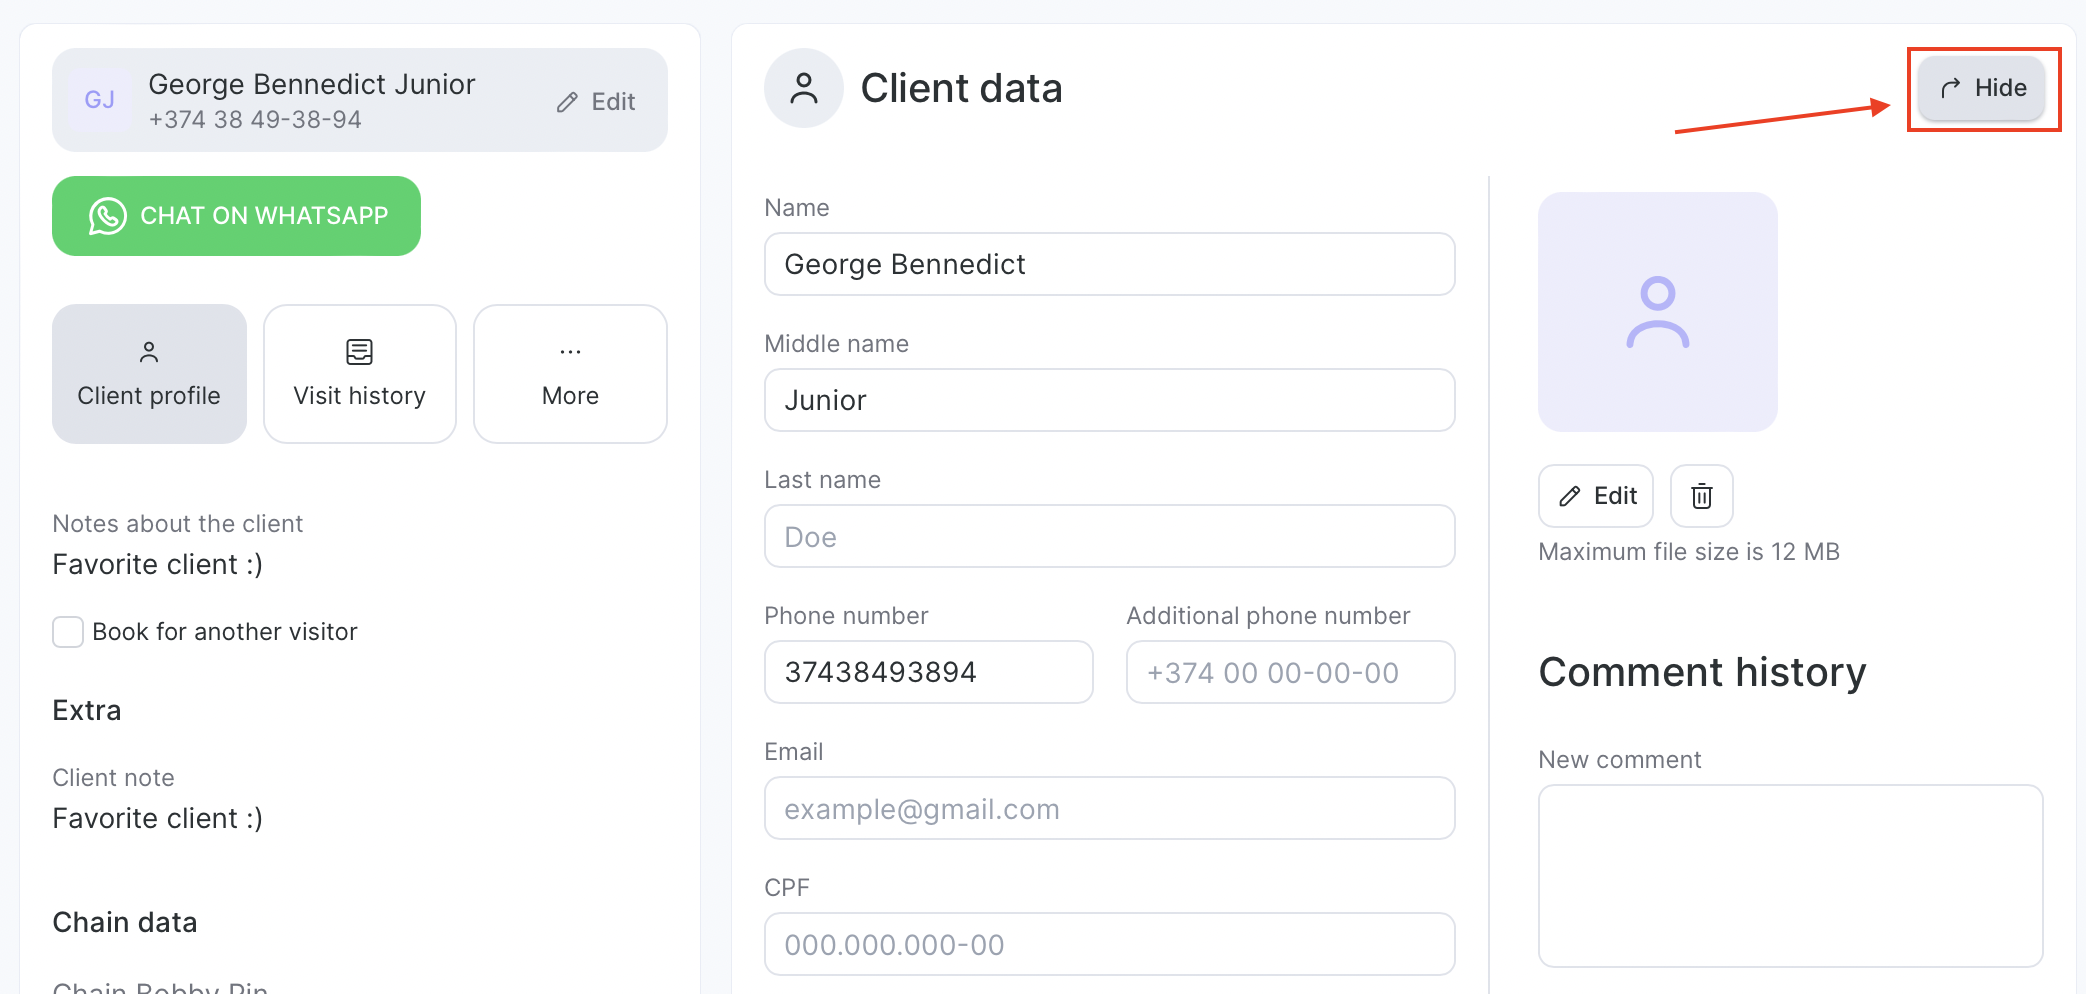
The client’s main information is displayed in a gray section at the top of the screen — this is where you can quickly see who the visit belongs to.
If you need to change or edit the client, click the Edit button — it opens the input fields for selecting or updating client details. Frequently used sections can be added to favorites for quicker access. To do so, click the More tile, find the section you’d like to add and click on the star icon next to section name. Once the star is highlighted in yellow, it will appear under client’s name for quick access.
Below the client’s information and favorite sections, the following details are displayed:
Client categories: Specified in the client’s profile.
Additional phone: If provided in the client’s profile.
Client notes: Editable in the client’s profile.
Additional client fields: Editable in the client’s profile, including the ability to book another visitor under the same phone number (e.g., a child).
Chain data: Includes the date of the last visit, total number of visits, number of no-shows, total amount sold and paid by the client, and the balance (difference between “Sold” and “Paid”).
Loyalty: Displays loyalty cards issued to the client along with their balances, as well as any purchased subscriptions or certificates with their numbers and balances.
Appointment data: Shows the creation date and the payment status of the visit.
To hide the client section tab, simply press the Hide button in the upper right corner:
Creating and Editing an Appointment #
At the bottom of the visit window, you’ll always see a panel with action buttons for managing the appointment.
Creating a New Appointment #
The panel includes a button labeled “New appointment”, which is always visible.
- If no service or client has been selected yet, you’ll see the button “Save blank appointment.”
This allows you to add a placeholder booking first and fill in the details later.
If a service or client is already selected, the button changes to “Create appointment.”
The system will use the chosen client and service information when saving the appointment.
Editing mode and save panel #
At first, the action panel with the Save changes button is not visible.
Once you make any modification to the appointment, a panel appears at the bottom of the screen containing the Save changes button. Use this button to confirm and save your edits.
Client information section
The client’s information is displayed in the right-hand sidebar.
To replace the client, click Edit on the gray client card in the sidebar. The gray block will turn into input fields with autocomplete enabled, allowing you to select another client from the database. When any change is made, the general Save changes button becomes active.
Adding a new client
If you enter full client data manually (for example, a complete phone number in the required format) but do not select an existing option from the list, the system recognizes this as a new client.
A message appears stating that the new client will be added to the client database (All Clients) once the appointment is saved, along with an Add client button.
After you click Add client, the input fields will be replaced with a gray client card showing the provided data and a “new client” label.
In this case, profile-related buttons such as Client profile or Visit history will not be displayed.
Note: As soon as you start entering data for a new client, the option to send a notification to the client becomes available.
Insufficient client data
If only partial client information is entered, the system will display a warning when you attempt to save the appointment.
You’ll be asked to confirm whether you want to proceed with saving the appointment without a client.

