Altegio introduces an updated user-friendly interface for setting staff work schedules, making the process of creating or modifying schedules for employees more efficient and streamlined with its flexible options and bulk editing capabilities.
There are several methods for assigning schedules to employees, including:
• Through the “Settings” > “Main Settings” > “Work Schedule” section
• Through the “Settings” > “Main Settings” > “Staff” section
• Through the Appointment Calendar
• Through the Altegio Mobile App
In this article, we will focus on the first method of setting up a staff work schedule in the new interface.
1. Adding a Work Schedule #
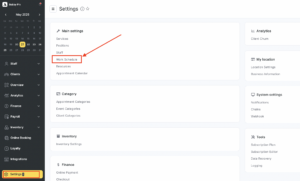
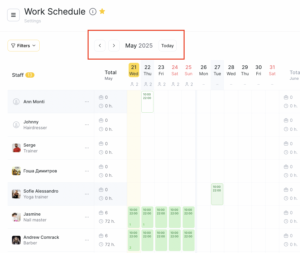
1. Go to “Settings” > “Main settings” > “Work Schedule” section.
2. Before setting the schedule, you can refine your employee selection based on their positions, if it’s deemed necessary for your planning process. To do this, click on the “Filters” button, where you can then choose one or more desired employee positions by checking the boxes.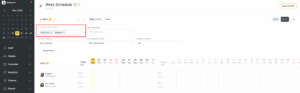
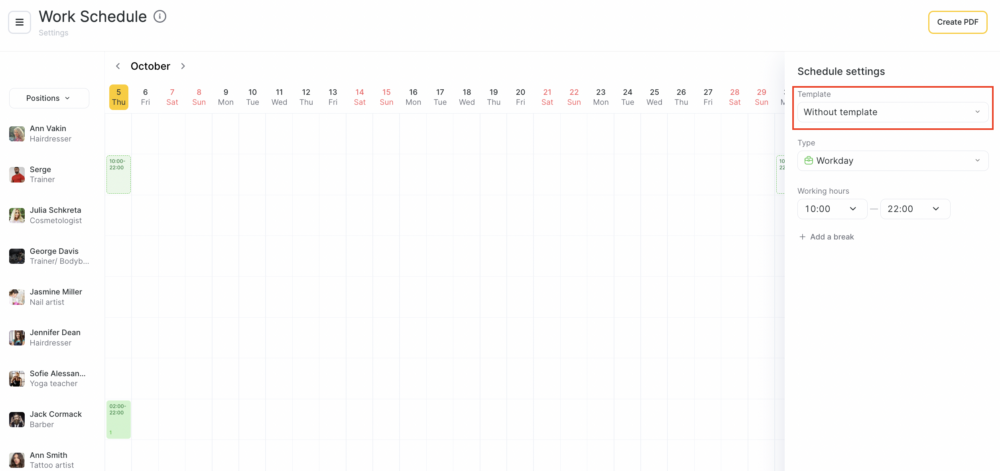
3. To create a new schedule for employee, start by clicking on the cell adjacent to the employee’s name. This action will trigger the schedule settings panel to appear on the right-hand side. Here, you can fine-tune the required settings for the specific employee or employees. If you need to start over or undo any changes, you can easily reset the settings by clicking the “Cancel” button
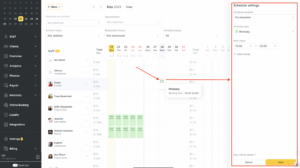
4. You can modify the schedule by customizing it without selecting a template, applying an existing template, or creating your own.
Important:
When switching from one template to another, if changes haven’t been saved, the days marked in the schedule will reset. However, upon returning to the previously selected template, the previously marked days will reappear. In other words, configuring a schedule with different templates simultaneously is not possible until changes are saved. Additionally, any alterations made to other parameters in the schedule settings will apply to all selected cells.
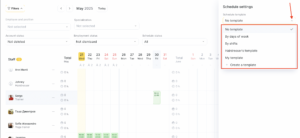
Available Templates:
1. No Template: By choosing this option, you gain the flexibility to configure the schedule for any specific day you choose. If you’re organizing a schedule spanning multiple days, you will need to individually click on each cell for each day. Opting for a schedule without a template is ideal for establishing unique or customized schedules, accommodating non-standard working hours, and making ad-hoc changes to the schedule as needed.
2. By days of week: Mark the checkboxes corresponding to the specific days of the week you want to schedule. You have the flexibility to configure the schedule for a single day, multiple days, or select all days simultaneously. After designating your chosen days of the week, proceed to input the desired number of weeks to apply the schedule.

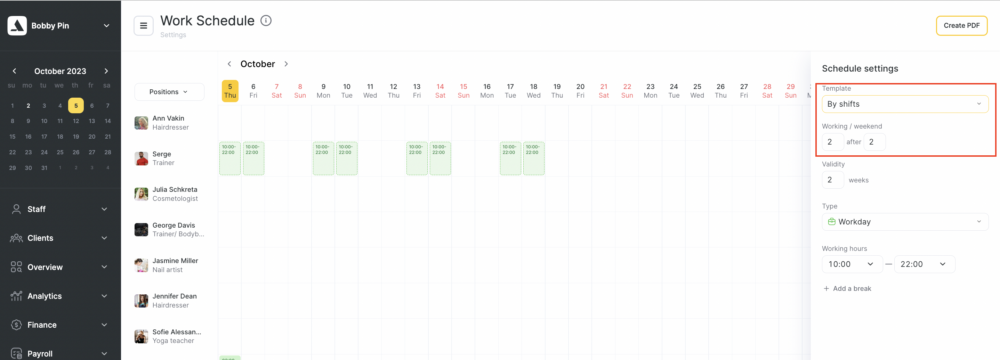
3. By shifts: Input your preferred shift period, such as 2/2 or 5/2, and follow by specifying the number of weeks you’d like this shift schedule to apply to.
4. Your own template: Craft a personalized template to suit your unique needs by simply clicking on “Create a template.” From there, you can define the template’s name and designate the working days, mirroring the flexibility offered by the templates designed for both days of the week and shifts.
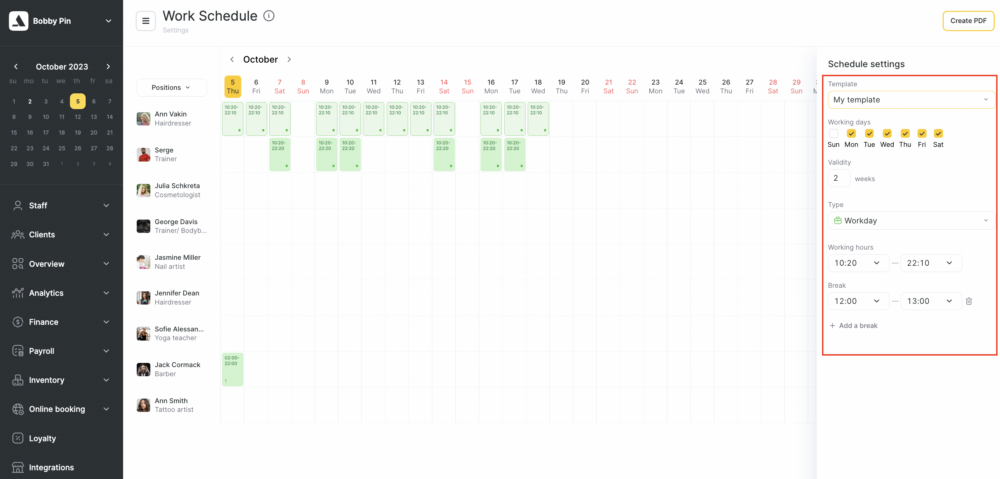
To preserve your template, click the “Save” button. You can then reapply it whenever necessary.
To make edits to a template, select it and click on the button featuring a pencil icon. During the editing process, you also have the option to delete the template you’ve created if needed.
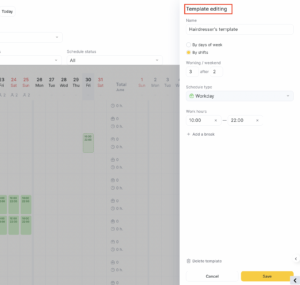
5. Choose schedule type:
• Workday
• Sick leave
• Annual leave
• Unpaid leave
• Missed shift
• Paid leave
• Custom (created in a Chain interface)
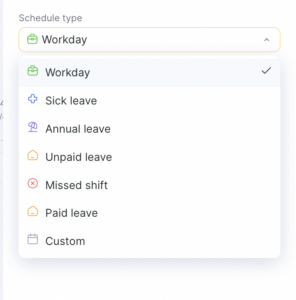
For non-working days, the “Working hours” setting is not applicable; the other schedule types are designed for non-working days. In the configured schedule, the selected type will be color-coded according to your initial selection during setup.
It is also possible to delete a workday that has existing bookings. When deleting, a banner will appear, warning about the bookings and informing the user where they can view and reschedule them.
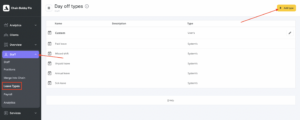
In case the default system options do not align with your needs, you have the flexibility to configure your own custom types under the “Staff” > “Leave Types” section within the Chain settings.
Additional notes:
1. When you add a schedule and subsequently edit it, an additional type, “Non-working day,” becomes available. You can find more details about this option in the section titled “How to delete a work schedule” below.
2. When creating your custom template, initially, only the “Workday” type is available. However, when setting up the schedule later on, you have the flexibility to change the schedule type as needed.
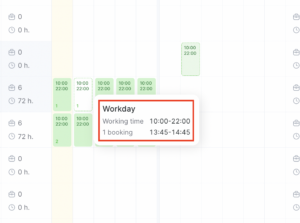
6. Specify working hours. You can select a time from 00:00 to 24:00.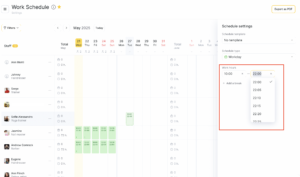
7. To set breaks for the schedule, click the “Break” button. The added breaks will appear within the schedule cells as numerical indicators, reflecting the number of breaks you’ve added. When you hover over a cell, you can view the count and timing of these breaks, with a maximum of four breaks displayed at a glance (if more than four are specified, it will show the first two and the last one). To see all breaks associated with a cell, click on the selected cell, and all breaks will be visible within the schedule settings panel.
To remove a break, click the trash can icon located next to the break. If a break has already been included in the schedule and you wish to delete or alter it for an employee, you’ll need to reintroduce the employee’s workday to the schedule (i.e., apply a new schedule template for the desired day) without the break or with a different break time.
Important:
When adding a schedule, please note that the selected breaks will be automatically applied to all marked cells.
8. Navigate between months by using the arrow buttons. To switch to a different year or month, click on the month name and then select your desired year and month from the options provided.
When the current year is selected, only the month name will be displayed alongside the arrows. However, if a year other than the current one is chosen, both the year and the month will be displayed next to the arrows. Currently, the chart can display a two-month period, such as from February 1st to the following March 1st.
9. To create a schedule for one or multiple employees, simply click within the work area. Any additional cells on the schedule can be removed before saving by clicking on them within the work area once more. For a complete cancellation of schedule changes, click the “Cancel” button in the right-side panel.
10. Save your schedule by clicking on the “Save” button located in the lower right corner. Similarly, an employee’s work schedule can be modified using a similar process.
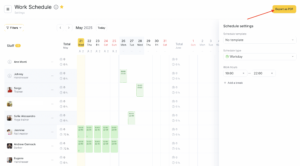
You can easily download the configured work schedule as a PDF file by clicking the “Export as PDF” button located in the upper right corner. This PDF file can then be saved to your device or printed as needed. You have the option to upload the schedule for all employees or for employees filtered by position. When uploading by position, all employees with the selected position will be included in the upload.
How to delete a work schedule #
1. Navigate to Settings > Main settings > Work schedule.
2. To delete a schedule, follow a process similar to adding and editing:
– Click on the filled cell corresponding to the employee’s name.
– Then, select the desired template and configure the parameters specific to the employee(s) in the schedule settings menu.
– Specify the days or weeks that need to be deleted. If necessary, reset parameters using the “Cancel” button.
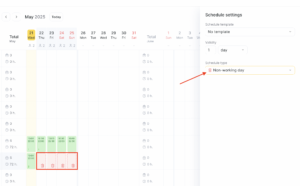
3. Choose the schedule type as “Non-working day.”
4. Click within the chart area for the desired employee(s) to highlight the days you want to delete; these selected days will be displayed in red.
5. Finally, click the “Delete” button on the chart settings panel to remove the selected schedule.
Important:
- Deletion of a schedule is irreversible; there is no option to undo it.
- Schedule cells containing dots and numbers indicate that the employee has an appointment for that day.
- If you attempt to delete a day with an existing appointment in the schedule, an error will be triggered. In such cases, before proceeding with schedule deletion, you must first reschedule the appointment to another day or assign it to another employee, or alternatively, cancel the appointment entirely.
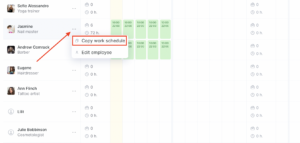
Copying a work schedule to another employee #
If multiple employees follow the same schedule, you can efficiently set up a schedule for one employee and duplicate it for others. Here’s how to do it:
1. Navigate to Settings > Main settings > Work schedule (new interface).
2. Locate the employee whose schedule you want to copy. To the left of their name, click the copy button.
3. Within the opened window, select the employees for whom you wish to copy the schedule. You can mark one or several employees from the list, with no limitation on the number of selections. To expedite the process, you can also use the “To” field to search for employees by name.
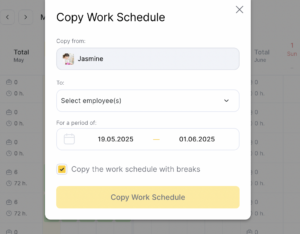
4. Determine the period for which the chart will be copied. By default, the copying period will be set to two weeks from the current day, but you can adjust it as needed. Please note that the maximum copying period is currently limited to the current and next month.
5. If the copied schedule includes identical breaks, you can expedite the process by checking the “Copy the work schedule with breaks” checkbox. However, if the breaks differ for each employee, leave this option unchecked. In such cases, you will need to manually add breaks for each employee after copying the schedule.
6. Click the “Copy Work Schedule” button. Once clicked, the schedule will be duplicated, encompassing both working and non-working days as indicated.
Important
You cannot cancel copying of the schedule.