
For various reasons, it may be necessary to refund a client for services, products, or a client account (deposit). In this article, we’ll look at different situations and options for processing refunds, as well as explain how to delete financial transactions directly in Altegio.
Full refund for a product and/or service #
If a client cancels a service and/or returns a product, the payment is fully refunded.
A full refund is possible if:
- The service was provided only partially or of unsatisfactory quality.
- The client made a prepayment, but the appointment was canceled due to the business’s fault (professional illness, other unforeseen circumstances).
- The client is dissatisfied with the purchased product due to its quality.
You can completely delete a financial transaction in two ways:
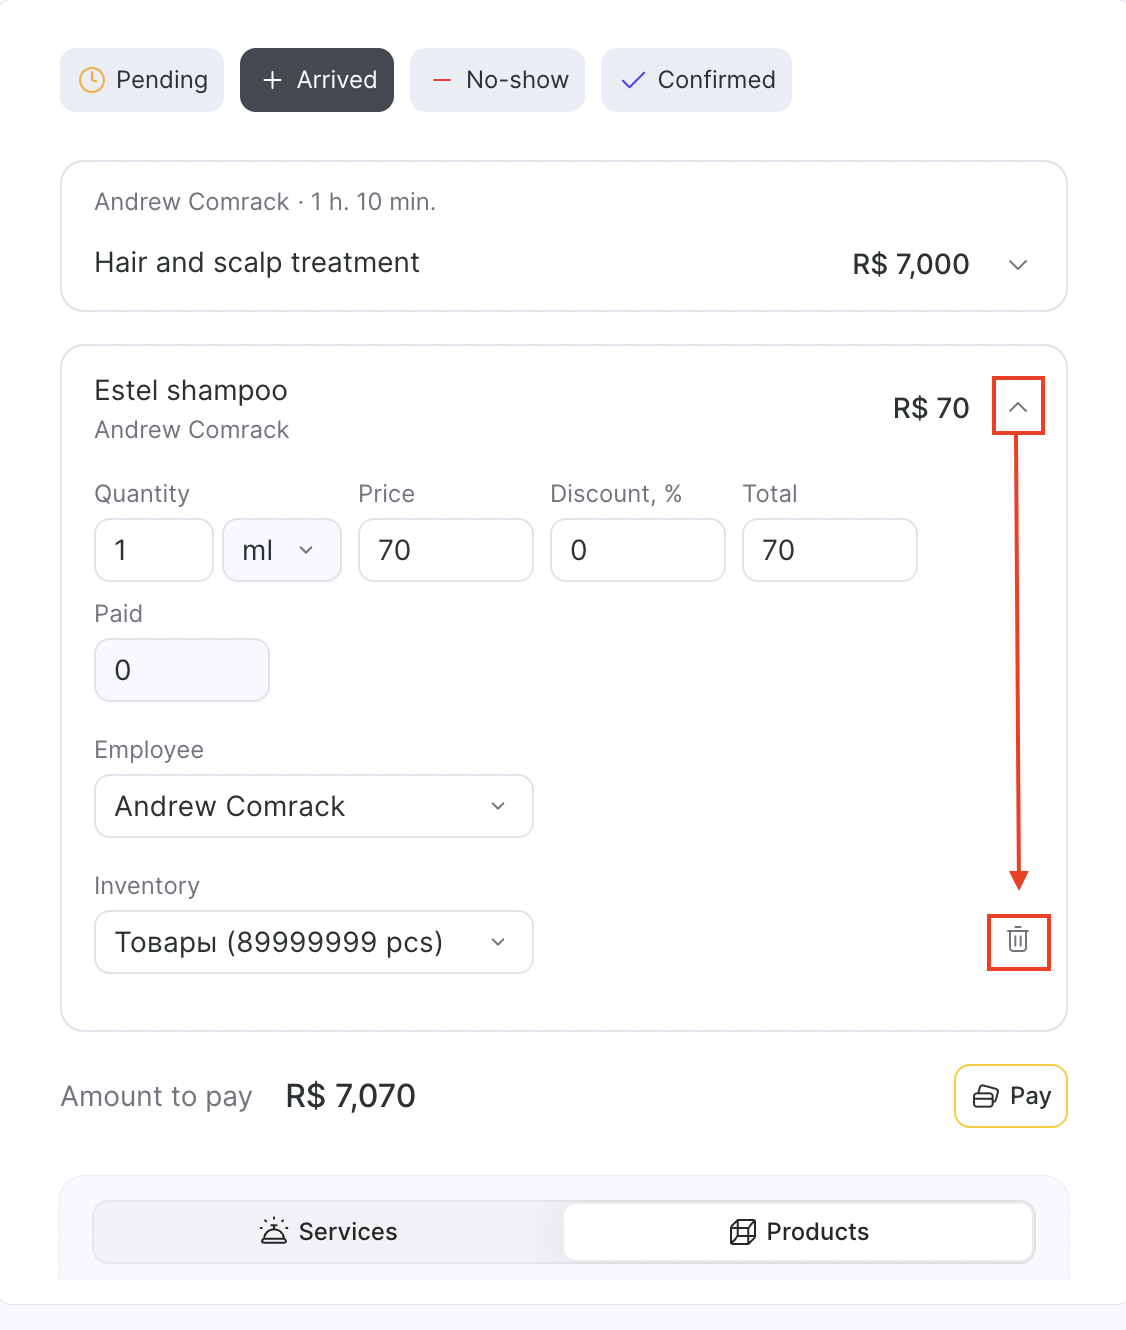
- In the Appointment Calendar
Open the appointment and go to the “Payment” tab. Next to the name of the service/product, click the downward arrow icon. A new line will appear showing the account where the payment was made, the amount, and a trash-bin icon. Click the trash-bin icon to cancel the payment — the financial transaction will then be deleted.
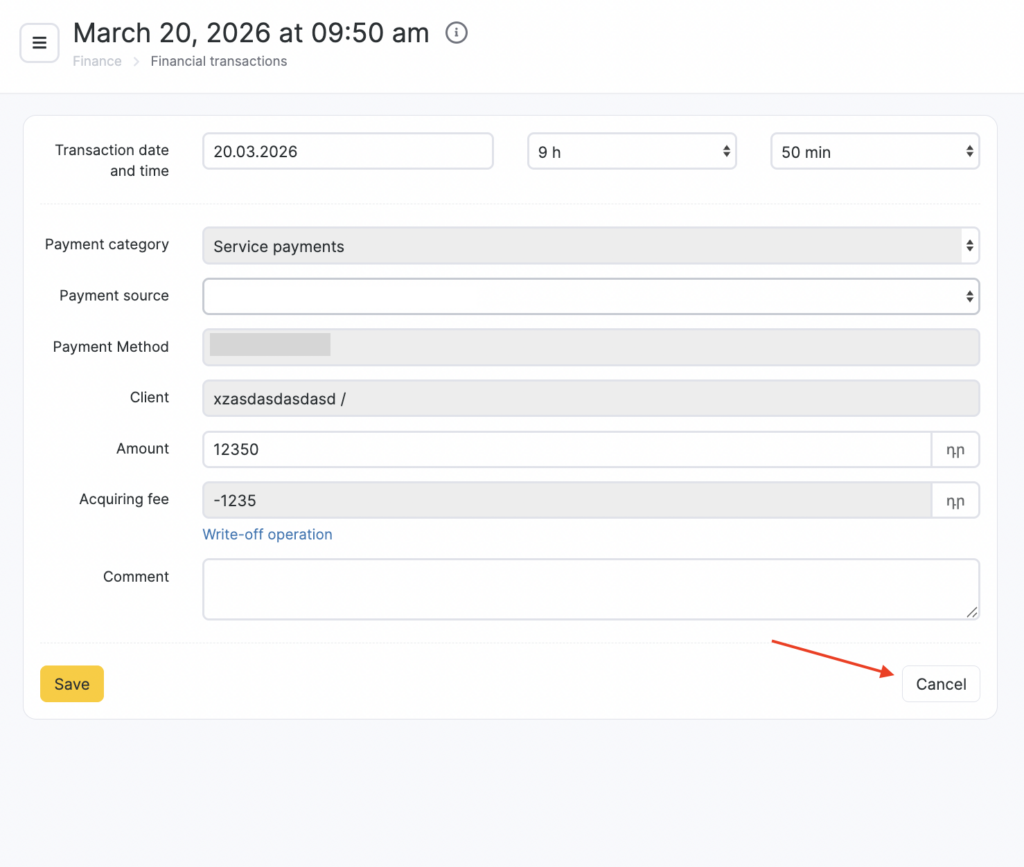
- Using the “Finance” section
Go to Finance > Financial Transactions (Administration mode), find the required transaction, and click the date/time in the first column. This will open the payment document. In it, click the “Cancel” button to void the payment.

After a financial transaction is deleted, the visit status will change to “Visit not fully paid.” Depending on the situation, you can either delete the visit or leave it with a comment explaining why the client was refunded.
Information about the canceled payment will remain in Finance > Financial Transactions (Administration mode). To find deleted transactions, set the filter to “Canceled” and then click “Show.”

Information about deleted transactions will also appear in Analytical Reports > Data Changes. In this section, you can see which user added, changed, or deleted a payment, at what time, and view additional details and data.

Partial refund for a service #
A partial refund is issued if the client is dissatisfied with the service or under other circumstances that require returning part of the previously paid amount.
To refund a portion of the amount to the customer, follow these steps:
- Cancel the payment for the service in the visit (see Step 1 above).
- Go to the “Visit Status” section and specify either the discount granted to the customer or the amount that should remain paid for this service.
- If you enter the payable amount directly, the “Discount” field will automatically be filled in.

- Go to the “Visit Payment” section and process the payment again. You can also make a fast payment from the “Visit Status” tab.

Full refund for a product sold during a visit (without refunding the service) #
If a client returns a product sold during a visit but keeps the service, the cost of the service is not refunded — only the product is refunded.
You can cancel the product payment in two ways: through Finance > Financial Transactions or directly within the visit.
To cancel the payment through Financial Transactions:
- Go to Administration mode Finance > Financial Transactions, find the transaction for the product sale, and click the date/time in the first column. This will open the payment document. In it, click the “Cancel” button.

- In the visit, go to the “Visit Status” tab and delete the product by clicking the trash-bin icon next to it.
- After deleting the product, be sure to click the “Save” button at the bottom.

Refund for a product sold separately from a visit #
To cancel the sale of a product if it was sold separately (outside of a visit):
- Go to Administration mode Finance > Financial Transactions or Products > Inventory Management, find the product sale transaction, and click the date/time in the first column.
- The inventory transaction for the product sale will open — click the trash-bin icon in it.
- Be sure to click “Save Without Payment.” After clicking this button, both the financial and inventory sale transactions will be deleted.

Information about the canceled sale will remain in administration mode Finance > Financial Transactions and in Analytical Reports > Data Changes.
Full refund of a deposit from a client’s personal account #
To cancel a client’s account top-up, you need to cancel the top-up financial transaction in Administration mode Finance > Financial Transactions. To delete the transaction:
- Go to Finance > Financial Transactions (Administration mode) and find the required transaction. For quick search, use the Payment Item filter “Client account top-up,” select the necessary dates, and, if needed, enter the customer’s name or phone number. Then click “Show.”

- In the first column, click the date/time of the transaction.
- The payment document will open — click the “Cancel” button in it.
Partial refund of a deposit from a client’s personal account #
A partial refund of a client’s deposit can only be done by debiting the amount to a product. After that, you need to create an expense transaction for the refund amount to balance the cash register on the refund date.
Since this is effectively a “conditional” product sale, you should first create a product called “Refund” (or something similar) so these sales are not included in reports.
Full refund of a membership #
A full refund of a membership can be done either by canceling the sale of the item (membership) or by creating an expense transaction for the membership amount.
To cancel the membership sale:
- Open the client profile and go to the Loyalty tab (from the appointment window or the client database), then find the required membership.
- Under the membership name, click the link Go to the sales transaction — it will take you directly to the financial transaction page.
- Open the sales transaction by clicking the date/time, remove the item (membership) by clicking the trash icon, and save without payment.
- The membership sale is deleted the same way as the sale of any other item. Details on deleting an item sale are described earlier in this article. As a result, the membership will be unlinked from the client profile and can no longer be used.
Partial refund of a membership #
If the client has used some visits but some are still remaining (the membership is not fully used), and you need to issue a refund for any reason:
- Find the client in the client database and open their profile by clicking the name.
- On the Loyalty tab, reduce the number of available visits (balance) in the membership to 0.
- Go to Finance > Financial Transactions, create an expense transaction, and write off the refund amount. You can add a comment specifying which membership the refund was made for and to whom.
More details on creating an expense transaction and editing a membership in the client profile are described earlier — the only difference is that the write-off amount is not the full amount.
Full refund of a gift card #
A full refund of a gift card can be issued in two ways:
- by canceling the sale of the item (gift card)
- by creating an expense transaction for the gift card amount
Option 1: Cancel the gift card sale #
- Go to Finance > Financial transactions (Administration mode) and find the sales transaction using filters. You can also use the payment category filter Gift card sales.
- Click the sale date/time, delete the item (gift card) using the trash button, and save without payment. The gift card sale is deleted the same way as the sale of any other item. More details on deleting an item sale are described earlier in this article.
As a result, the gift card will be unlinked from the client profile and can no longer be used.
Important
The downside of this method is that there will be a cash register discrepancy: an overage on the day of sale and a shortage on the day the refund is issued — you’ll need to account for this. Also, there will be no reporting on refunds issued.
Option 2: Create an expense transaction (refund) #
- First, create an expense payment category called Refund. See the article Creating a new payment category for details.
- Create an expense transaction for the gift card amount dated the day the refund is issued. For more details on creating financial transactions, see the article New payment.
- Then open the client profile, go to the Loyalty tab, and reduce the gift card balance to 0. To be able to change the gift card balance in the branch, the gift card type must have permission enabled to change the balance and validity period.
Important
The advantage of this method is that there will be no cash register discrepancy between the day the gift card was paid for and the day the refund was issued. You can also leave a comment in the client profile stating that a refund was issued for gift card No. ****, and this gift card will appear in the client’s history.
Partial refund of a gift card #
If the gift card has not been fully used but you need to issue a refund, do the following:
- Find the client in the client database and open their profile by clicking the name.
- On the Loyalty tab, reduce the available gift card balance to 0.
- In Finance > Financial transactions (Administration mode), create an expense transaction and write off the refund amount. You can add a comment specifying which gift card the refund was made for and to whom.
More details on creating an expense financial transaction and editing a gift card in the client profile are described earlier — the only difference is that the write-off amount is not the full amount.

